2A8ED6C3-A719-4B50-AABE-7C6BEB07C16A.jpeg

Barchetta Lefty’s B - Progress Topic

Introduction

As most will have seen in my newbie post, I have inherited a Barchetta when my brother passed away earlier in the year.

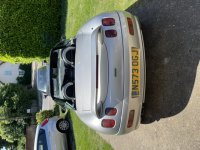
The car has been in storage for 10 year and I now have it back at my house with an intention to get it running and street legal by the summer

First weekend of work was more investigative, but then went in to a bit of cleaning.

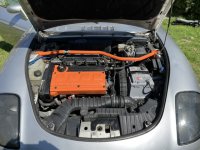
I took the spark plugs out and the engine turns freely :)

Generally, the rust is minimal and mainly surface rust

All brake pads would have been in serious need of replacement, even if it hadn’t been in storage.

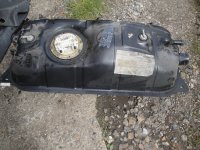
Fuel tank removed, about 1/2 gallon of fuel in it, but clean and no rust or debris.

My 26 year old son wanted to help, so, as the passenger seat was out, he wanted to clean up the interior as it was in serious need of some tlc.

Parts ordered from local car spares shop (trying to help the local business where I can)

Timing belt kit including water pump and pulleys
Auxiliary belt
Rocker cover gasket set
Front discs and pads
Read discs and pads
Oil filter
Fuel filter
Spark plugs

Should all be with me during the week, so next weekend will be busy!

CC165F2D-57C2-42B1-B9A4-041839EBD257.jpeg
04221ADD-1E5C-4AD2-A739-1317C3C903BB.jpeg
B5EEBAC8-D86F-4FB7-9C62-99361E95E9C4.jpeg
D980F909-554B-4506-82F8-19E2C5AC4127.jpeg
5533D6F1-C230-41D5-9A65-5BF254AD1D8E.jpeg
Sorry, I'm a bit late to this.

You can get the calliper carrier bracket part numberss from ePER on this site.

The secret is knowing how to drive ePER properly.

Whilst initially ePER/(7zap) only show the whole assembly on the right is column "C" - Show Product Components. Here the view is expanded to show carrier, pads, seals, etc.

Hope this helps.

Thanks s130, but not needed now thanks to Barchetta Bloke 440 and Fabio

Sorry to see such a legend car the way it is, but happy to keep some parts of it on the road
 
Doesn’t look like I will get much done this weekend ☹️

My garage isn’t big enough to work on the car, so I need to roll it out to work on it

Weather forecast says rain all weekend

I could put my gazebo over it, but the rain is bad with wind so will come sideways

I have a fuel tank to get back in, a brake hanger to fit with new disc and pad on the back left.

The cam locking tool I ordered seems to have been lost by the courier which is very annoying, belt kit waiting.
 
Hi, if you do the cambelt change, could you write, photo, video how you went about it. Any pointers on how you got around any difficult actions in changing the belt would be really helpful to those who want to do this. It’s good to follow your progress and best wishes, good luck.
SteveD
 
Hi, if you do the cambelt change, could you write, photo, video how you went about it. Any pointers on how you got around any difficult actions in changing the belt would be really helpful to those who want to do this. It’s good to follow your progress and best wishes, good luck.
SteveD

I will be making it up as I go along, but will try to put something together once done
 
Hi, there is some help on the forum, doc orange put some photos up and Davefridge posted a good description. The workshop manual available off this site gives a mechanics workthrough. Your experience added to these posts will probably put the icing on the cake for the mechanically challenged like me.
Have a search, the doc orange project is into about 35 pages I think before you get to the belt change but a search for cambelt change should find it.
Theee is a Youtube video but it is in German may be worth a look in silent mode.
Cheers
Steve D
 
My B is 19 year old with 67,000 Km on it. This is the 2nd timing belt to be fitted. The first belt I managed to change without the workshop manual. Now I have the manual, I realise it is a guide for skilled mechanics and is not written like a Haynes manual. I will attempt to add in the sort of info that Haynes include. I will add info by page number.
Page 18. Wheel arch liner removal.
2 of the screws are shorter than the rest, make a note of where they come from. Rectangular cover includes 1 plastic rivet. Just push the centre part through to release it. As to removing the liner itself, it is one big struggle!
Page 19. Auxiliary belt removal.
The tensioner nut is 15mm. To increase the leverage of a regular spanner, I slipped a much larger spanner over it (see 1st photo).
Page 19 & 20. Timing belt guard removal.
The 3 lower & 3 upper screws are Ribe keys. You can use a Torx T40 instead. The middle 2 screws are 5mm Allen keys. I removed the header tank fixings to give better access to the top 3 cover fixings or you could remove the header tank altogether. I used a mini ratchet with T40 Torx bit (see photos 2&3). The left hand upper screw is exceptionally difficult to get to!!
Page 20. Air con pump cable.
Very difficult to get at! Connector is like the coil pack connectors. Squeeze the outer and it should pull apart. (difficult with a big pipe in the way!)
Page 20. TDC and cam locking
Before locking the cams I removed the auxiliary drive pulley from the crankshaft (page 22). I locked the crankshaft by wedging a prybar into the flywheel through the lower cover (page 22, pic 1)
When finding TDC the cam lobes on cylinder No1 inlet shaft should be facing towards the rear of the car.
To be continued tomorrow
Click image for larger version

Name: IMG_2237.JPG
Views: 17
Size: 606.0 KB
ID: 167065 Click image for larger version

Name: IMG_2238.JPG
Views: 12
Size: 616.3 KB
ID: 167066

Click image for larger version

Name: IMG_2239.JPG
Views: 15
Size: 583.4 KB
ID: 167067
 
Timing belt replacement continued.
Page 21. TDC and cam locking.
To turn engine over I used a socket, 14" extension to clear bodywork and a 16" knuckle bar on the crankshaft nut. A piece of dowel in cylinder No1 spark plug hole is sufficient to judge TDC. Cam locking tools should fit the appropriate lobes easily. If not, "tweak" the crank until they do. With the cams locked I Tipex marked the flywheel through the lower inspection cover. I didn't bother with the top inspection cover because its difficult to get at and see the marks. The lower cover is easy to see when working in the wheel arch area.
Slacken the belt tensioner. What they don't tell you is that if you re-tighten it
in its "loosest" position the belt is much easier to remove and re-fit!
I didn't replace the tension or idle pulleys because the car has only done 10,000 miles since new ones were fitted.
I also didn't slacken the inlet cam pulley. With cams locked in place I can't see the point.
I did, however, replace the (original) auxiliary belt and tensioner. The tensioner bearing sounded "dry".
The rest is just a case of reversing the dismantling process.
I hope these tips help and if anyone has questions, let me know while its fresh in my mind! I could be having a few beers later which does not help my memory!!
Cheers
 
Yes it is. Not sure if page numbers are correct. The subject I state by the page number should give you a clue. I have all the information in a folder. If you need any further information I can check it out after work.
 
Day started bad when I dropped a bolt into the spark plug hole, but managed to get it out with a magnet and long bolt

Timing belt has now been changed and to be perfectly honest, the instructions in the manual along with the comments from Davefridge are 99% perfect

Timing belt, water pump, pulleys and auxiliary belt all replaced in about 2 hours

The only thing I would add on the end is to make sure you do not overtighten the bolts on the camshaft cover like I did...

0C32DCBC-DBC9-45FF-AC4F-3A643162E2E0.jpeg

Now to change the oil filter, new plugs, charge the battery & get some fuel. Then cross my fingers

If things go well, the engine could start for the first time in 10 years
 
Last edited:
2 hrs, wow! You don't hang about. I'd be on my 3rd cup of tea and still pondering the job lol. Glad the tips helped. On another point, when you change oil n filter I would take spark plugs out and spin the engine over for 30 secs to get oil around the cams and crank bearings.
 
:Great day today!

Did as Davefridge suggested and turned the engine over a few times with no plugs in

Then put the new plugs in and connected them up.

First turn of the key and it fired up :D

Didn’t have the air low pipes on it, so it wouldn’t stay running, but, once I connected them back up, it fired up, ticked over at 1000rpm revved ok :D :D :D

Remember, this is the first time in 10 years that this car has run

Then I even managed to drive it back into the garage instead of pushing it.

Next steps are 4 new tyres and then think about the MOT

One question, the handbrake seems to be absolutely useless. I checked the adjuster and it is already at full adjustment. As there are new pads in it, does that mean the cables are stretched and in need of being replaced? Or does anybody have any other tips?
 
The old cables rust inside the sheathing rendering them useless. New ones are needed, they’re not expensive. Before pulling the old ones out tie string to them and pull through from under the car so you can tie the new ones on to pull back through. Don’t throw the old ones away. You might need the inner ends if the new cables are slack.
 
Back
Top