It is fairly easy to take the tank out. The procedure I used is as follows:
1. Disconnect the battery.
2. Disconnect the battery..... really.
3. Remove the passenger seat, four bolts. Careful to disconnect the electrical plug under the seat before lifting the seat out.
4. Remove the wind stop.
5. Raise the brake , remove the felt/rubber sleeve from around the base of the hand brake lever to expose the single screw at the front holding the plastc cover down. Lift the arm rest cover and undo the two bolts holding the arm rest to the floor. Lift away the armrest, careful to disconnect the plug to the auxilary plug (cigar lighter). I couldn’t undo the plug so gently manipulated the armrest out of the way and supported it with a bungee chord.
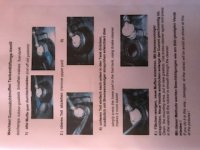
6. Remove the plastic backing on the rear bulkhead to expose the removable plate hiding the fuel tank. The two plastic covers by the seat belts at each door will need to be removed, two screws hold each one in position.
7. Unbolt the back plate, 10mm bolts, lift away the plastic flloor a little away from the bottom of the plate. The technique I used to remove the plate was to slide the plate sideways to the right (as you face the rear of the car), manipulate the left side of the plate down and towards you, once free from the left side lift up and away sliding left. This worked for me, some people nhave found that they have to remove cill plastics as well but I didn’t find this necessary.
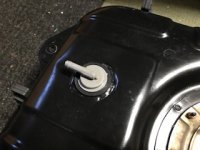
8. The fuel tank is now exposed. Next lift the plastic carpet slightly from the hood shelf. If you partly traise the roof and use a bungee chord to hold it out of the way it is easier to access the plate cover over the fuel pump. 6 nuts hold the plate cover, remove them and the plate. This allows easy access to disconnecting the fuel line to the fuel pump and the power lead. They disconnect easily. If you have small hands you may not need to access the pump connections from this access point if you can get to them from the back plate area. It is quite quick to access though and much easier to see what you are doing.
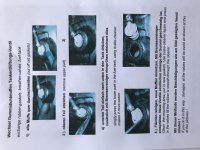
9. Next disconnect the pipes clipped to the tank and the power lead. Undo the connectors to the vents and fuel lines. If they are connected using the crimped bands it is easier to use a special tool to break the crimp. This took me the longest time using increasingly larger screwdrivers to force the crimp open. Be careful. Some of my connections had jubelee clips and were easier to undo. i replaced the crimped connectors with pressure /fuel jubelee connectors.
10. Undo the two 13mm bolts, one ea ch side of the tank holding the tank in position. With the pipes disconnected, including the fuel fill pipe and overflow, the tank can be pulled towards you and out. I used two bungees chords to gently hold the disconnected pipes out of the way while I pulled the tank out. Really easy.
11. Once out the valves can be replaced as before described, remember plenty of lubricant help, I used brake cleaner.
12. Replacement is the reverse order.
13. DO NOT FORGET to reconnct the plug under the seat before reconnecting the battery.
Timings, it took me about 1.5hrs to get the tank out but that was because I was cautious and didn’t have the proper tools to undo the crimped pipe connectors. 45mins to remove the vents, clean them and replace the seals. I spent time cleaning the fuel tank before putting it all back together.
I put fuel in the tank before I replaced the back plate and when everything was buttoned up I opened the fuel cap and had that satisfied pressure hiss as the fuel had expanded a little while in the tank from being outside.
All in all a satisfying job.
Before ypu start make sure you have replacement fuel clips Jubelee clips.
SteveD


")
