Technical Replacing Timing Belt

Currently reading:
Technical Replacing Timing Belt

Joined
Sep 15, 2005
Messages
114
Points
100
Location
Lancashire
Hello,

I am preparing to change the timing belt, tensioner and water pump on my 1997 Barchetta.

I note in the manual that the intake end camshaft pulley bolt needs to be loosened in order to facilitate timing belt positioning

Is this really necessary

Also does the water pump need a sealant applying to the mating faces or is the rubber ring gasket sufficient to seal

Any advice welcome


Many thanks

Phil
 
It is essential to use the proper timing tool (camshaft lobe locks) as this will ensure the timing is correct and in doing so correct any possible timing errors that may have been introduced the last time the belt was replaced. If previous belt replacements had not used the proper timing tools then it is almost certain the timing is not spot on.

With regards to the camshaft pulley being loosened then the chances are you will not have to do this but it is always better to do so. I was prepared and ready to loosen mine when I did the belt change but found that 1) the nut was so tight I bent my sprocket locking tool and 2) there was no tooth/notch misalignment at all anyway. Was a perfect snug and tight fit.

It is essential you lock the crank flywheel down. Also use the TDC marking in the top of the gearbox bell housing window as these are far more accurate due to the diameter involved.

Can not comment on the water pump as our 'B' is low mileage so when the 5 year change came up the miles were low and there was no pump play/wear/end float etc.
 
Hi,
I would really like to do my own cambelt change in the future and politely ask if you could record, photograph or video the procedure for those of us who are unsure but willing to have a go. A lot to ask but the cambelt change subject comes up quit often. I have searched youtube but nothing for the Barchetta or punto hgt.
Thanks in any case and good luck with your change.
Steve D
 
I agree it would be nice to have a Barchetta only explanation etc. I found a lot of information and help by looking at the Alfa Romeo twin cam sites on you tube.
 
I repaired my variator last year and took some photos together with a few short notes. It's very similar to changing the cam belt. The difference is that you'd avoid messing with the painful task of removing and putting together the actual variator but would instead need to remove the aux belt (which is very easy to do). I've attached my guide as a PDF. If you have any particular questions just let me know!
 

Attachments

  • variator.pdf
    2.7 MB · Views: 816
Please, could somebody copy the above article into the Barchetta guides section, make it easier for the future. I'm useless if I cant hit it with a hammer or get a spanner on it I'm lost.
Brian
 
Hello and thanks for the replies
If I replace the variator can it be done with the camshaft in place and when it is locked with the cam locking tool ?

Thanks
 
No, you'll have to remove the camshaft. This is why I never replaced the entire variator but instead only cleaned the current one and replaced the spring inside.
 
Thanks for all your assistance.

However I would like to query why the camshaft needs to be removed to replace the variator
Once the cam lock tools are in place surely this locks the camshaft in position and thus allows removal of the variator

Any comments ?

Thanks
 
I suppose you could give it a try, but looking at this guide
It seems to me that the variator is really stuck to the camshaft, and really needs to be. I'm afraid trying to remove it while the camshaft is still in place will ruin the bearings.
 
Hi,
I've just replaced my timing belt, auxiliary belt and auxiliary belt tensioner. I can add loads of extra instructions & tips to the (very basic) workshop manual instructions if anyone is interested.
 
No, I didn't bother with changing either. Variator is good and I figure that if the pump starts to leak I will change it. My B is 19 year old with 67,000 Km on it. This is the 2nd timing belt to be fitted. The first belt I managed to change without the workshop manual. Now I have the manual, I realise it is a guide for skilled mechanics and is not written like a Haynes manual. I will attempt to add in the sort of info that Haynes include. I will add info by page number.
Page 18. Wheel arch liner removal.
2 of the screws are shorter than the rest, make a note of where they come from. Rectangular cover includes 1 plastic rivet. Just push the centre part through to release it. As to removing the liner itself, it is one big struggle!
Page 19. Auxiliary belt removal.
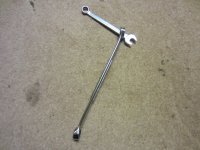
The tensioner nut is 15mm. To increase the leverage of a regular spanner, I slipped a much larger spanner over it (see 1st photo).
Page 19 & 20. Timing belt guard removal.
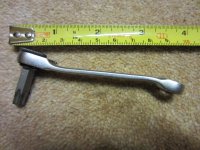
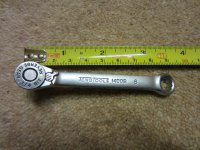
The 3 lower & 3 upper screws are Ribe keys. You can use a Torx T40 instead. The middle 2 screws are 5mm Allen keys. I removed the header tank fixings to give better access to the top 3 cover fixings or you could remove the header tank altogether. I used a mini ratchet with T40 Torx bit (see photos 2&3). The left hand upper screw is exceptionally difficult to get to!!
Page 20. Air con pump cable.
Very difficult to get at! Connector is like the coil pack connectors. Squeeze the outer and it should pull apart. (difficult with a big pipe in the way!)
Page 20. TDC and cam locking
Before locking the cams I removed the auxiliary drive pulley from the crankshaft (page 22). I locked the crankshaft by wedging a prybar into the flywheel through the lower cover (page 22, pic 1)
When finding TDC the cam lobes on cylinder No1 inlet shaft should be facing towards the rear of the car.
To be continued tomorrow
 

Attachments

  • IMG_2237.JPG
    IMG_2237.JPG
    606 KB · Views: 102
  • IMG_2238.JPG
    IMG_2238.JPG
    616.3 KB · Views: 52
  • IMG_2239.JPG
    IMG_2239.JPG
    583.4 KB · Views: 87
Timing belt replacement continued.
Page 21. TDC and cam locking.
To turn engine over I used a socket, 14" extension to clear bodywork and a 16" knuckle bar on the crankshaft nut. A piece of dowel in cylinder No1 spark plug hole is sufficient to judge TDC. Cam locking tools should fit the appropriate lobes easily. If not, "tweak" the crank until they do. With the cams locked I Tipex marked the flywheel through the lower inspection cover. I didn't bother with the top inspection cover because its difficult to get at and see the marks. The lower cover is easy to see when working in the wheel arch area.
Slacken the belt tensioner. What they don't tell you is that if you re-tighten it
in its "loosest" position the belt is much easier to remove and re-fit!
I didn't replace the tension or idle pulleys because the car has only done 10,000 miles since new ones were fitted.
I also didn't slacken the inlet cam pulley. With cams locked in place I can't see the point.
I did, however, replace the (original) auxiliary belt and tensioner. The tensioner bearing sounded "dry".
The rest is just a case of reversing the dismantling process.
I hope these tips help and if anyone has questions, let me know while its fresh in my mind! I could be having a few beers later which does not help my memory!!
Cheers
 

Attachments

  • IMG_2241.JPG
    IMG_2241.JPG
    546.7 KB · Views: 168
So guys, I have a situation here. I have bought barchetta with 85k km and propably still factory timing belt. I had change it but when in tdc outlet camshaft was slightly turned to the left according to locks and without moving it i could not properly set new timing belt (it was like 1/2 of tooth on the camshaft movement) So i did move it just that and locked in position with lock. Later as I was doing it with book open i slackened the inlet one to give timing belt a proper tension. Of course two full rotation and nothing bad happens so I decided to see how it starts without puting in auxuliary belt yet and disaster happened. It started but showed some smoke from below the cams cover and it runned roughly. As I am now starting to think that collision occured maybe someone here can tell me what went wrong? :confused:


Sorry for language mistakes, greatings from Poland
 
Hi, problem solved. Smoke came from some droplets out of cooling system and after few seconds everything looked good. Rough running was as I suspect because of air mass sensor not plugged in correctly and meaby throttle needed accomodation.

I do admit, at first it looked I did something wrong but as car passed about 8000 km after my job and nothing bad is going on I think its just fine.
 
Back
Top