

You are using an out of date browser. It may not display this or other websites correctly.
You should upgrade or use an alternative browser.
You should upgrade or use an alternative browser.
Technical Barcheta TOP, ruber and metal construction around window
- Thread starter acavozd
- Start date
Currently reading:
Technical Barcheta TOP, ruber and metal construction around window
Easy fix.
Take the door pannels off.
Put the window to almost down position. You will see a screw with an allen key thread. 2 of them. When the window is completly down a screw thread towards the back of the door. (this one is used to lower the window stop height) The other two bring the window towards the hood rubbers or towards the front window rubbers.
If this makes no sense e-mail me @ [email protected] and I'll send you an attachment which explains all.
")
Take the door pannels off.
Put the window to almost down position. You will see a screw with an allen key thread. 2 of them. When the window is completly down a screw thread towards the back of the door. (this one is used to lower the window stop height) The other two bring the window towards the hood rubbers or towards the front window rubbers.
If this makes no sense e-mail me @ [email protected] and I'll send you an attachment which explains all.
- Joined
- Aug 19, 2007
- Messages
- 554
- Points
- 129
If this makes no sense e-mail me @ [email protected] and I'll send you an attachment which explains all.
Any chance you could post that attachment here? I'm going to do this job in the next few days...
Yeah I'll give it a go. If you mail me I will send it post hast.
It's just a word doc with images.
I have one that shows how to remove the door and another how to adjust the windows.
It's just a word doc with images.
I have one that shows how to remove the door and another how to adjust the windows.
- Joined
- Aug 19, 2007
- Messages
- 554
- Points
- 129
Both would be great, thanks! [email protected]
REMOVING THE DOOR TRIM
DESCRIPTIONTOOLS
There are a couple of reasons for removing the door trim. the main one is to adjust the window alignment. Another is to lubricate the window mechanism, which can become sluggish or stop in cold weather.
Tools: Size 3 Hex wrench, Body trim removal tool (or metal ruler and cloth)
STEP
ACTION
1
2
NOTE: You should not have to remove the speaker wires to take off the trim panel, but if you do remove the connections make a note of which colour wire connects to which terminal.
3
4
4
This is the fiddly bit...
Lift the shroud from the end nearest the locking button and slide the whole panel (and shroud) towards the front of the car. Do not pull the shroud as it has 2 plastic lugs holding it to the door opener and these could snap.
The pictures show which bit of the handle stays on the door and which bit the shroud is
5
NOTE: if you are using the electrics you may wish to have the engine running to avoid flattening the battery, if you run the engine make sure you are outside or in a well ventilated area.
6
If you note where the lugs are on the back of the trim panel you will know where to apply pressure to get the panel to clip back into place.
When replacing the speaker, locate the lugs first, it can only go in one way around, with the lugs to the flat side of the hole.
https://www.fiatforum.com/attachment.php?attachmentid=24527&d=1172479942
https://www.fiatforum.com/attachment.php?attachmentid=24529&d=1172479942
https://www.fiatforum.com/attachment.php?attachmentid=24531&d=1172479942
https://www.fiatforum.com/attachment.php?attachmentid=24533&d=1172479977
Hallo, tnx for posts
i found that windows adjustment useful, but, please see my seals and window adjustment on pic below.
The red is where the seals are now, and the green is right position, I think that adjusting window will just make distance between seals and window more. My problem is top construction? Or u have some suggestions?

I'd try and adjust the window down, then see where it sits. The seals do push the glass out quite a bit, it might be fine.
Lower the glass window all the way down. Take the top of your door off, find a flat head screw on the top back of the door. Screw that down until you get the right height.
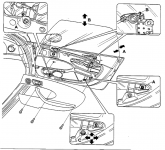
WINDOW ADJUST
W I N D O W A D J U S T M E N T
A. Horizontal plane
B. Height of the window
C. Angle of the window mechanism.
Many thanks for this, it was most helpful when I adjusted the passenger side window yesterday and would have really struggled without it.
Many thanks for this, it was most helpful when I adjusted the passenger side window yesterday and would have really struggled without it.
That's what we are all here for.
Anytime................
I fix the problem on my right door today, it is problem with SOFT TOP frame, I found screw on frame of soft top for adjusting. It’s near head BACK. After adjusting my soft top was more higher than before, after that I adjusted window position and now its like new
#I fix the problem on my right door today, it is problem with SOFT TOP frame, I found screw on frame of soft top for adjusting. It’s near head BACK. After adjusting my soft top was more higher than before, after that I adjusted window position and now its like new
Good stuff. All ok now?