Currently reading:
Styling F4usT - Silver B

F4usT

I have my own title.
Joined
Jan 17, 2008
Messages
1,367
Points
213
Location
Čakovec
I decided to stop spamming other threads, so i create my own. :D here are some picies and mods...

Custom seat covers and panel.


Third brake light


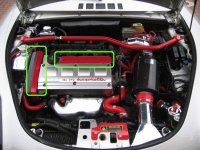
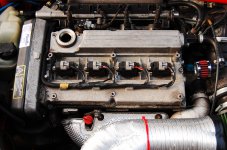
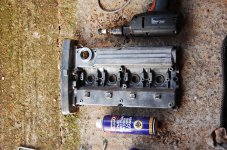
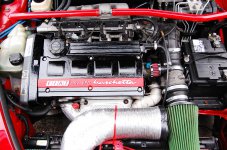
Engine cover (before and after)


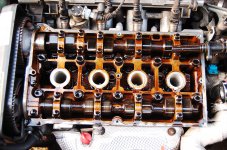
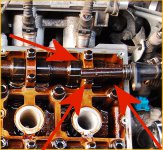
btw: i noticed on a lot of covers that have black spot, you can see it on first picture above 16V text on this second spark "bumper"... :confused:

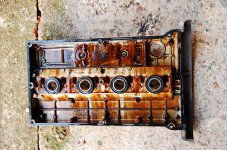
i polished it, but later i decided to paint it to silver. i need to paint words and numbers to red.
 
about exhaust... i forgot name but here is video and sound:


1. cleaning and repainting battery holder...
2. painting other parts of engine
3. fixing or replacing heat shield
4. new air induction kit (inox tubes) because i have some "sport mushroom" instead of original air filter. i put it to existing tube, so it hangs down and i believe it breathe a lot of dust now...

q: can i clean and paint directly this parts marked with green? i don't wont to remove whole engine apart. i will cover all other parts with newspaper and sticky tape.
 

Attachments

  • Image1.jpg
    Image1.jpg
    43.9 KB · Views: 238
Last edited:
about exhaust... i forgot name but here is video and sound:
YouTube - Fiat Barchetta exhaust sound

1. cleaning and repainting battery holder...
2. painting other parts of engine
3. fixing or replacing heat shield
4. new air induction kit (inox tubes) because i have some "sport mushroom" instead of original air filter. i put it to existing tube, so it hangs down and i believe it breathe a lot of dust now...

q: can i clean and paint directly this parts marked with green? i don't wont to remove whole engine apart. i will cover all other parts with newspaper and sticky tape.

Yup, its easy to clean/pain the parts that you have market in green, although its much easier to do it off the car. Tip, if you do remove it from the car take extreme care putting it back on again. When you re-fit it put the bolts in one at a time and work out from the centre in a circular motion, first of all do them finger tight, then tighten them until you feel a little resistance agains the head, then nick them up and finally tighten them. It takes a while but I have seem a few cracked cam covers where someone has been a bit gun-ho about re-fitting them - take your time and apply the pressure evenly and you will be ok!
 
@beacon - well, first i clean whole cover with some de-rust fluid, after that i take some sand paper and shake it until your fingers fall out and of course until rust is removed. for tiny parts (holes in numbers and letter) use dremel tool. after that clean it again. i use some silver spray for painting. it have to be heat resisted (mine was up to +600°C). btw: you may search other threads about this.

@doolahrock - my old panels were eaten by time and they were ugly... this is also simple mod, remove panels, remove current cover. take some new cover and draw curves of it and cut it out (add additional 3-4cm for nailing). i use those "U" nails. the hardest part was removing door handles.
 
thanks LRB for tips. so i can easy remove this (under-cover) cam cover and no worries about anything? somebody told me that there is some sealing rubber, should I buy new one or this existing will be ok when putting back? it will be much easier to clean and paint if i remove this. what else should i be carefull of? sparks? oil?
thanks.
 
Yup, sorry I guess I only gave you 1/2 the advice there!

You should replace the rubber seal, it does not cost much and if its been on there for more than a couple of years has probably gone hard so would benefit from being renewed. The seals often fail on the bottom left hand corner and dribble down the front of the block under the manifold, gave me a hell of a scare when I first saw it as I thought I had a crack in the block! When re-fitting the seal I would also suggest using some oil resistant instant gasket, just to make sure!

No need to remove the plugs, just the leads!

Here are a couple of piccies, really is an easy job!

HTH, if you need anything else let me know ;)
 

Attachments

  • DSC_0469.JPG
    DSC_0469.JPG
    1.6 MB · Views: 93
  • DSC_0470.JPG
    DSC_0470.JPG
    1.8 MB · Views: 126
  • DSC_0472.JPG
    DSC_0472.JPG
    1.7 MB · Views: 92
  • DSC_0473.JPG
    DSC_0473.JPG
    1.7 MB · Views: 90
  • DSC_0482.JPG
    DSC_0482.JPG
    1.9 MB · Views: 171
Last edited:
:eek:what the.. ??? :eek:

LRB is this sand?
 

Attachments

  • WTFLRB.jpg
    WTFLRB.jpg
    259.5 KB · Views: 144
today i will fit this cover until i buy some red paint. i will also use red color for battery holder and brake scissors (pincers, pliers, t(h)ongs...) :D
 
why did I do that? now I have to clean all my engine and all other parts what are rusty and dirty.


i decided to remove this heat shield... it was not hard to remove, anyway....


new costs about 70€ at fiat dealer. there are two types I think. i need 4-2-1...
 
i have a question about oil catch. there are two pipes going out of engine, one is going somewhere down and other is fitted to air intake... so, to what pipe should i connect this oil catch? to both?
 
i have a question about oil catch. there are two pipes going out of engine, one is going somewhere down and other is fitted to air intake... so, to what pipe should i connect this oil catch? to both?

Both, one is for vapour the other is for heavy deposits - you want to collect both types!

Take a look at the Doc's project thread, I think he may have tip's n hint's on how to fit one! (y)
 
look at this beautifully spot on my new cover. it is not oil or something, it is burned shelter under bonnet. i will kill somebody. :bang::bang::bang:
 
i will try to remove this cover under bonnet and try to refit it tighter again...
but, now i have other problem on headlights... on headlights are some fine transparent film (they are varnishes?) and it starts to going down, it looks ugly... i found some tutorials how to polish them, but i am scared not to make it worse than is now.

hers is url, but just watch pictures because of language. :D
http://www.cice.com.hr/forum/showthread.php?p=232990#post232990

now i noticed some watter on right back brake light.... :bang::bang: is it possible to open this lights, they are really tight fitted... i read that some put them to oven 200°c for about 4-5 minutes, so they can open it...
 
Last edited:
Back
Top