Park your car on a flat level surface and leave in gear. Chock the front wheels and release the handbrake. Jack up the car and remove one of the rear road wheels. DO NOT work on the car using just the emergency jack from the boot of the car. I used an axle stand to support the car.

With the road wheel removed, you can see the brake disc and caliper assembly. The caliper is fastened to the trailing arm by two 8mm cap screws which are located on the inside face of the trailing arm. The cap screws are very tight and I sprayed WD40 on them and left them to soak for a few minutes. I removed them using a substantial allen key but a hex bit in a ratchet bar would be better if you have one. To get more leverage on the allen key, I slipped the tubular handle of the wheel brace over the key.


With the two cap screws removed, the caliper can be tapped backward off the disc. I let the calliper rest on a second axle stand as I don’t like the thought of it hanging by its brake hose.

The brake disc is secured to the wheel hub by two 12mm lug bolts which also hold the wheel spacer in position. With the bolts and spacer removed, a gentle tap with a hammer will dislodge the disc.

Although you can refit your new disc at this stage, it is easier to replace the brake pads first as there is more room without the disc in the way.
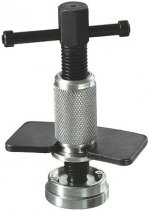
Remove the old pads by sliding them towards each other and they will drop out of the caliper. Carefully take the caliper into two parts. Take care that the rubber dust seals on the pins don’t tear. With the ‘outer cage’ removed from the calliper, I used a Laser rewind tool to push the piston back into the caliper.
IMPORTANT: Pushing the piston back into the caliper can cause the brake fluid reservoir to overflow so you should remove the cap and pack an old towel around the reservoir to avoid spillages.
With the piston pushed back into the caliper. Smear a little grease onto the caliper pins and slide the two parts back together making sure the rubber seals fully relocate.
Now refit your new pads. My Mintex pads come complete with an anti squeal shim but, even so, I still like to smear a little copper slip onto the back of the pad before refitting.
With the new pads fitted, the caliper assembly can be rested back onto the top of an axle stand whilst you fit your new brake disc.
Fitting the new disc is just the reverse of removing it but give it a good wipe with a clean rag first as many new discs come covered in a protective waxy substance to stop them corroding in storage.
With the new disc refitted, slide the caliper assembly back over the disc and refit the cap screws.
I took the opportunity to lubricate the hand brake cable with a little oil, and smeared a drop of grease on the exposed end of the cable and lever/spring assembly.
Refit the road wheel and turn your attention to the other side of the car.
With your new discs and pads fitted, check the level in the brake fluid reservoir and refit the cap.
Your new discs/pads will take a few miles to bed in so take it easy.
The complete job takes less than a couple of hours and the only specialist tools you need are the brake rewind tool.
All the best - Steve

With the road wheel removed, you can see the brake disc and caliper assembly. The caliper is fastened to the trailing arm by two 8mm cap screws which are located on the inside face of the trailing arm. The cap screws are very tight and I sprayed WD40 on them and left them to soak for a few minutes. I removed them using a substantial allen key but a hex bit in a ratchet bar would be better if you have one. To get more leverage on the allen key, I slipped the tubular handle of the wheel brace over the key.
With the two cap screws removed, the caliper can be tapped backward off the disc. I let the calliper rest on a second axle stand as I don’t like the thought of it hanging by its brake hose.
The brake disc is secured to the wheel hub by two 12mm lug bolts which also hold the wheel spacer in position. With the bolts and spacer removed, a gentle tap with a hammer will dislodge the disc.
Although you can refit your new disc at this stage, it is easier to replace the brake pads first as there is more room without the disc in the way.
Remove the old pads by sliding them towards each other and they will drop out of the caliper. Carefully take the caliper into two parts. Take care that the rubber dust seals on the pins don’t tear. With the ‘outer cage’ removed from the calliper, I used a Laser rewind tool to push the piston back into the caliper.
IMPORTANT: Pushing the piston back into the caliper can cause the brake fluid reservoir to overflow so you should remove the cap and pack an old towel around the reservoir to avoid spillages.
With the piston pushed back into the caliper. Smear a little grease onto the caliper pins and slide the two parts back together making sure the rubber seals fully relocate.
Now refit your new pads. My Mintex pads come complete with an anti squeal shim but, even so, I still like to smear a little copper slip onto the back of the pad before refitting.
With the new pads fitted, the caliper assembly can be rested back onto the top of an axle stand whilst you fit your new brake disc.
Fitting the new disc is just the reverse of removing it but give it a good wipe with a clean rag first as many new discs come covered in a protective waxy substance to stop them corroding in storage.
With the new disc refitted, slide the caliper assembly back over the disc and refit the cap screws.
I took the opportunity to lubricate the hand brake cable with a little oil, and smeared a drop of grease on the exposed end of the cable and lever/spring assembly.
Refit the road wheel and turn your attention to the other side of the car.
With your new discs and pads fitted, check the level in the brake fluid reservoir and refit the cap.
Your new discs/pads will take a few miles to bed in so take it easy.
The complete job takes less than a couple of hours and the only specialist tools you need are the brake rewind tool.
All the best - Steve