Off Topic Coolant lose

Currently reading:
Off Topic Coolant lose

Stephen A500

Member
Joined
Jul 21, 2019
Messages
87
Points
87
Oh dude she’s now bled all over the car park at work..
RAC claims radiator has a leak, proper gutted.

Is the front bumper a pain to remove and refit?
 

Attachments

  • FCD7FA38-C1D3-4A55-B7A5-45D4B3DD7D39.jpeg
    FCD7FA38-C1D3-4A55-B7A5-45D4B3DD7D39.jpeg
    5.4 MB · Views: 216
  • 0216B7C3-77CF-4452-8A92-4EC04DD20928.jpeg
    0216B7C3-77CF-4452-8A92-4EC04DD20928.jpeg
    2.3 MB · Views: 47
No/yes top and bottom bolts are Torx and shouldn't give too much issue, wing to bumper ones(under wing) can be problematic due to rust, the 6 small Pozi screws can also be a problem if the heads are rusted/stuck, carefully tease apart the bumper to wing plastic fixings from underneath, DON'T yank off.

 
It looks simple to be honest

Yes when new, potentially not with rusted bolts screws that have been there many years, I snapped out the wing fixing and the small screws were a pain, eventually cut a slot in them to remove then replaced with stainless
Put the Torx bit in a 1/4 socket if you've not got Torx sockets can be quite hard to turn at first.
 
Last edited:
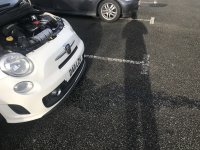
Put some old carpet on the floor to protect the bumper paint.

That bumper will be coming off again so use a decent quality anti-seize on the screw threads. Fiat sell replacement screws. Or replace the pozi screws with hex or socket heads then no more worries with chewed screw heads. Avoid stainless as it corrodes lesser metals in contact with it (water salt + electrolytic action). That said, a high quality anti seize paste should be ok if you cant get the screws as normal self tappers.
 
What I found helped a lot with the fender to bumper clips was a generous amount of silicone spray to lubricated the plastic clips as they pop out.
 
The car I’ve just got has headlight top bolts replacing the wing torx screws. Much easier to get undone.

Those torx screws can be a pain but as you undo it you need to push the wing liner out of the way or it won’t come out properly.

A small socket set with a torx head and an extension bar is the best way to get them undone. I’ve never not been able to get one out.
 
It was a absolute pain in the ass.. one top torx snapped and wing/bumper torx just span and needed drilling..

Next week it’s the radiator.. if anybody can guide me throu it, that would be great..

Thanks steve
 

Attachments

  • 578B7FB6-E90B-42E2-93EB-0D762863B75F.jpeg
    578B7FB6-E90B-42E2-93EB-0D762863B75F.jpeg
    1 MB · Views: 54
My Pandas are 13 years old and the bumpers came off fine. do the awkward to reach bolts up behind the headlight first. If the screw shears off ,fit an M6 Rivnut alongside it. Always use copper paste on all threads.
 
Drain the rad.

Remove the top reinforcement bar.

Undo the two 10mm bolts on the brackets that support it at the very bottom of the front panel.

Unplug the two fan electrical connections.

Undo the two 8mm bolts that hold the fan in place and slide it out then up out of the car.

Undo the four 8mm bolts that hold the A/C condenser on and bend that at 90 degrees on the pipe work out of the way.

Pull down on the rad and will release from the two locating pins at the top. Then just slide it out.

Push the new one into place on the locator pins and replace the bottom brackets in that order.

Then just do everything in reverse to fit it.
 
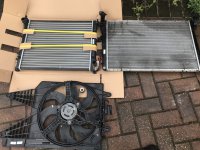
The so-called QD connectors for the rad hoses is a pain in the bits. Cut the crimped hose clips and replace with worm clips. That allows you to see how the QD thingies actually work so they can be swapped to your new radiator. But if you get lucky with a good used rad you wont have the bother - just swap the whole lot and use the worm drive clips on the hose ends.
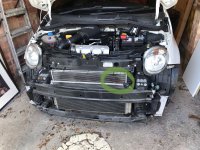
 
And this happened...

Is that electrical component replaceable? About 1” tube.. picture

Another weekend I guess
 

Attachments

  • E865F029-3F36-4066-BED9-32CCDFFA2E55.jpeg
    E865F029-3F36-4066-BED9-32CCDFFA2E55.jpeg
    2.8 MB · Views: 47
  • 3AF6EBC2-F215-4E06-957F-45C6AB198A1A.jpeg
    3AF6EBC2-F215-4E06-957F-45C6AB198A1A.jpeg
    4.4 MB · Views: 45
When I lifted the fan off, it was sitting on the radiator
 

Attachments

  • 742A7FA3-532A-4B81-8D9F-88937C7655E2.jpeg
    742A7FA3-532A-4B81-8D9F-88937C7655E2.jpeg
    1.2 MB · Views: 34
Back
Top