Aug27_front_L.jpg

900 900t Restoration (Connie)

Introduction

Hi

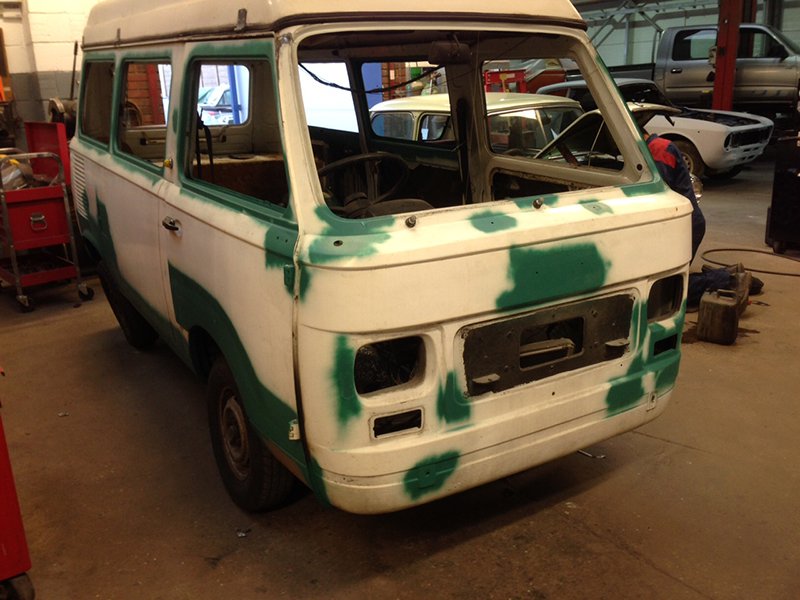
After having our 900T Amigo camper (Connie) for the last 14 years (off road for the last 10) we now have the time to work on the restoration.

Luckily for a 1978 Fiat she is surprisingly good condition, thanks largely to the Ziebart rustproofing.

Current status:

- Interior stripped, salvaged sink & cooker but rest was rotten.
- near side sill removed (practically fell off due to previous botched repair - pop-riveted on).
- Engine and gearbox out, largely out of necessity as rear wishbones had turned to paper. Local engineering firm laser cut the spring seats and rebuilt the damper mountings - now back on 4 wheels.
- Various panels sources many thanks to Ricambio.

Will be off to the welders in a couple of weeks to have all the welding done and generally made structurally sound (not much welding really).

Once back she will be stripped back to bare metal, rust-proofed and resprayed. Not sure what colour yet, probably stick to the original white.

I'll add some pic's to chart the progress soon.

I've posted a separate thread about how to upgrade the suicide brakes and would appreciate any suggestions.

Cheers
Plugs wet?

D
Yep!
I left it a while before trying to restart (as you would do normally with flooding) but still no joy.

I think that I've aligned the static timing correctly so I'm going to try some Easy Start to see if that works - the engine hasn't been run for a long time so maybe it needs reminding what to do.

If that doesn't work it would suggest that the timing is way off and I'll need to play around with it some more.


Hi Gary

check your choke linkage is still there on the carb.

If you still have no success with the easy start, takeout plug 1 and feeling the top of the piston with something long and thin turn the engine manually until the piston is at tdc, then check the end pulley is showing tdc as they have a habit of the pulley not staying in the correct place, you could set up the timing based on the piston position.

if the engine sounds like it wants to start by firing but not fully starting then first thing to do is change the condenser.

i hope these are not a distraction.

Tim
Hi Tim

All ideas welcome - especially if I've missed something obvious.

The choke linkage is there although the choke cable had rusted through and wasn't attached to the choke lever - I have a new cable and will be replacing it. In the meantime I held the choke open with an elastic band.

I've had the distributor converted to 123-Ignition (electronic) so no condenser to worry about. (The old distributor was very badly worn and needed replacing so the extra cost of the conversion seemed worth it.)

I'll check the TDC of No. 1 cylinder as you suggest (through the plug hole) - I'll check this before trying easy start.

I cleaned out the oil filter (very impacted) so it could be something as stupid not putting it back in the correct position (as this has one of the timing marks).

I'll know better at the weekend when I next get time to work on her.

Cheers
 
I suspect the timing marks are incorrect, or possibly wrong firing order I.e leads 180 degrees out. I can't remember now which cylinder is number one on this back to front, counter cw spinning engine. Like the filter housing marks, easy to overlook.if the timing was close you would expect a pop etc.
 
I suspect the timing marks are incorrect, or possibly wrong firing order I.e leads 180 degrees out. I can't remember now which cylinder is number one on this back to front, counter cw spinning engine. Like the filter housing marks, easy to overlook.if the timing was close you would expect a pop etc.


Hi Gary

Another bit of useful info, while you have the plug no1 out and when you have it set at tdc put a piece of standard hose pipe over the plug hole and try to blow down it, if you cant seem to pass much air into the cylinder then you are at firing cycle, if you can pass air into the cylinder then you are at the point where the inlet and exhaust valves are open and therefore not firing point. this will tell you whether to put the sparking point on the dissy to cylinder no1 or not. i would normally then turn the engine back 10 degrees manually,
next turn the ignition on. turn the distributor clockwise from above by about 45 degrees. then turn it anticlockwise for about about 45 degrees until you hear a spark(this bit may not work so well with the 123 than a standard points dissy),pinch up the nut holding the dissy bracket, then refit the spark plug, reconnect the lead.check the other leads are connected in firing order of 1324 (no1 being pulley end) you may be able start the engine.
Hi Tim

The tip about using a piece of hose pipe to check where the engine was in it's cycle did the trick (y).

The timing marks were correct but I needed to rotate the engine one full turn to get to the firing point - this showed that the dizzy was 180 degrees out.

A squirt of easy start and Connie fired up on the first turn :) and runs really smoothly - although I will need to double check and fine tune the timing at some point.

Hopefully the missing part for the brake master cylinder will turn up in the next few days and I can finish off the brake rebuild to allow me to move Connie under her own power for the first time in five years.

Cheers
 
By the way...
Although the engine rotates anti-clockwise the distributor runs clockwise - very important to know when setting up the 123-Ignition (otherwise you could be quite a few degrees out with the set up)
 
By the way...
Although the engine rotates anti-clockwise the distributor runs clockwise - very important to know when setting up the 123-Ignition (otherwise you could be quite a few degrees out with the set up)


Hi Gary

thats great news, as the camper starts you may as well leave it for a while for all the carb to get used to having fuel in it, theres not a great deal of a point of setting the engine up too much until you have a fresh supply of regular fuel..

still great news

Tim
 
Focused on the brakes this long weekend - had to rig up a shelter as way to hot to work in direct sun (can't believe I'm saying that in April).

When I laid Connie up (5+ years ago) I removed the brake shoes and wheel cylinders from 3 of the wheels, these were easy to reassemble with new parts and took about an hour each.

However, wheel number four (front near side) was seized solid and took 6+ hours, two cans of WD40, a big rubber mallet, drill, cold chisels, lots of sweat and a few choice words (apologies to the neighbours made) before the drum, shoes etc. came off. Luckily the only minor damage caused was to the threads of the brake adjusters made good by a bit of filing to restore the threads.

The new master cylinder had a slight weep on one of the filler connections, nut not tight enough and a right pain to tighten when in-situ (hopefully okay now but will need check no further leaks).

I've also fitted all new brake pipes running from the front to rear and new rear flexible pipes. I was going to fit new pipes at the front but the unions to the 4-way connector (with the brake light sensor) are seized, so I've made do with adding a new union to the existing front pipe to the master cylinder for now. (I'll fit all new at the front when I upgrade to discs).

For the moment the brake shoes are slackened right off, so need to pump the brakes quite a bit to get them to work. As Connie will be off road for at least another month or two this will reduce the risk of the brakes binding while standing around.

Next job is the electrics, lots to reconnect and to also figure out why most of the warning lights and gauges don't work. A simple process of elimination but also quite time consuming.
 
Hi Peter
I spotted that on your Bluebell thread (discussing the engine types) - that's pretty much where I put Connie's. I also noticed that it looks like you have a second earth strap attached just above the timing chain cover?
 
Just realised that I haven't posted any photo's for a bit so here are a couple.

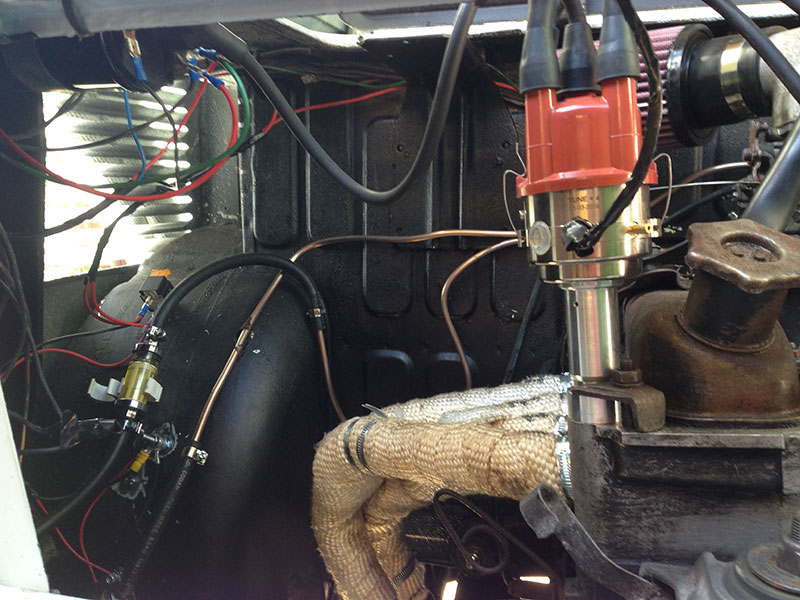
The first one shows the plumbing for the electric fuel pump and the 123 Electronic Ignition Conversion.

FuelPump.jpg


The fuel pump is a small Facet Posi-Flow 1.5 to 4.0 psi just out of shot at the bottom of the wheel arch. I need to tidy up the wiring and add a heat deflector around the fuel lines or box in the exhaust & manifold - can't decide which way to go just yet.

You can also just see the K&N filter behind the electronic distributor. Once I've found where I've put the rubber elbow I'll be adding a tube so that the filter draws cool air in from the nearside air vents.

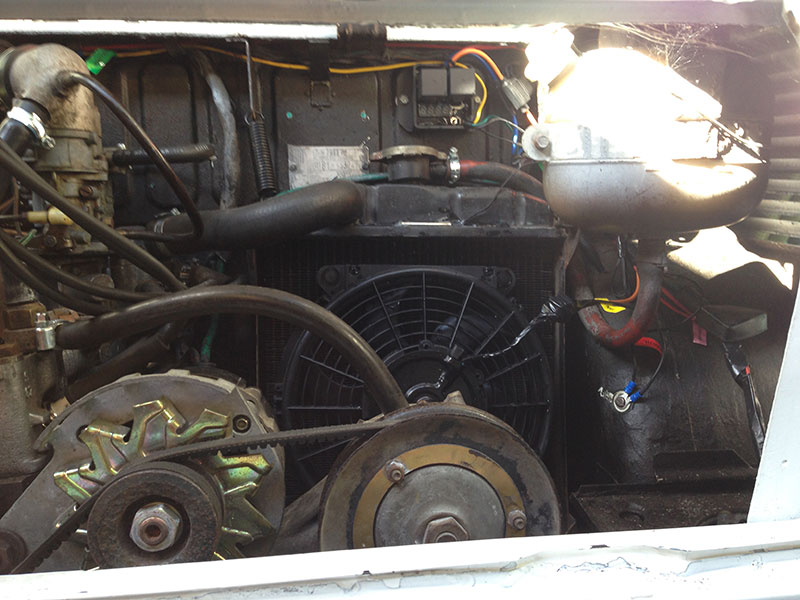
The second photo shows the electric radiator fan.

ElectricFan.jpg


This is a ten inch Tripac with an electronic controller - seen just above the radiator filler cap. You can set the temperature you want the fan to come on at - the default is 85C (I've left it at that for now). The unit also has a second relay for another fan if needed.

The thermostat probe should be inserted into the radiator core but it's too long. The chap at Merlin Motorsport suggested sticking it to the top of the radiator with high temperature silicone - it seems to be working okay.

The keen eyed amongst you will have spotted that the alternator is non-standard.

About 14 years ago the alternator died. I had it reconditioned but it only lasted a week :mad: I hadn't discovered the joys of Ebay or made any 'Fiat' contacts at the time so after a bit of phoning around I managed to find some one who was able to match up the bolt holes with an alternative make. This is more powerful than the standard unit but a thicker spindle - hence the pulleys being different sizes than normal.

When I got the new unit back I then had to get the mounting plate machined down by 8mm to get the belt alignment right.

A lot of hassle but the extra amps should make living with the electric fan easier.
 
Very smart stuff. There's lot going on there but I like the way you're addressing things in such a practical way and going for a usable and reliable motor.(y)

As you say, it will be most important to make sure that the syatems are as rationalised as possible before setting out on the road.

How easy would it be to backward-engineer things by the roadside if something non-standard lets you down?
 
My theory/expectation is the upgrades are using universal parts that are readily available off-the-shelf. Therefore spares should be easier to obtain - with the exception of the 123-Ignition Conversion but this should be fit and forget.
 
Therefore spares should be easier to obtain - with the exception of the 123-Ignition Conversion but this should be fit and forget.

I was dubious of the 123 which I fitted to the 500 and used to take the spare distributor with me. But after more than 20,000 miles I now know that they're very reliable and make a big difference to the the smooth running of the car.
 
It's early days (and I've yet to be able to take Connie on the road) but the stable tick-over is a huge improvement. I can now blip the throttle and she quickly settles back down to tick-over whereas she used to cutout/stall.

Although to be fair, I hadn't realised how badly worn the old distributor was.
 
Back
Top