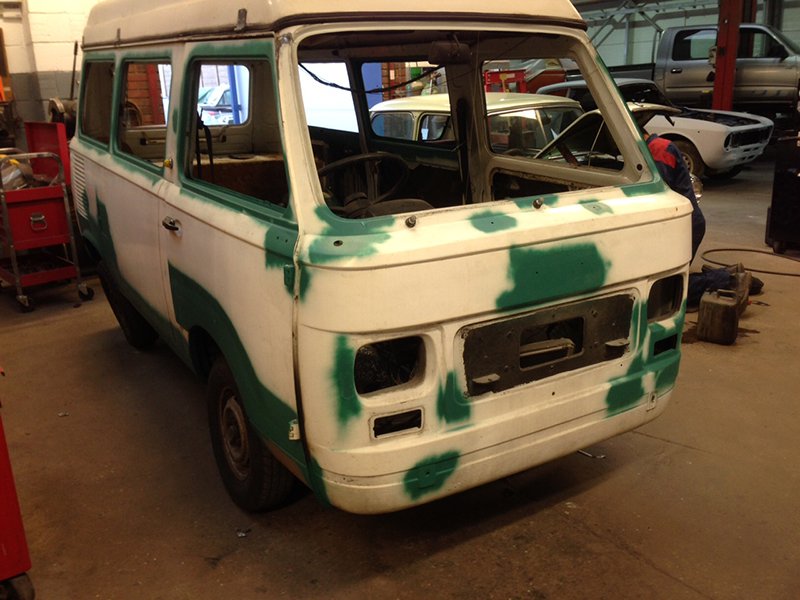
Aug27_front_L.jpg

900 900t Restoration (Connie)

Introduction

Hi

After having our 900T Amigo camper (Connie) for the last 14 years (off road for the last 10) we now have the time to work on the restoration.

Luckily for a 1978 Fiat she is surprisingly good condition, thanks largely to the Ziebart rustproofing.

Current status:

- Interior stripped, salvaged sink & cooker but rest was rotten.
- near side sill removed (practically fell off due to previous botched repair - pop-riveted on).
- Engine and gearbox out, largely out of necessity as rear wishbones had turned to paper. Local engineering firm laser cut the spring seats and rebuilt the damper mountings - now back on 4 wheels.
- Various panels sources many thanks to Ricambio.

Will be off to the welders in a couple of weeks to have all the welding done and generally made structurally sound (not much welding really).

Once back she will be stripped back to bare metal, rust-proofed and resprayed. Not sure what colour yet, probably stick to the original white.

I'll add some pic's to chart the progress soon.

I've posted a separate thread about how to upgrade the suicide brakes and would appreciate any suggestions.

Cheers
Hi Peter
I've been following your progress with a little bit of envy - all I've managed to achieve in the last year has been to strip and repaint the bumpers on Connie :(

Ah the joy of family life and having 100+ diy jobs to do before having the time to work on the restoration. At this rate Bluebell/Buttercup will be back on the road before I've even got the engine back in Connie :(

Replacing the 'canvas' roof is still on my to-do list, I want to use modern tent fabric to save weight and bulk. However, I haven't started to source a supplier yet.

To be honest, the rip-stop waterproof tent fabric isn't over expensive to buy (I estimate less than £75 including seam tape and thread (if ebay is anything to go by) - an equivalent VW replacement canvas is around £350), so I may have a go myself, once I've done all the upholstery. Luckily I'm pretty handy with a sewing machine plus, there is a campervan upholstery course not far from where I live (so I can get access to the more powerful sewing machines).

Looking at how your welding skills have come on over the last year I'm sure that sewing up a bit of canvas is well within your skills :)
 
Looking at how your welding skills have come on over the last year I'm sure that sewing up a bit of canvas is well within your skills :)

I'm not so sure about that :D, I can hide my mistakes quite easily with welding, but sewing is a precision art!

I've had confirmation from a VW pop-top company that they can make me a replacement. It's a bit pricey but they know what they're doing as they also make them for the Super-Viking. There is also a wide choice of fabric-colours and patterns. So I'll be packing the old one off to them. I'll need to think about the re-trimming before that.:eek:

I certainly know what you mean about life getting in the way, but this summer I've just kept ignoring as many other "distractions" as I can get away with.:bang:
 
I've finally got some time to resume the restoration on Connie :)

Focus is now on getting the running gear back in and Connie moving under her own power, there's quite a bit to do. Engine & gearbox back in, rebuild all the brakes, new brake pipes and refit the fuel tank just for starters.

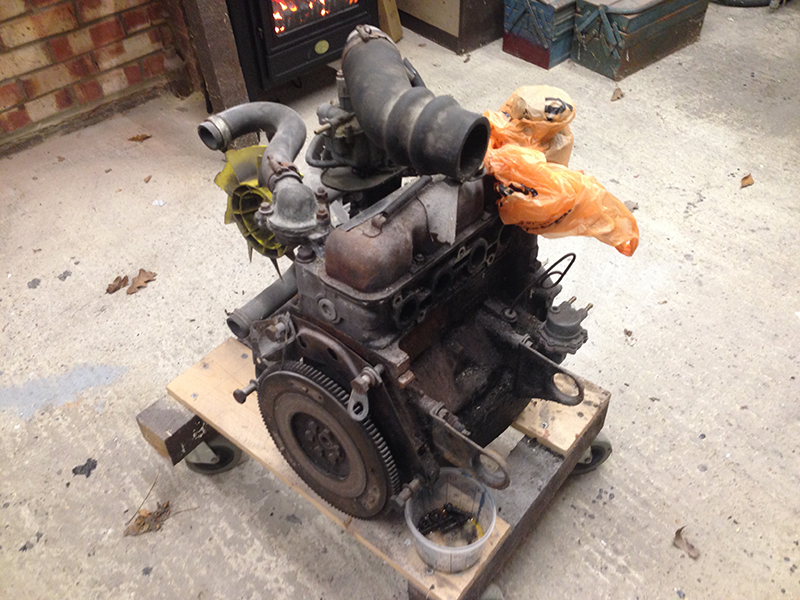
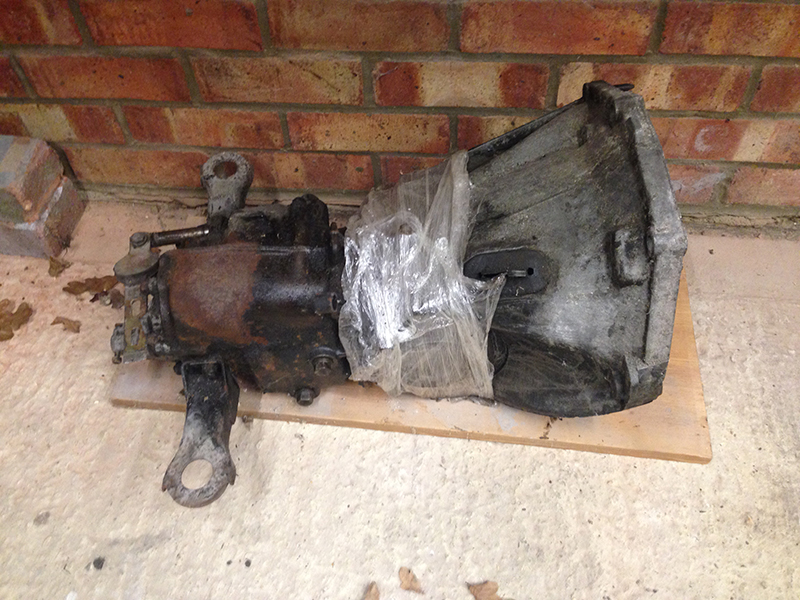
Here's a couple of pic's of the engine & gearbox after they have been sat on my garage floor for 3+ years.

Engine-Before-Clean.jpg

Gear-Box-Before-Clean.jpg


Fortunately both the engine and gearbox turn over by hand so nothing apparently is seized. I'm working on the basis of they were working before I took them out so they should hopefully still work when I put them back. The idea being that I don't want to go looking for trouble... if I can't see it, it's not there.

(I've been acquiring a number of new parts over the last couple of years so these will be fitted as I go along.)

I've worked my way through the Haynes manual to create my shopping list of consumables and fluids etc. and a check list to ensure that everything goes back in the right place.

However, I can't seem to find the torque settings for the following...

  • Transmission mounting bolts to body
  • The 4 drive shaft bolts into the rubber flexi-joints

Can anyone provide these?

I'll post more in the coming weeks.
 
On the 500, with the same and only slightly smaller setup, the driveshaft sleeves to hubs is 20ft/lbs. I reckon the gearbox to body bolts will be up to about 30.
I'm glad you're back on the case Gary...please inspire me.[emoji3]
 
Hi Peter

I've been following your progress with equal amounts of envy and guilt.

I'm now in the position that I could do with being able to use my garage for other projects so it gives me an added incentive to get the bits back in and get Connie up and running again.

(You have the advantage that you don't appear to have taken the running gear out of Bluebell/Buttercup.)

I'm also hoping that once she can move under her own power (and with MOT, Tax and Insurance) I'll be able to finally get on with the fun stuff and fit out the interior and start using her as she was meant to be used.

I've also started a separate thread on what fluids etc. to use as you don't appear to be able to get the Haynes quoted Castrol variants anymore. Perhaps you could add your font of knowledge to the cause?
 
More progress this weekend...
  • New clutch fitted
  • Engine & gearbox reconnected
  • Arbarth exhaust fitted

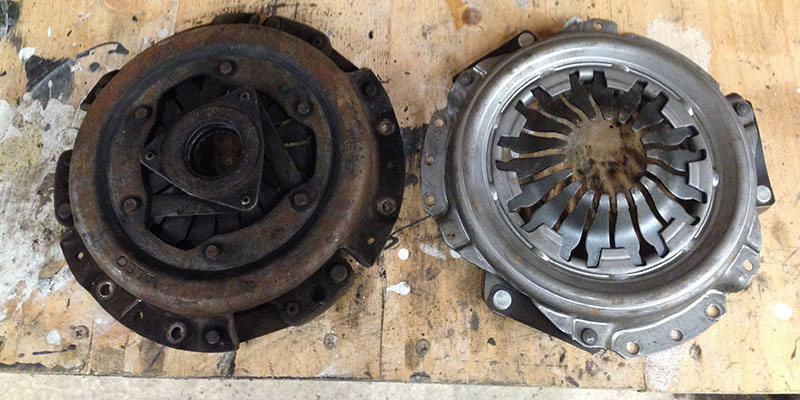
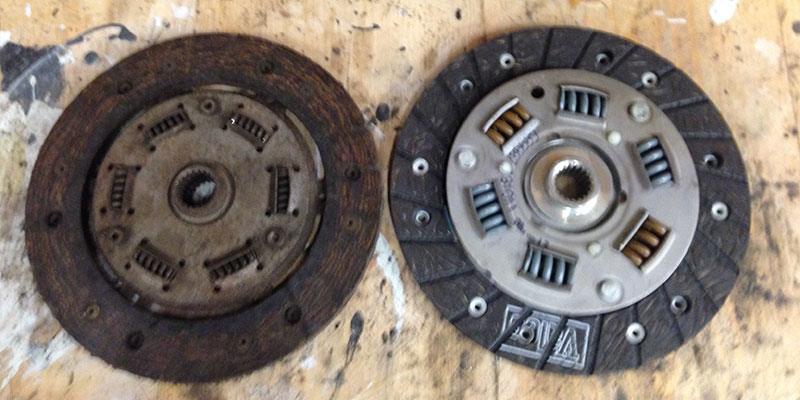
As you can see from the photo's the original clutch was in pretty bad shape - the plate was down to the rivets (and was slipping very badly before Connie was taken off the road).

Clutch-Cover.jpg

Clutch-Plates.jpg


The clutch is a slightly different design but all the sizes match up so I'm hoping all will be well - I've also fitted a new thrust bearing (allthough the existing one hardly looked used).

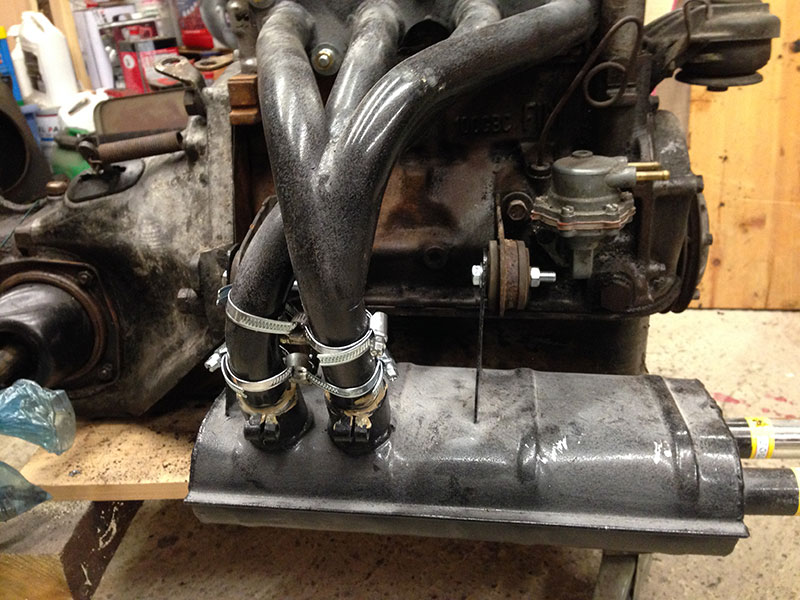
Fitting the Abarth 4 branch manifold & exhaust required a bit of fettling. I needed to file down the right-had side of the manifold a couple of millimetres to clear the casting for the distributor (I've smoothed everything off to reduce stress points).

The downpipes to exhaust were 0.5 cm out of alignment and needed a bit of persuading to join together. I used a combination of clamps and linked jubilee clips (see picture) to allow them to slide together. The exhaust mounting brackets need a little bit of bending to align with the new exhaust.

Exhaust-Fitting.jpg


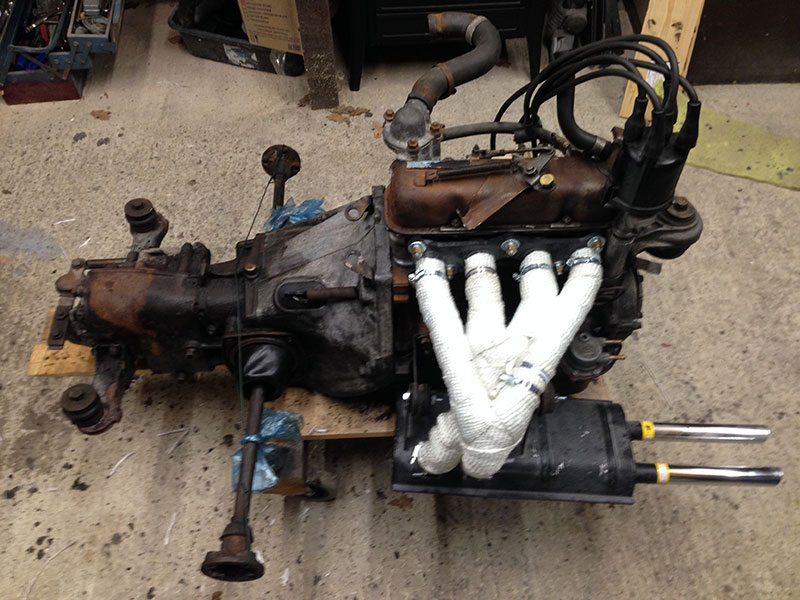
I had originally intended to leave the exhaust & manifold off until after I'd re-fitted the engine but as it had been a real pain to align up I've left them fitted. This made the wrapping of the manifold more fiddly. I'm hoping that the heat insulating tape will help keep the engine bay temperature down a bit.

Here's the engine, gearbox and drive shafts back together ready to go back in.

Engine-Gearbox-Reassembled.jpg


However, I've a few more jobs to do while I've got space in the engine bay and under the van before putting the engine back in - need warmer/better weather for this as it will be outside.

I suspect that I will probably regret not taking the time to give the engine and gearbox a proper clean & polish and paint job (2 days after Connie is back on the road). However, I'm now at the point that I just want her running and useable again and a good wire brushing all over will suffice for now.
 
I couldn't put it off any longer... I've now refitted the petrol tank :bang::bang:

I knew it would be a pain and that turned out to be an understatement :bang::bang::bang::bang: If any one has done this before I'm sure that you will agree that this really is a job for two people and either a pit or high ramp (so you can work underneath comfortably). I my case I had to make do with jacking the van up and sitting her on car ramps at each corner and about 18" crawl space - and just me.

Fitting two fuel pipes (in/out), two wires (fuel tank sender), fuel tank breather pipe and fuel tank filler hose followed by having to lift everything up to bolt into place was nothing short of torture.

I'm hoping that I've tightened everything correctly and that nothing has been trapped or come lose in the refitting - there isn't much room to manoeuvre the tank into place.

Fingers crossed there will be no leeks and the sender unit works (fitted a new one while I had the tank out, as the old one looked a bit corroded). I've also fitted new fuel lines & hoses as the old ones were very corroded.

If I have to take the tank out again I'll be cutting a hole in the floor before I put it back so that I can access all the pipes etc. from the top.
 
On a different note.

Can someone confirm where the earth strap fits between the engine/gearbox and the body?
It's been so long since I took the engine out I can't remember - and the Haynes manual isn't very helpful in this case.
 
On a different note.

Can someone confirm where the earth strap fits between the engine/gearbox and the body?
It's been so long since I took the engine out I can't remember - and the Haynes manual isn't very helpful in this case.

If you are striving for originality, I can't help.

But, you can never have too many earths, particularly in an Italian.

If originality isn't your aim, fit many.

D
 
As you put like that, it's blindingly obvious :bang:
I now wish that I'd ordered a couple more new earth straps and saved on the postage.

Originality isn't my goal, I just want practicality & reliability... hang on a minute why did I buy a Fiat :bang:
 
Only a couple of small jobs this weekend...

1. Removed the fuel pump and fitted a blanking plate (as I will be fitting an electric fuel pump).

2. While the engine is out I also thought that I'd give the oil filter a clean. I'm glad I did, I'm not sure when it was last done - the impacted gunk was 5mm thick (is this usual?). Cleaning the filter isn't a big job but I suppose having to take the rear cross-member off to get at it tends to put people off.

I was going to start rebuilding the brakes. However, the standard M10 brake unions I bought don't fit the wheel cylinders, although they do fit the new flexible hoses. I've ordered some genuine Fiat ones, I'm guessing that the threads are not quite M10.
 
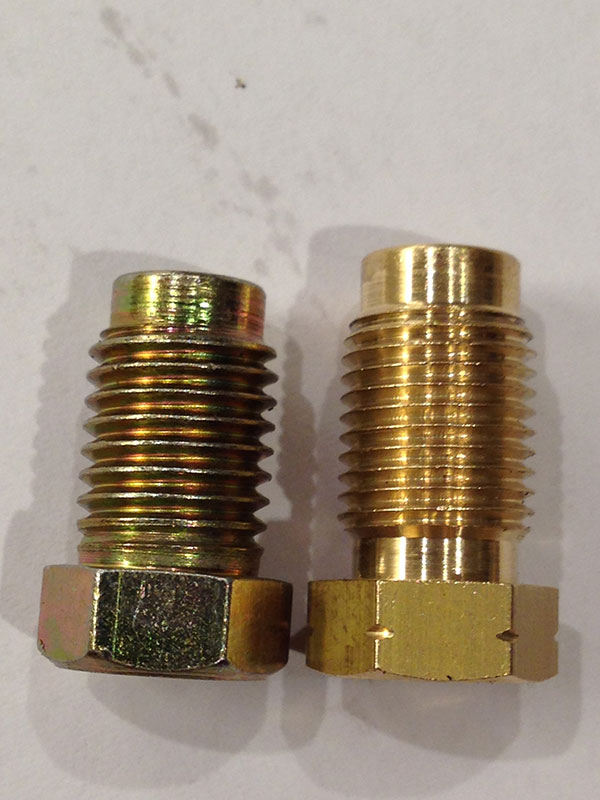
The genuine Fiat brake pipe unions arrived today. The photo below shows the comparison between the 'modern' M10 unions and the 'classic' Fiat versions.

Brakepipe-Unions.jpg


The classic Fiat version is on the left - this has a slightly courser thread and fits the brake cylinders. I also bought some classic Fiat banjo unions (for the front brakes) as these have the same Fiat thread.

As luck would have it the new rear flexible brake hoses I have use the modern M10 thread so I will have to replace the unions on the both sides. I was going to replace all the brake lines in any case in preparation for a front disc conversion so no additional work in the grand scheme of things.
 
As you put like that, it's blindingly obvious :bang:
I now wish that I'd ordered a couple more new earth straps and saved on the postage.

Originality isn't my goal, I just want practicality & reliability... hang on a minute why did I buy a Fiat :bang:
Engine and gearbox refitted today... feeling really pleased with myself then spotted the earth strap sitting on the bench:bang::bang::bang: Now need to work out how to fit it without having to take the engine out again :bang::bang::bang:

Quite a bit of work still to do - I'll post some photo's at the end of the week.

In the meantime can anyone help with these bits?

1. The old rear shocks were seized so I have bought new ones. The problem is that the new rubber bushes haven't compressed yet. This means that I can't get the nut on the bottom. I've had a trawl around the internet looking for something that will compress the bushes to allow me to get the nut started on the thread - I only need a few mm but haven't had any joy.

Has any one had a similar issue when replacing the shocks? And if yes how do you mange to overcome it and/or does anyone know of where to get a tool that will compress the bushes enough to get the nut started?

2. After reconnecting the gear selector I tested the gear change to make sure the gears were selectable. Various combinations of 1st through to 4th were okay. However when selecting reverse there is a horrible crunching sound (like walking on gravel) coming directly below the gearstick.

Looking at the Haynes manual there doesn't appear much to the gearstick connection. Another job to add to the to do this. Has anyone come across something similar?
 
Engine and gearbox refitted today... feeling really pleased with myself then spotted the earth strap sitting on the bench:bang::bang::bang: Now need to work out how to fit it without having to take the engine out again :bang::bang::bang:

Oops

1. The old rear shocks were seized so I have bought new ones. The problem is that the new rubber bushes haven't compressed yet. This means that I can't get the nut on the bottom. I've had a trawl around the internet looking for something that will compress the bushes to allow me to get the nut started on the thread - I only need a few mm but haven't had any joy.

Has any one had a similar issue when replacing the shocks? And if yes how do you mange to overcome it and/or does anyone know of where to get a tool that will compress the bushes enough to get the nut started?

Can you get a couple of G cramps on?

D
 
A bendix spring compressor sounds like might do the trick?

Hi Gary.

my 900t 1979 has a large braided earth lead bolted on the end of the waterpump and connects directly to the back panel bolts which is where the battery earth connects to.

with the shocks you could fit just one rubber and all the washers, leave it overnight then next visit put the other rubber in for compression. third visit put both rubbers in.

normally most Fiat 850's have an earth strap between the clutch covering tin plate bolts and a connection bolted to the base of the fire wall just next to the radiator.

i hope this makes sense

Tim
 
I forgot to say. with your choice of exhaust you may need to create a bit more clearance to the inner wheel arch, be careful with the folded lip at the bottom of the wheel arch as it may damage your exhaust wrapping when you slide the engine in.

Tim
 
Hi Tim

Working back from where the earth strap appears to connect to the body (at least that's where the last bolt left in the box appears to go) the earth strap naturally aligns to the clutch covering tin plate - so that's where it's going.

For the shocks I ended up re-using the flat washers and the slightly thinner top rubber mounts from the old shocks (these looked in good condition). I'll keep an eye on them and if the clearance allows for it will swap them over to the new rubbers in the future. (I tried G-Clamps but these either slipped off or got in the way.)

For the exhaust the clearance with the wheel arch is good - about 2 inches. However, it sits about 6 inches higher than the original one which has meant having to cut a notch in the rear crossmember to allow it to fit. I'll need to weld a piece back in to cover the hole in due course.

More importantly, the exhaust sits a lot closer to the where the fuel lines come in. I need to make up a small heat deflector to reduce the direct heat on the pipes. Not so much a fire risk but more of a vapour lock potential problem - something that Connie suffered from before.

By the way, I've replaced all fuel lines, fuel tank sender* and will be fitting an electric fuel pump - again to reduce the vapour lock issue (more of this when I fit it).

*I wish that I'd taken the opportunity to cut an inspection hatch above the fuel tank - it would have made connecting all the pipes up much easier.

Gary
 
Further work yesterday & today.

In preparation for starting her up it made sense to be able to stop first. Consequentially I've been rebuilding the brakes, including new wheel cylinders (old ones seized solid), brake lines and flexible pipes. The rear brake shoes had only done 5000 miles before Connie was taken off the road so these were cleaned up and checked for damage before refitting them.

What I don't get is that you fit everything as it should be and then you can't get the drum back on - no matter how much you slacken off the adjusters. Therefore, you are left with no choice but to strip everything down and reassemble everything as before and this time the drum just slides on without a problem :bang:

I managed to get hold of a set of front disc assemblies from a Fiat Spider and will be fitting these once I have had time to overhaul them - basically keeping the back & mounting plates and replacing the rest with new.

In the meantime I will be using the existing drums, I bought a pair of new front wheel cylinders sometime ago before deciding on the disc upgrade.

All was going fine until the friction material decided to depart from the shoe :bang::bang::bang:

Not so long ago the Aluminium shoes were regularly surfacing on Ebay for reasonable money (£30-£40 a set). They all gone!!!

If you have aluminium brake shoes your only choice now appears to be having them reconditioned - at £150+ a set :eek::mad:

I always fancied upgrading to 900E rear brakes as these appear to be self adjusting making life much easier - and softer on the wallet as they take steel shoes which are readily available and much cheaper.

Has anyone done an upgrade on the rear brakes - either to self adjusting drums or better still discs? Longer term it will probably be a better option as I suspect that the aluminium shoes will only get more expensive and rarer.

Gary
 
The end of a very long week (holiday :cry:) that can only be summed up as 'almost...'

I've almost finished rebuilding all of the brakes. Turns out the 900T and 900E brake master cylinders have slightly different fittings for the brake fluid reservoir. Unfortunately, the images on the website didn't show this so M/C 1 had to go back but then M/C 2 had one of the connectors missing - a odd thread that isn't readily available. (Missing bit should be with me shortly.)

I almost got the engine running again - fuel flowing, sparks sparking but no engine roar :bang::(

I've fitted an electric fuel pump (to make hot starting easier). The pump is quite small and easy to fit but you must be no more than 12 inches above the bottom of the fuel tank. When I first fitted it I fitted it too high (about 14 inches up), the fuel got as far as the filter but couldn't get any further - so the carb was dry. A quick repositioning and re-routing of the (new) pipes and there is now a steady flow of petrol.

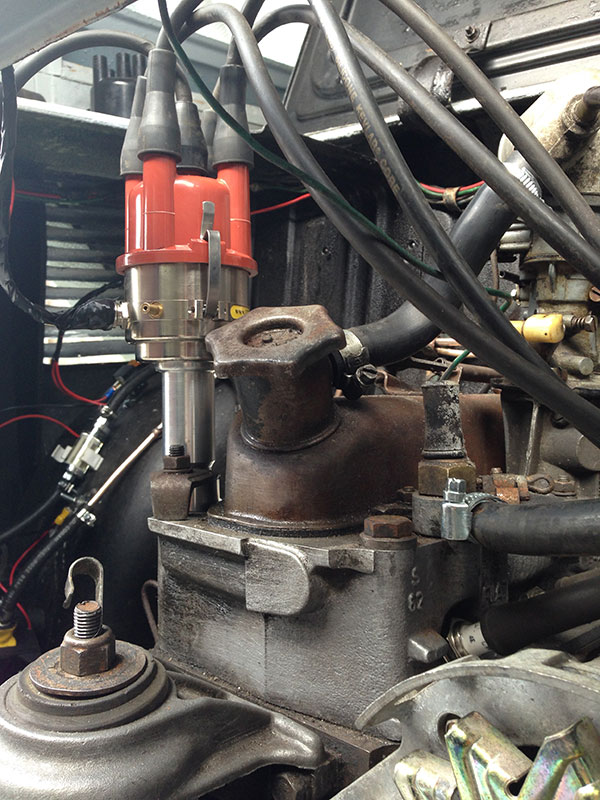
You can just see the fuel filter in the background of this photo (on the wheel arch). The fuel pump is just to the left as far down as I could fit it at the bottom of the arch. All fuel pipes now go around the back of the engine bay (to make removing of the rear cross member easier).

Ignition-and-Fuel-Pump.jpg


In the photo you can also see the new electronic 123-Ignition Conversion (distributor). This is the plus version with bluetooth connection, there is some very useful data fed back via this to the App - I'll upload a photo once I've got the engine running again.

Once everything is running I'll tidy up the wiring and box in exhaust to keep the heat away from the fuel lines etc.

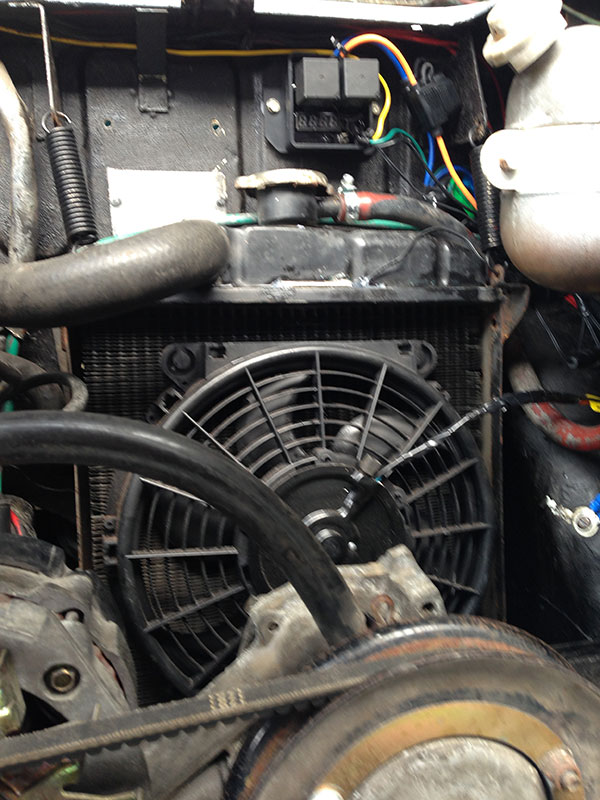
I've also fitted an electric radiator fan and controller, the controller is above the radiator filler cap. The heat probe was too long to fit through the fins so this is attached by high temperature silicone at the top of the radiator.

Electric-Radiator-Fan.jpg


(All wiring will be tidied up when fully tested.)

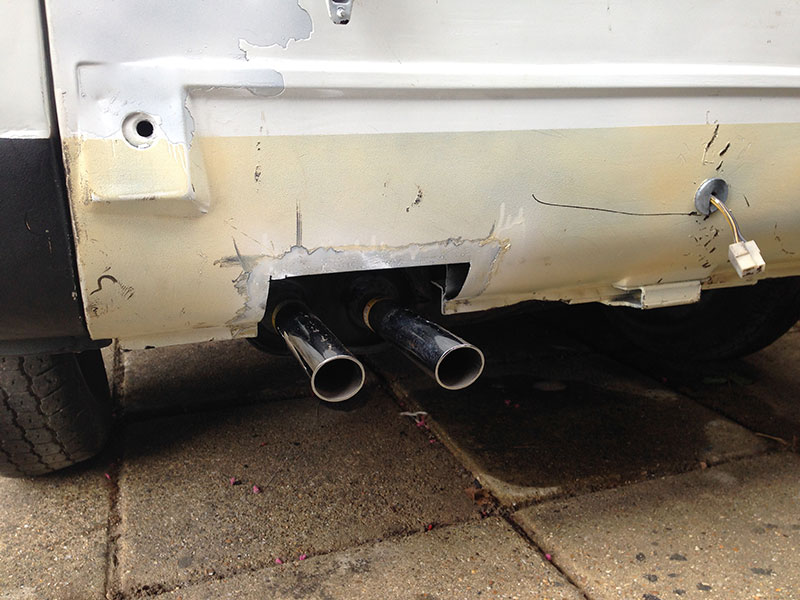
I had to cut a slot in the rear cross member to allow the Abarth twin pipes to fit.

Twin-Pipes.jpg


One of the reasons for routing the fuel pipes at the back was due to having to take the cross member back off to clean it up and weld in a section where the hole is cut.

Finally, the 12 year old 36 Amp/hr battery has been replaced with the biggest that I could fit in the bay - a 56 Amp/hr one that should cope with the extra demands of the electric fan etc.

Back to the head scratching on why she won't start...

Fuel at carb - check!
Spark at plugs - check!
Starter motor spins engine - check!
Ignition/distributor set to no. 1 cylinder TDC static timing - check!

.....:bang::cry::confused:
 
Back
Top