IMG_0053.JPG

850 Here we go...1970 850 Spider Restoration

Introduction

Hi all. I guess this is the right place to document my "rustoration" of a completely clapped out 1970 850 Spider. When I got it l, it had been sitting in a field in Texas for I am guessing at least 20 years. Here are some pics. Bottom is completely rotted. So here is where I start!
  • Like
Reactions: khnitz
Pried open the trunk, here is what I saw. I had to open the good 6 inches and reach in to undo the hinge bolts. Two of them broke. Kind of a mess.
 

Attachments

  • IMG_0094.JPG
    IMG_0094.JPG
    2.3 MB · Views: 146
  • IMG_0097.JPG
    IMG_0097.JPG
    2.5 MB · Views: 129
  • IMG_0103.JPG
    IMG_0103.JPG
    2.7 MB · Views: 123
  • IMG_0105.JPG
    IMG_0105.JPG
    3.1 MB · Views: 122
I'll be starting a restoration on a 1973 Spider 850, soon. It will be my first Fiat, and my first non-fuel-injected car (although we had air-cooled Beetles growing up). I will pick it up this Easter weekend. Good luck with your project!
 
Khnitz, good luck on yours! I hope your car is in better shape than this. I doubt it could be much worse.
I took out most of what was left of the passenger seat, and the rotted remains of the rubber mats, and this is what I found. Yikes! Amazingly, the passenger door still opens and closes ok. The second picture shows the brace I welded across the door frame. Time to open up the rocker and see what is left. Not much I bet! Oh, and a bonus pic of all the leaves and crap in the back.
 

Attachments

  • IMG_0137.JPG
    IMG_0137.JPG
    651.7 KB · Views: 93
  • IMG_0136.JPG
    IMG_0136.JPG
    3.3 MB · Views: 96
  • 57610823080__E9FB3F1D-0B12-492C-ABB0-FEBBA8B11684.JPG
    57610823080__E9FB3F1D-0B12-492C-ABB0-FEBBA8B11684.JPG
    2.8 MB · Views: 126
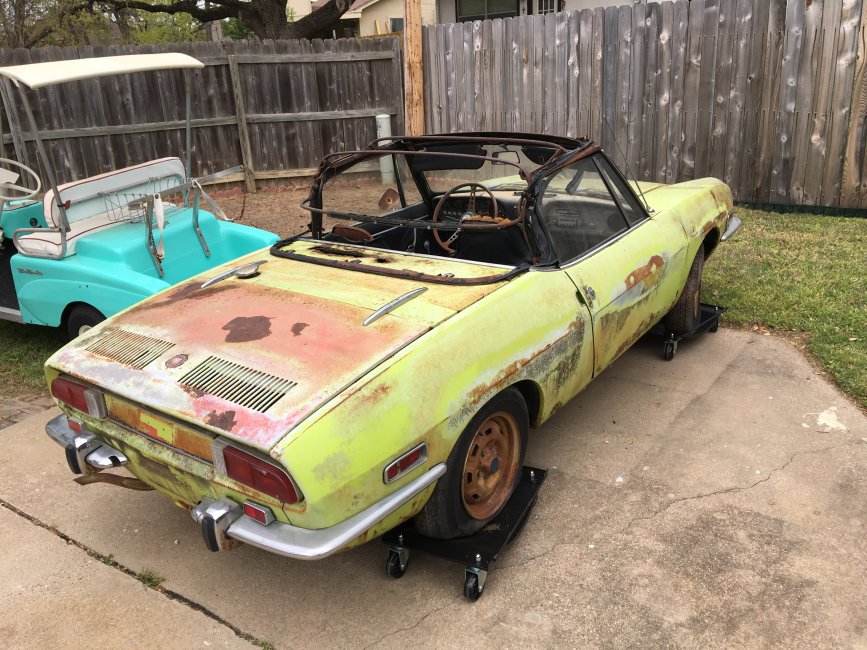
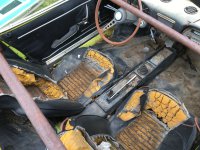
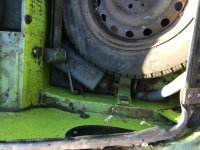
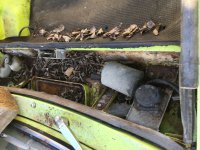
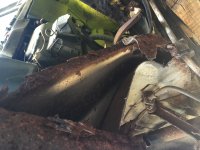
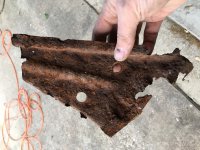
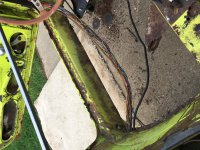
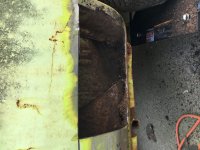
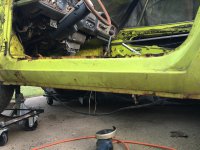
Hi Daniel, not to dampen your enthusiasm for diving into a restoration, but have you considered passing on this one? Meaning: this isn't your restoration candidate, but it may be a good parts car to use to restore another 850 with a body that is less rotted?

Years ago, I bought back my first car with the intention of restoring it. It was a 1980 BMW 320i that I bought from my uncle when I was in high school, and my sister drove it after I moved on from it. When I got it back from her, my intention was to completely disassemble it and restore it - I wanted my first car back for nostalgia reasons! Once I had it disassembled (all parts tagged and bagged), I had a local auto-body shop owner stop out and give me his assessment - I trusted his opinion, as he had performed various accident repair work for us and his work was top-notch. Once he looked over the shell and the amount of rust rot in the trunk, floors and elsewhere on the body, he gave me a sobering assessment: he said "You may not want to hear this, but it's not worth saving. You'll never get out of it what you'll have to put into it." It took a little time to digest that feedback and give up on my idea of restoring my 320i - my first car - but ultimately I came to realize he was correct.

I came to realize that it wasn't just a financial issue - restoring this car wasn't about flipping it to make money - but that the amount of time and money I would invest on this car could be used more efficiently. Maybe on another restoration project that was a better starting point, so that would mean less money and time would go into a car to reach the same endpoint (an enjoyable, restored vehicle). It is also important to be responsible with your time, not just your money. You can't earn or buy more time (with family, friends, etc.).

So, maybe this 850 has opened the door to a project, but this body isn't the candidate? Maybe get the motor/drivetrain sorted out while you search for another restoration candidate? Find an 850 Spider with a better body, but a blown engine or transmission - that could be a reasonably inexpensive option? And then you'll already have a stash of good parts salvaged from this one to set it right.
 
Last edited:
I have indeed thought about parting it out, and may yet do that. I don't have too much in it, and so I thought I would have some fun and see if I am as good at restoring cars as I think I am (I'm not). But, I do have a welder, and metal is cheap, so let's have some fun! Worse case scenario is off it goes to the scrapyard! But I do appreciate your thoughts on it, as I have had the same.
 
Cut the drivers floor out of it yesterday, and welded in the support bar across the drivers door. Not much left of the "X" frame! I have been pondering the best approach to fixing the rockers and the structural member behind the front wheels. I am going to jack it up tomorrow and take a closer look, and maybe start doing some exploratory surgery.
 

Attachments

  • IMG_0165.JPG
    IMG_0165.JPG
    3.3 MB · Views: 122
Ok, so I did some more cutting on it today, and I think I have the first part of the plan formulated. I cut off the bottom of the inner fenderwell to see what was going on, and discovered that excepting the very bottom, the metal looks pretty good. The frame rail that ties the front frame to the side frame is toast, so I cut it off where the rot began. The innermost rocker is in pretty good shape, excepting some obvious soft spots. So, here is plan 1a. Cut out the soft spots on the innermost rocker, weld a piece of angle iron to cover the side and bottom of the inner rocker, and weld a box tube to the angle iron. This will strengthen it up, and give me my support I need for the floor, since my u-shape support is rotted away completely. This will also give me additional metal to tie the side frame rail to the front frame when I figure that one out. The picture show the cut out fenderwell, the rotted frame piece and the cleaned up rocker.
 

Attachments

  • IMG_0174.JPG
    IMG_0174.JPG
    2.6 MB · Views: 114
  • IMG_0175.JPG
    IMG_0175.JPG
    2.1 MB · Views: 91
  • IMG_0177.JPG
    IMG_0177.JPG
    2.3 MB · Views: 83
  • IMG_0176.JPG
    IMG_0176.JPG
    2.5 MB · Views: 85
Didn't have a lot of time today, but I did have time to take the flap wheel to the rocker and to cut a hole in the rear quarter to take a peek at how the rocker terminates. Man there was a lot of dirt in there. I think my angle iron plan is a good one, and it also appears that the rockers are basically solid. There is rust at the top where the door trapped crap, but the rest of the rocker is amazingly solid. Pictures attached.
 

Attachments

  • IMG_0183.JPG
    IMG_0183.JPG
    2.5 MB · Views: 99
  • IMG_0184.JPG
    IMG_0184.JPG
    2.5 MB · Views: 77
Ok, so I bought some angle iron, cut it to fit and drilled 41 freaking holes in it for welding. I then tacked it into place. I think this is goi g to work. Also, this is the first weight the car has added in 20 years! Progress!
 

Attachments

  • IMG_0186.JPG
    IMG_0186.JPG
    6.1 MB · Views: 95
  • IMG_0187.JPG
    IMG_0187.JPG
    2.3 MB · Views: 101
  • IMG_0188.JPG
    IMG_0188.JPG
    3.8 MB · Views: 75
  • IMG_0189.JPG
    IMG_0189.JPG
    1.9 MB · Views: 104
I have been working on forming a frame piece using my head roller, vise and hammer. My 30+ year old vise wore out on me, so that slowed me down some. The piece I am forming is the one that joins the front frame rail to the rocker. Attached is a picture of where I am at on it. It fits well, and I think it it almost ready. However, just to be sure, I am also going to reinforce it with angle iron. Hopefully wrap it up and get it welded in the next couple of days. Then it will be time to repair the console tunnel and any other sheet metal around the drivers floorboard.
 
Here are some updates. Got the frame section welded in, and also patched the wheel well where I had opened it up. I have put the seam sealer on as my welds are so ugly that I am embarrassed. But so far they seem strong enough. At least they handle me bashing them with a hammer to test them. Pics of that attached.

Oh, and I also found some rust out under the front fender where it attaches to the rocker. Not too bad. So I cut it out and patched it.
 

Attachments

  • IMG_0236.JPG
    IMG_0236.JPG
    1.8 MB · Views: 64
I was running out of daylight today, but I wanted to get something done on the car. So I decided to make a patch panel for my front fender. It would be nice if these were available. Anyway, since all I have is a bead roller, this is how I did it. Still need to finish shaping it, then weld it into place and grind like crazy. Sorry to disappoint if y'all were expecting a 100 point car...this is a pile of rusty junk I am just hoping will see the road again. 70% Fiat..30% me!
 

Attachments

  • IMG_0255.JPG
    IMG_0255.JPG
    2.7 MB · Views: 97
  • IMG_0256.JPG
    IMG_0256.JPG
    5.1 MB · Views: 85
  • IMG_0257.JPG
    IMG_0257.JPG
    3.4 MB · Views: 90
  • IMG_0258.JPG
    IMG_0258.JPG
    2.1 MB · Views: 64
  • IMG_0259.JPG
    IMG_0259.JPG
    2 MB · Views: 64
  • IMG_0261.JPG
    IMG_0261.JPG
    2.1 MB · Views: 97
Patch is up and in place. I am also contemplating the floor plans now. I think I am going to build the x frame out of one inch steel tubing with iron plate welded to the top. I am also thinking a flat floor. I dunno why fiat put in these water collectors. Let us see what transpires!
 

Attachments

  • IMG_0280.JPG
    IMG_0280.JPG
    1,008 KB · Views: 104
  • IMG_0281.JPG
    IMG_0281.JPG
    2.8 MB · Views: 120
Well, after some considerations, I think I am going to discontinue posting updates on this project in this forum. It does appear that I have either over-estimated how much the group here would enjoy reading about this project, or this forum is basically not very lively. Except for one nice individual, I have seen no indication that this is a fun read for anyone. So, thanks for reading (if you did), and now, back to welding!
Dan
 
Dan, I just found your post and would be interested in seeing your progress as you put this rusty relic back together. If you make some good progress, an occasional post would be worth seeing.
 
These sorts of posts might not get immediate attention but serve as a good documentation of your work and inspiration for people in future. I’m new here but have an 850 Sport coupe for many years and look forward to reading more about them as mine comes out of a period of storage :) please keep posting!
 
Back
Top