20211201_091612.jpg

850 Fiat 850 Coupe Hill Climb/Sprint car

Introduction

This is my Fiat 850 coupe I bought new in 1970. I drove it for 4 years and did all the usual things like get married and had kids. Sold it when we needed more room for the kids. The car stayed local. About 23 years ago when I was towing home a car for my eldest son to rebuild there it was, parked on the side of the road with a for sale sign! Looked a bit sad with plenty of rust but I jumped at it and for $250 I had my old car back with a spare motor and gearbox, spare doors, glass etc.


A few months ago it was announced there will be a motor racing complex built within 20 kays of here! I had already been involved with a club doing hill climbing with a MX5 but now I had some serious motivation to do something with the Fiat. My Fiat was built in 1970 during a period of unrest at the factory and like all the cars built then had poor paint and rust proofing. I had a partial repaint during the warranty period. I decided that the car would not see road service again so I set about building a car for hill climbing using the original motor to ensure it will be Fiat car club friendly! The division I race my Mazda in is up to 1600cc and the Fiat will be doing the same. I have an AMR500 supercharger that will still allow me to race in the under 1600cc classes and my aim is to get the car down to minimum weight. 15 kilos is about 1 hp!
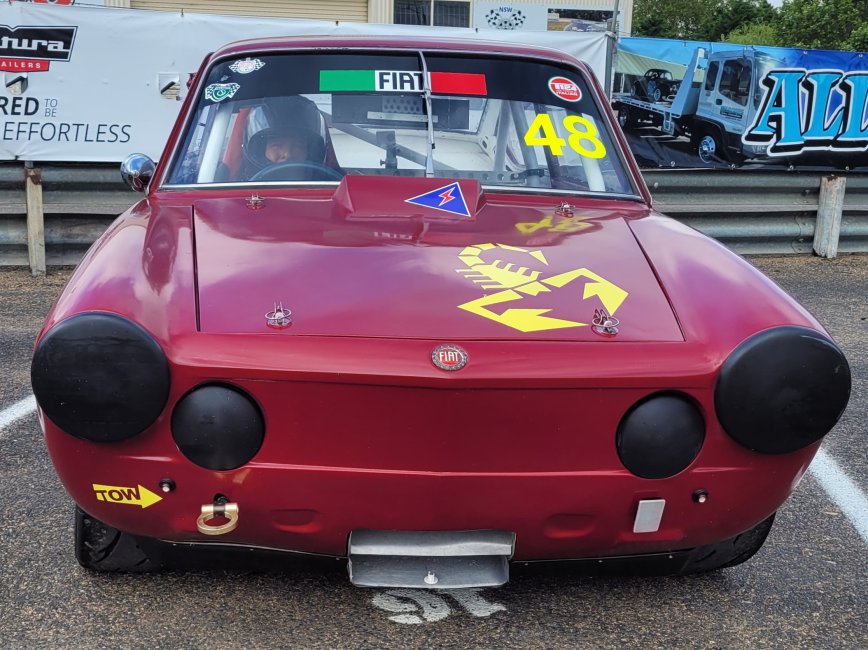
I have gone to a front alloy radiator, wishbone front end and I'm flop moulding epoxy 'glass bonnet, engine covers. Retaining the original windscreen and will have have the rest of the windows in plastic. Lightweight starter motor, Suzuki 750 brake calipers for the front. I have cut out some sheet metal that was not necessary. Weight I have added is the super charger and the half rollcage. The photo below is from a couple of weeks ago. Car is now off the rotisserie. I had to fabricate two new sills and the A pillars both needed some creative metal work and there were a lot of hours spent there!
I will stick up more pictures later.
  • Like
Reactions: alexGS and Jayarr
Great story, and love the black and white photo. But OMG that supercharger is huge! Looking forward to future instalments.
No the charger is quite small. I'm estimating about 10psi and aiming for about 75 hp. I have a 1 3/4 inch SU carby and I'm in the throws of making brackets for the unit now although most of my efforts are on the car body. The flat pulley is off a Mitsubishi Verada I think it was. I have machined the original pulley to fit the flat pulley over the top. The bracket is utilizing the water pump bracket and I have a pipe going into the centre for water. 12v water pump up the front.

 
Had to look twice at the front crank pulley, that's a very neat job integrating the centrifugal filter with the multi rib belt drive. Presume that the alternator will be used as the tensioner for supercharger belt drive, and convert ccw motion to cw.

Cheers.
 
I have an alternator off a Diahatsu that will mount under the charger down low. A belt tensioner will be used using the mounting holes that were used previously for the old alternator on the back of the belt. This is the only way I can think of to clear the rear engine mount. The charger runs either way so its mounted upside down so there is no need to change rotation
 
Front radiator mounting. Original crossmember was rotten so cut it out and made a tube mount for the radiator and fan. The recess in the bulkhead is for a 10 litre alloy fuel tank that fits above and to the rear of the radiator. Coil over wishbone front so have a tube to reinforce the shock towers. Battery box on LHS.

Lots of rust cut out of the front.

Removed the side indicators and bumper bar and welded up the holes.

Half cage welded in and new seat mounts. Coolant pipes will run down the LHS interior
 
Great project. I had an 850 Sport Coupé (which is what this is) years ago; rust was real pain. My only question would be how long you expect the gearbox to last as the increase in torque must be considerable.
 
Yes rust is a problem. I have been flat out the last few days getting rid of surface rust hidden under the paint on the roof alongside the gutter. I am hoping to have the paint job better than what came from the factory.

The gearbox should be able to handle the torque fine. Drive shafts might be more of a problem. The flexible gearbox connection seems to be more of a failure point and I have mine out out the moment and will through bolt it. Fortunately with modern technology with things like Youtube we can follow people like Fiatnutz and incorporate his modifications and learn from his experiences.
This is slightly off topic but I would be keen to learn more about what gearbox is used with these units. http://www.davrian.net/forum/viewtopic.php?f=4&t=358
 
Looking for the paint code on this car. The original paint is the red in the front "boot". The car was repainted in a brighter red. I think the colour is Monza red 113 but I'm having trouble finding it in the paint companies catalog. Any ideas?
 
The local ones don't have the info and they don't seem too keen on analyzers. I have decided on Ferrari Rosso Monza 311/6. Modern Ferrari red which is pretty close to the old 70's coupe red. The whole car has to be painted anyway.
 
Started flop moulding panels. This is the engine cover after one layup of cloth and epoxy. The scoop is the same as the one I have set up for the front bonnet. Here it is an air intake for the SU carburettor. On the red panel at the back is the mould. I have set it there as an exhaust for the front radiator and a deflector for the single windscreen wiper though its main purpose is as a handhold to lift the bonnet!


The ducktail is 10mm closed cell foam. The lower section of the engine cover is done and will be glued to this piece after it's popped off the mould.
 
Finally got the doors fitted during the week. After replacing both outer sills and fairly major re construction of the A pillars I was relieved the doors still fitted at all. The gap along the bottom of the doors is perfect.
In the fore ground the rear panel is having the first lay up of fibreglass cloth and epoxy.


Front bonnet in fibreglass and epoxy. Skin is about 2 to 3mm thick and had to add foam strips and carbon tape to get rid of oil canning on the fairly flat panel. Weighs exactly 2 kilos now with out paint. Laying up the rear panel now. This will be quite a bit lighter because there is plenty of stiffness because of the shape. The various angles and shapes caused lots of grief getting it off the mold though!
 
Is 2 kilos much lighter than a standard bonnet? Most of the steel bonnets I've had have been lightened through extensive rust!

Mine too. The stock item weighs 9 kilos. Stock engine cover is 5 kilos, my new one 1.3 kilos. The rear panel is 9 kilos stock, "plastic one is 2 kilos. I will have to make an aluminium engine mount for the rear so some weight has to go back. I reckon I will save about 17 kilos and get rid of some rust problems.
 
Mine too. The stock item weighs 9 kilos. Stock engine cover is 5 kilos, my new one 1.3 kilos. The rear panel is 9 kilos stock, "plastic one is 2 kilos. I will have to make an aluminium engine mount for the rear so some weight has to go back. I reckon I will save about 17 kilos and get rid of some rust problems.

17 kilos (y) If I can get half of that I reckon I could have second and third helping helpings of Christmas pudding. Woo hoo!
 
Back
Top