Technical Fiat 500x Radio Removal to fit Parrot MKi9200 handsfree kit

Currently reading:
Technical Fiat 500x Radio Removal to fit Parrot MKi9200 handsfree kit

Do you need help unlocking your radio?
Get your code instantly using our radio unlock service 🎵

Addman101

New member
Joined
Jan 27, 2019
Messages
3
Points
1
Hi everyone

Just joined and wonder if someone could assist me please?

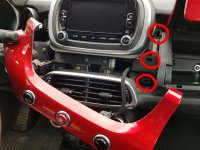
I have purchased a Fiat 500x 1.6 pop 2017 and seems to have a lot of kit apart from handsfree ? I have bought a Parrot handsfree kit and the adaptor lead to fit it inline however I seem to be struggling to remove the radio.

I have seen a YouTube video that implies the dash around the radio pulls off however I have been tugging at it and it seems pretty solid so don’t want to force or use prying tools. Once this panel is off it seems straight forward to remove the radio afterwards.

Has anyone removed a radio from a fiat 500x before am I missing something?

Thanks in advance

Regards

Adam
 
I haven't removed the radio itself, but I have removed the dash part around it a couple of times. It's attached quite firmly, so you need to apply force, no way around it. Just be careful and use a rounded plastic tool to avoid scratching any surfaces.
 
I haven't removed the radio itself, but I have removed the dash part around it a couple of times. It's attached quite firmly, so you need to apply force, no way around it. Just be careful and use a rounded plastic tool to avoid scratching any surfaces.

Thanks Goodcoin as it’s a new car with only 2k miles on it I didn’t really want to damage the dash. I’ll get some proper prising tools and try harder. As a matter of interest any idea where the clips are to start prying at or is there a nack to where to pull apply the prising pressure?

Thanks again
 
As a matter of interest any idea where the clips are to start prying at or is there a nack to where to pull apply the prising pressure?

On the attached photo you can see the holes where the clips go (keep in mind that my car is left-handed). Firstly, open up the "fridge" cover to access the area you need to pry. Just lift it up, no need to remove it entirely. Then slide the tool under the bottom corner of the colored dash part, slightly up from the indicated bottom clip location. Apply force until you hear the clip releasing, then carefully slide the tool upwards to the middle clip location and apply force there, and finally move it under the upper corner. After this side has all the clips released, move on to the other one. In my experience, the driver side doesn't even need a tool, it comes off easily once the passenger side is released. But if it doesn't, just help it a bit with the tool.
 

Attachments

  • 20180812_154945.jpg
    20180812_154945.jpg
    307.2 KB · Views: 176
On the attached photo you can see the holes where the clips go (keep in mind that my car is left-handed). Firstly, open up the "fridge" cover to access the area you need to pry. Just lift it up, no need to remove it entirely. Then slide the tool under the bottom corner of the colored dash part, slightly up from the indicated bottom clip location. Apply force until you hear the clip releasing, then carefully slide the tool upwards to the middle clip location and apply force there, and finally move it under the upper corner. After this side has all the clips released, move on to the other one. In my experience, the driver side doesn't even need a tool, it comes off easily once the passenger side is released. But if it doesn't, just help it a bit with the tool.
Excellent picture and write up will give it a go once my interconnection lead arrives.

Thanks again
 
Do you need help unlocking your radio?
Get your code instantly using our radio unlock service 🎵
Back
Top