

You are using an out of date browser. It may not display this or other websites correctly.
You should upgrade or use an alternative browser.
You should upgrade or use an alternative browser.
General A and B pillar Trims - peeling
- Thread starter Derbyfella
- Start date
Currently reading:
General A and B pillar Trims - peeling
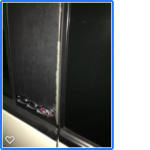
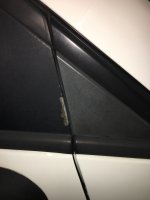
is there any easy way that is going to look good to repair or rectify
With cosmetic bodywork rectification, there are easy ways, and there are ways to make it look good, but there is generally no method for achieving both at the same time.
I've never had any great success with repairing peeling vinyl trim; much the same thing happened after about seven years on my Ka (the first one, not the one made by Fiat) and in the end, I just used a solvent to remove the whole thing, and polished up the underlying paintwork; it looked OK rather then pristine, but good enough for a car of its age.
From your pictures, if you remove these, I'd say you're either going to have to replace them with something, or do some painting.
You can buy OEM trims from shop4parts at a discount, but they're still not particularly cheap.
In your situation, I'd be thinking about wrapping; perhaps with something like this? Alternatively, just buy a roll of black satin wrap and make your own.
@typecastboy, you must have had to deal with damaged vinyl trims on some of your cars - what would you do here?
Last edited:
This post contains affiliate links which may earn a commission at no additional cost to you.
Derbyfella
Established member
Thanks JR-
I had looked at that....trouble is if it’s even slightly off I think it would look a bodge.
There are some gloss trims on eBay at the moment...
The other thing is removing and adding the 500c badge...is that glued on?
I don’t mind spending time on this to be fair, just looking for options
I had looked at that....trouble is if it’s even slightly off I think it would look a bodge.
There are some gloss trims on eBay at the moment...
The other thing is removing and adding the 500c badge...is that glued on?
I don’t mind spending time on this to be fair, just looking for options
Last edited:
trouble is if it’s even slightly off I think it would look a bodge
I'd be concerned about that too. If you want it to look OEM, you may have to bite the bullet and buy OEM replacement trims. These sort of parts are rarely cheap. The ones for the special editions can be downright extortionate, and that's if they're still even available at all.
Just the sheer number of different ebay options out there is evidence that this is a relatively common issue.
The other thing is removing and adding the 500c badge...is that glued on?
It seems so. Take a look at this listing.
Last edited:
This post contains affiliate links which may earn a commission at no additional cost to you.
These are not coated, they are painted and the paint chips off. I've replaced loads of these. You basically have two options.
Remove them and replace them and my video here shows you easily how to do that.
https://youtu.be/tnjbA6A_SQM
Or you can wrap them. You can get pre cut to size and shape carbon effect or you can buy wrap vinyl and do them in a myriad of different finishes. I've done both several times. They are really easy to wrap and I did the main one without even taking it off and it looked great.
The vinyl is widely available on eBay.
Piccolo Nero e Bella
Prominent member
If you can get the '500C' badges off without damage you can clean off the back, apply some .5mm 3M VHB tape (or even 1mm), trim the excess and reapply them. I haven't done it but I did reposition my car's 'Twinair' badge and it's still on after more than six years!
Last edited:
I got fairly good finish by removing mine sanding back then primer and statin black paint
But that was just the a pillar ones and the one near the mirror where the colour difference would probably show up more
But that was just the a pillar ones and the one near the mirror where the colour difference would probably show up more
Derbyfella
Established member
Thanks all.. Not sure how to proceed....there is a full gloss set on ebay....The wrap seems a decent option although im not hugely keen on the carbon fibre.
i presume just heating the badge/glue should be enough for me then to remove them more easily.?
i presume just heating the badge/glue should be enough for me then to remove them more easily.?
Piccolo Nero e Bella
Prominent member
A hairdryer or heat-gun is good but don't try to work too quickly. Heat them until just warmed through and allow the heat to permeate the plastic then insert a blade behind a corner and apply gentle, steady pressure until it starts to lift. I prefer to start at one end and work right across rather than going around the edges.
I have read that you can use dental floss to 'saw' through the adhesive but I haven't tried it.
I have read that you can use dental floss to 'saw' through the adhesive but I haven't tried it.
Similar threads
- Replies
- 10
- Views
- 553