General DRL and MOT

Currently reading:
General DRL and MOT

Thats what I thought but every new or newish one even 70 plate if they're fitted the default must be off as they're never on, whilst out take note, 18 plate led cars seem fine
18 plate will probably not have a off settings as I think they are required to be on from then onwards not 100% however
 
Last edited:
18 plate will probably not have a off settings as I think they are required to be on from then onwards not 100% however

This is the official line:

"Vehicle manufacturers must fit DRL to new types of passenger car and light goods vehicle (car derived vans) type approved to European vehicle requirements from February 2011. In practice this means that any new model launched after this date, and many launched before, will be fitted with DRL. However, existing models on sale before this date without DRL fitted can continue to be sold and used indefinitely."

Where there is a requirement for DRL's to be fitted to comply with European type approval, there will not be an option to turn them off in the menu.

As far as the 500 is concerned, my understanding is that the facelift models have a different type approval, so only pre-facelift cars should have the menu oftion to turn the DRL's off.

Somewhat confusingly, DRL's will be checked (if fitted as original equipment) as part of the MOT for vehicles first registered from 1st March 2018 (most of these vehicles will have their first MOT from 1st March 2021 onwards).
 
Last edited:
Eh up all,

For what it’s worth a couple of points I got out of fixing the 500 DRL this weekend.

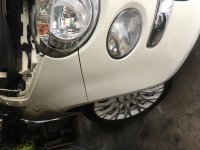
On the passenger side, not sure about drivers yet, I thought I would try and replace the drl without taking the bumper off.:D

Jacked up and took wheel of, removed 4 x self tapper, 3 x 10mm nuts ( plastic and metal) removed inner wing and hey presto- easy access to drl.

I think it’s as quick if not quicker than bumper off, plus no need for anyone’s help.

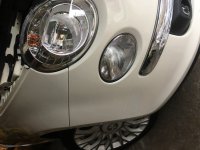
Also noted once my drl was out that the unit had failed because on of the 4 copper pins on the multi plug was gone:confused::confused: Pissed wet through in the multi plug so guess it’s water damage, anyway if it happens to you just make sure you find the broken pin. Mine was stuck in the wiring harness connection, managed to break into this and found the male pin in the female connections.(y) . Not sure what would have happened if I would have struck the new unit in without checking. Used some silicone grease on the pins on the new unit.

Final point and if anyone can shed any light on this :ROFLMAO:

The drl bulb connections look like they have really deteriorated, could this be the bulb I’m running. I’m using the flebay ones that have the whiter light, blue tinted ones still 12v but I’m guessing they run warmer than standard ones hence could they be heating the holder and deteriorating the plastic:idea:

Hope the above might help someone, all advice welcome as usual

Cheers all
 
could they be heating the holder and deteriorating the plastic

:yeahthat:.

Disintegrating plastic is one of the curses of modern living; scarcely a month goes by here without some plastic component in the house failing; this month, it was one of the tabs on a central heating control valve. Another £20; I'm just glad for ebay and for being able to fix this sort of thing myself. The local plumbers here want Fiat franchised dealer money just to turn up.

Age, heat and UV light all play a part; sometimes the components literally just crumble under light finger pressure. New ones manufactured at the same time as the originals often do little better; some are literally doomed to fail from the moment they're manufactured.

The otherwise laudable move toward more biodegradeable plastic isn't helping in this regard, either.

Recently I've been experimenting with repairing this sort of stuff using polyester resin & fibreglass mat (the kind of stuff that's intended to be used for flat roofing); initial results are promising and it bonds well with some (though not all) plastic. HDPE is the worst; it's practically unbondable with anything.

There are some proprietary plastic gutter brackets on my conservatory that crack across the webs after about three years; I've now got the third set on order and I'm thinking I'll try reinforcing them before fitting this time. Sometimes prevention is better than cure.
 
Last edited:
I also use the blue bulbs for my DRLs and all good!
im going through a few niggles with my drls though! I bought aftermarket replacements all shiny new & crystal clear except they keep fogging!!!
banghead.gif


ive had them off sealed em blasted em with warm air but with all this damp air they still fog....
thumb_down.gif

ive tried to help the rubber cap seal better using some of that fury tape that you wrap car wires with and I think that has helped a little


it seems to have created a better seal
I did notice yesterday when I had one off that you can see through the plug that holds the blue bulb not sure if my original one is like that but will check


I also noticed yesterday water on my drivers side drl plug also not sure where this is getting in as my arch liner is fine! any ideas where to check to see where water getting in?
 
typecastboy when I had my front bumper off yesterday I noticed a broken tab on the bracket (drivers headlight side) so my bumper is not as (flush)when on watching your vid on beige girl made me think
worship.gif
as her joins were very tight and mine....not so... do you think this is possibly where water is getting in and wetting my drl plug?


very wet yesterday and windy and I did end up with quite a bit of damp behind that side of the bumper! I ae ordered new brackets...


any fitting advice?:idea:
 
Quite possibly. If you noticed my plug after the bumper wasn't connected at the side, it was very wet and that was just parked up. If it was driving then the water would go straight in and drip down so I think it's highly likely that's where it's coming in.

When you rivet the bracket in, get a screwdriver and bend the tabs slightly or better still which I haven't tried, heat them up a bit with a heat gun to soften them before offering up the bumper. When they are new, they seem quite tight and it can be a job getting it in. Make sure the bumper is wrapped around the headlight properly before pushing it in, as it can go in lopsided and droop down if it's not.


thanks for that info
worship.gif
I think mine have been weakened somewhat due to my bumper being off more than a brides nighty :eek: that may be why that drl is steaming up too due to the water! until last night seeing your vid I had no idea you could replace those! yaaay!
thumb.gif
 
Quite possibly. If you noticed my plug after the bumper wasn't connected at the side, it was very wet and that was just parked up. If it was driving then the water would go straight in and drip down so I think it's highly likely that's where it's coming in.

When you rivet the bracket in, get a screwdriver and bend the tabs slightly or better still which I haven't tried, heat them up a bit with a heat gun to soften them before offering up the bumper. When they are new, they seem quite tight and it can be a job getting it in. Make sure the bumper is wrapped around the headlight properly before pushing it in, as it can go in lopsided and droop down if it's not.
got it sorted today hardest bit was getting bumper back on
yuck.gif
did both obvs and now my seams are nice and tight! thanks for the advice as always
worship.gif
 
got it sorted today hardest bit was getting bumper back on
yuck.gif
did both obvs and now my seams are nice and tight! thanks for the advice as always
worship.gif
Just popped a before n after pic in I think the seams are much tighter now!
 

Attachments

  • A33DAF61-04A0-4091-85EA-6208567B96FC.jpeg
    A33DAF61-04A0-4091-85EA-6208567B96FC.jpeg
    2.2 MB · Views: 17
  • 605A5BF2-72F7-4FFD-BCC8-7A24830818BB.jpeg
    605A5BF2-72F7-4FFD-BCC8-7A24830818BB.jpeg
    2.3 MB · Views: 17
Back
Top