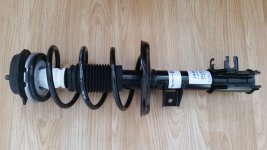
Those parts are just cosmetic in normal use; they're only there to stop the struts falling out when you jack up the car. See
this post for more on this.
The nuts can be challenging; they screw onto the dampers, which themselves are free to rotate within the strut, so the only way to stop the whole lot turning is with an allen key in the top of the damper. Once the whole lot is well rusty (generally after about 3 weeks on a 500, due to the stupid design), it may be difficult or impossible to get them off without damaging the damper threads (and if you do, then you
will be replacing the struts). It usually makes little difference whether the weight of the car is on the wheels, or not - but it's easier to do if the car isn't jacked up as it will be more stable. Hint: Use a top quality allen socket, and make sure it is well seated - if you round off the hex section inside the damper rod, you'll probably have to resort to grinding the nuts off.
If their appearance bothers you. then change them if you want (provided you can undo those pesky nuts), but it won't affect the feel of your suspension in any way whatsoever.
None of the bits that wear are visible from under the bonnet; the real top mounts (which can and do wear, and will affect the handling when they do) are buried under the wing.
On a 10 year old car, there will likely be a small amount of wear in all the suspension parts. Collectively, these will make the ride/handling less crisp than when it was new. If you want to restore that 'new car' feel, then you'll likely need to replace the lot. However, if you use decent parts (and if you don't, it will never feel as good as a new car), then it won't be cheap.
Personally, I don't think it's worth spending that sort of money on a 10yr old car, so I'd replace anything that's excessively worn, and keep the rest.
My 10 yr old Panda, which has basically the same arrangement, now has almost 100k on the clock, and the whole lot is still original. It rides and handles fine, and passed its last MOT with no advisories on the suspension. For sure, if I replaced everything, it'd probably feel a bit crisper, but if you want that new car feel, the cheapest way to achieve it is probably to buy a new car and change it before the warranty runs out.
On an older car, it's all too easy to spend quite a lot of money replacing stuff which is a bit worn, but still perfectly safe.