

Replace blue & me unit
If your Blue & Me (Convergence) Unit has lost communication with the body computer and a proxy alignment isn't helping then it may well need to be renewed. This is pretty straight forward and this is how you do it.
Before messing with this, remove the earth terminal quick release on the battery.
Picture 1
Remove the 2 bolts holding the seat backs in the boot area. Two bolts either side. Leave the brackets connected to the seats, just remove them from the side of the car.
When you've removed the four bolts which you will find easier to do with the seat backs pushed at varying angles forwards, fold both seatbacks flat and you will see between the two seat backs is an Allen bolt. Remove that and the flap that holds the cotton reel between the two seats. Then manouvre the seats out of the car via the hatch, keeping them together.
Picture 2
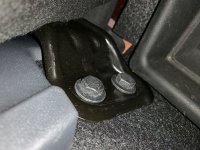
Inside the rear cabin, the seat pad is bolted to the upright part of the rear floorpan with one bolt either side. Remove this and the seat pad just lifts away.
Picture 3
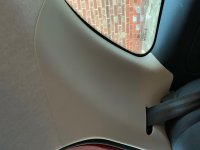
This quarter panel must come off too. There is a Philips screw that holds the cream piece to the rear quarter panel and there is another screw beneath the rear parcel shelf support. Remove those two screws and then the panel is just held on by trim clips. A sharp pull and it will come away.
Picture 4
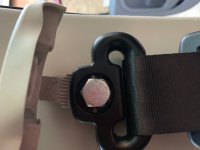
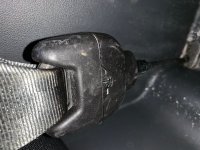
Undo the seatbelt nut after flipping up the cover and let the seatbelt drop to the floor.
Picture 5
Get a cross bladed screwdriver where the seatbelt meets the pre-tensioner and turn it. It will then just pop off (to refit, just push it back on and it will click in). Unthreadle the seatbelt through the aperture in the side panel.
Picture 6
This is the bottom of the rear black quarter panel where it meets the front door kickplate. You need to unscrew the two Philips screws, then release the front door kickplate by ranking it from its clips. You don't need to take it right off from the front, just move it out of the way upwards.
You then need to remove the cream bit of trim where the seatbelt was attached. Careful not to break the clips as you pull it off. That will reveal a single screw at the top of the side panel. Remove that off and then pull off the door rubber seal to just the side where it meets the cream trim and the grey panel that you're taking off.
Now that is all off the panel is held on by several push pins and one bolt. I would suggest you leave the bolt alone. The bolt which is at the back bottom of the panel around where the seat base goes, goes to the outside world. If you take this out, you may not be able to get it back in. You can pivot the whole panel out of the way to allow you to get into the gap where the Blue & Me is.
Pull at the panel and it will come away, pull it back as much as you can so you can get behind it.
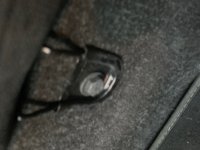
The blue and me module is the silver module that is pop riveted to the side panel. Those rivets need to be drilled out. I find that a smallish masonry bit does it best. Drill in the centre until the outside of the rivets spin and then they will normally lever off and you can lift out the module.
Release the electrical connections and then fit the new one. Ideally you would rivet in the new module but you could most likely bolt it in if you don't have a rivet gun.
Put it all back together in the reverse order, however it may be worth trying to do a proxy alignment now to make sure that it has been successful.
The last photo shows the panel removed and you can see the Blue & Me module at the bottom underneath the rear speaker.
Don't forget after fitting any new module you will need to do a proxy alignment.
Do not disturb the electrical connection on the seatbelt or pre-tensioner.
Hopefully this guide will help you if you need to replace your Blue & Me Module.
If your Blue & Me (Convergence) Unit has lost communication with the body computer and a proxy alignment isn't helping then it may well need to be renewed. This is pretty straight forward and this is how you do it.
Before messing with this, remove the earth terminal quick release on the battery.
Picture 1
Remove the 2 bolts holding the seat backs in the boot area. Two bolts either side. Leave the brackets connected to the seats, just remove them from the side of the car.
When you've removed the four bolts which you will find easier to do with the seat backs pushed at varying angles forwards, fold both seatbacks flat and you will see between the two seat backs is an Allen bolt. Remove that and the flap that holds the cotton reel between the two seats. Then manouvre the seats out of the car via the hatch, keeping them together.
Picture 2
Inside the rear cabin, the seat pad is bolted to the upright part of the rear floorpan with one bolt either side. Remove this and the seat pad just lifts away.
Picture 3
This quarter panel must come off too. There is a Philips screw that holds the cream piece to the rear quarter panel and there is another screw beneath the rear parcel shelf support. Remove those two screws and then the panel is just held on by trim clips. A sharp pull and it will come away.
Picture 4
Undo the seatbelt nut after flipping up the cover and let the seatbelt drop to the floor.
Picture 5
Get a cross bladed screwdriver where the seatbelt meets the pre-tensioner and turn it. It will then just pop off (to refit, just push it back on and it will click in). Unthreadle the seatbelt through the aperture in the side panel.
Picture 6
This is the bottom of the rear black quarter panel where it meets the front door kickplate. You need to unscrew the two Philips screws, then release the front door kickplate by ranking it from its clips. You don't need to take it right off from the front, just move it out of the way upwards.
You then need to remove the cream bit of trim where the seatbelt was attached. Careful not to break the clips as you pull it off. That will reveal a single screw at the top of the side panel. Remove that off and then pull off the door rubber seal to just the side where it meets the cream trim and the grey panel that you're taking off.
Now that is all off the panel is held on by several push pins and one bolt. I would suggest you leave the bolt alone. The bolt which is at the back bottom of the panel around where the seat base goes, goes to the outside world. If you take this out, you may not be able to get it back in. You can pivot the whole panel out of the way to allow you to get into the gap where the Blue & Me is.
Pull at the panel and it will come away, pull it back as much as you can so you can get behind it.
The blue and me module is the silver module that is pop riveted to the side panel. Those rivets need to be drilled out. I find that a smallish masonry bit does it best. Drill in the centre until the outside of the rivets spin and then they will normally lever off and you can lift out the module.
Release the electrical connections and then fit the new one. Ideally you would rivet in the new module but you could most likely bolt it in if you don't have a rivet gun.
Put it all back together in the reverse order, however it may be worth trying to do a proxy alignment now to make sure that it has been successful.
The last photo shows the panel removed and you can see the Blue & Me module at the bottom underneath the rear speaker.
Don't forget after fitting any new module you will need to do a proxy alignment.
Do not disturb the electrical connection on the seatbelt or pre-tensioner.
Hopefully this guide will help you if you need to replace your Blue & Me Module.
Attachments
Last edited: