IMG_7594.jpeg

500 (Classic) '65 RHD F Restoration

Introduction

Hi guys :)

My name is Steve, and I'm a rusty-old-car-aholic :p

I've been quietly browsing the forums for a while, and slowing collecting knowledge while looking out for a 500 project. A few weeks ago I took the plunge and bought a project, it's definitely not the best starting point, but it's also far from the worst.

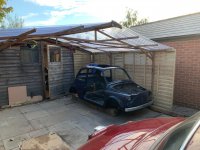
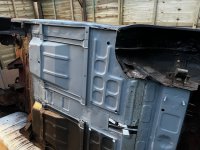
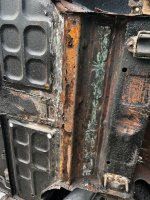
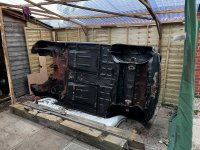
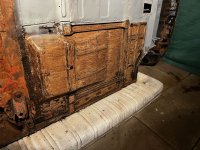
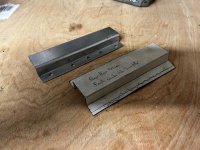
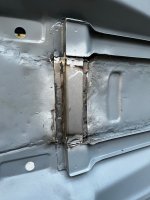
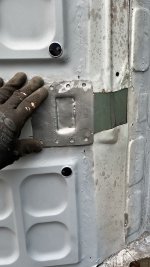
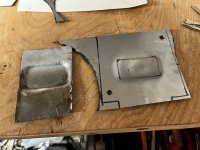
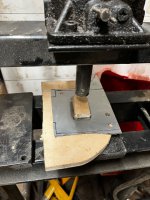
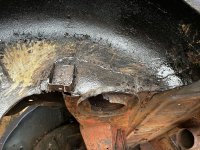
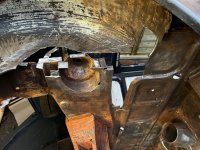
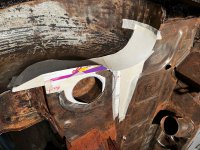
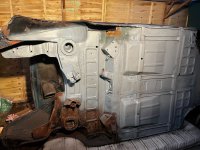
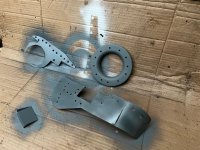
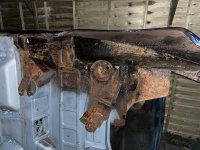
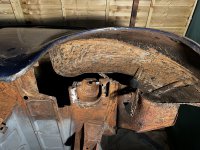
It's a RHD 1965 500F in dark blue. It appears to have been off the road since the mid 80s, and was recently purchased by a trader who was clearly looking to getting running and flip it for a profit before he realised just how much was wrong with it (and there is quite a lot wrong) beneath the surprisingly shiny paint job.

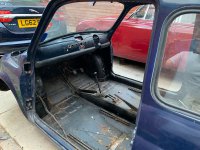
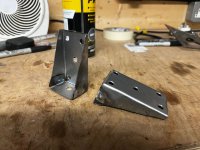
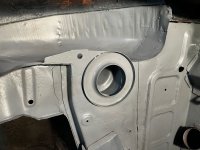
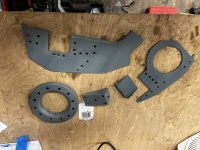
This means it's come to me already mostly disassembled. I'm aware this is a bad idea, especially as this is my first 500 and so I'm not familiar with how it all goes back together... It can't be that complex though can it?! :p

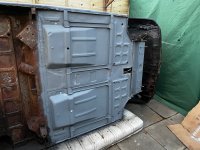
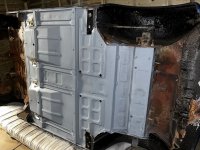
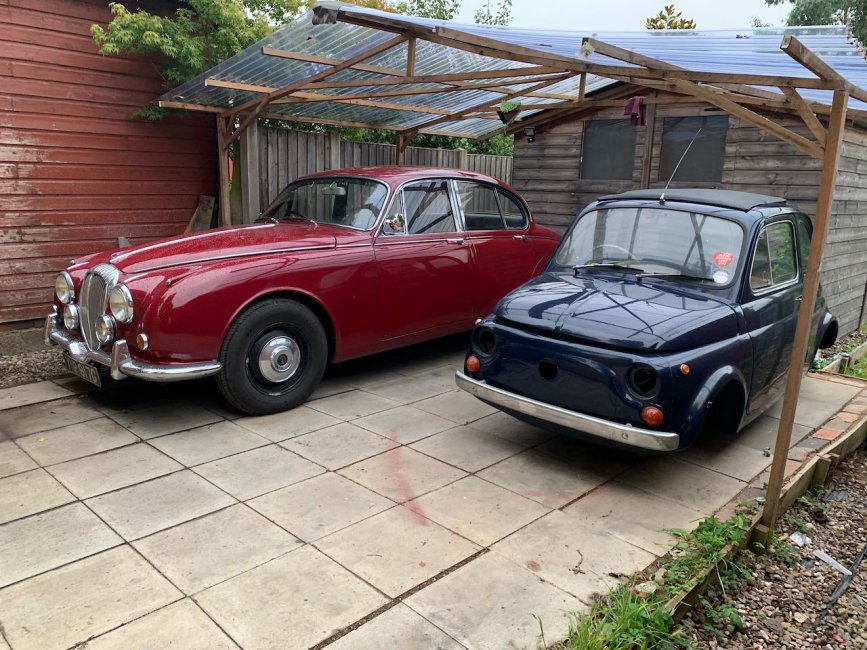
In the photos you can see how it looked as delivered to me, and also how my other classic (also resurrected from a 30+ year lay up period) dwarfs it!

IMG_7589.jpegIMG_7588.jpegIMG_7586.jpeg
  • Like
Reactions: dapedza
Congratulations on becoming the owner of a 500, from the pictures it looks to be in pretty good condition although I know you can’t always tell from photographs. Welcome to the forum which you will find very friendly and full of very knowledgable and helpful people.
 
Take heart, we've seen worse starting points on this forum end up succesfull. Try and find yourself a 500 w/shop manual and then ask as many questions as you like--that is what this forum is for. Where about do you live--will be handy to know so that you can be put in contact with somebody near your you to 'hold your hand'if required.
Like your other car---Mk2 with the BEAUTIFUL Turner designed V8.
 
Welcome to the farm Steve. You're in the right place and the guys and girls from this forum will help you to get your little baby back on the road!

Maybe open a restoration thread, so we can follow your progress.

Cheers
Rob
 
It's been a slow start to the project so far. First order of the day was just to make sure I could find all the parts I thought I should have, and the good news is it does appear to be all there.

As the weather is closing in on us, it also seemed prudent to take some time to put the winter weather protection up on my car port.

After that I could actually do a bit of work on the car. I picked up where the previous owner had left off and completed the strip down. Removing the interior, glass and other bits and bobs to get right down to a bare shell. That was I could see what I was working with.

Now I can see it, I'm not sure that was a good idea! :p

I've worked on enough rusty old cars in the past decade to know that it always turns out to be worse than I thought it would be and this one is no different, but there is good news too.

The front panel, and the bulkhead behind it are made of a wonderful combination of rust, fibreglass, pop rivets and seam sealer. This I was aware of, so clearly they'll need to get replaced in their entirety.

There are rust holes in the rear spring mounts. All 4 inner wheel arches have been patched, to a varying standard. The front right inner arch is especially bad and has large holes fibreglassed over. There is also a big ugly patch under the front edge of the floor, and the inner sills appear to be a pure patchwork construction. I'm sure the condition of the middle sill will be terrible.

New front wings and rear wheel arch repair sections have clearly been fitted (and been treated to shiny paint), but not welded to the inner arches. Instead someone has just fibreglassed over the gap between the new wings and the old rusty remains of inner arches. See picture of the right hand rear arch after digging the fibreglass out!

I had felt the fibreglass in the arch lips when viewing the car, so knew something fishy was going on, but I have to admit I didn't expect it to be quite this much of a bodge! Fixing it properly will mean removing the outer panels and messing up that shiny paint.

So what about the good I hear you say? Well the floors have clearly been replaced and, though the welds are ugly, are solid. The bonnet, engine lid and doors are all in surprisingly good condition. The window apertures appear to be all original and rust free, likewise the pillars and roof structure also all appear in good condition with no signs of previous repair.

Very much a mixed bag, but I knew that would be the case and now I knew what I was working with, I could make a start :)
 

Attachments

  • IMG_7627.jpeg
    IMG_7627.jpeg
    185.2 KB · Views: 135
  • IMG_7603.jpeg
    IMG_7603.jpeg
    192.4 KB · Views: 127
  • IMG_7614.jpeg
    IMG_7614.jpeg
    307.4 KB · Views: 141
  • IMG_7638.jpeg
    IMG_7638.jpeg
    279.2 KB · Views: 135
Thanks for the warm welcome guys :)

To to able to ask a few questions of the collected knowledge, that you all mention, is exactly why I thought I'd start this record of what I've been doing with the car.

Fiona500F, as you will see in the post above, the photographs are definitely deceiving!

Thehobbler, the Daimler is a lovely old thing, though it gives with one hand and takes (mostly money) with the other! It was several long years of work to get it to this stage of general usability. I'm just south of Birmingham.

Thanks for the welcome Lazylobster :)
 
Welcome to 500 ownership. It will be a roller coaster ride for you, but i guarantee it will be worth it in the end.

Check out my restoration, along with some of the others on the forum.


I had the pleasure to enjoy a friends 500 before getting my own for over a year during our summer months. It gave me time to appreciate the car and its shortcomings, and really helped me plan out what my dream 500 was going to be. Which is what i am building now. The perfect balance of performance and classic looks. Its still a long road ahead, mine was in terrible condition with alot of missing parts. "Project" ones are literally non existant in my neck of the woods, and so called "good condition" ones have nasty mediocre repairs done hidden behind the bondo touch. So starting from the ground up was my only choice for the time.


One word of advice, if it needs it, do it. Almost all of the "rustable" parts are available.
 
Last edited:
Hi Steve, your car has some of the features of the 900e van I bought a few years ago; it had patches on patches and some crude, heavy-duty welding. It's very unlikely that anyone will find an unwelded Fiat 500 these days, so you did what you had to do and at least you got one. :)

I go against the grain a little and think it's better to try to retain original panels as much as possible. As said already, you can get almost any panel for this car and this can lead to you serially replacing everything and losing some original panel fit and shape because you're trying to make so many non-original bits fit together.

You may find rather than reducing the shell to a skeleton, by tidying and rationalising some previous body and chassis repairs you can more easily bring the car to life. Whatever you do it has the potential to be a great car; please keep us posted.
 
It's always a roller coaster ride with these old cars Bounding Bambino! Regardless of the outcome it's always worth it, for the sanity it brings to have something 'real' to go and do after a week of sitting at keyboard for work.

It is helpful how many parts are available, and their affordability. When I restored my Fulvia (shouldn't have sold that one!) it was a nightmare finding some of the parts and sometimes even if you could find the bits the prices were mental, £140 for a front wheel bearing anyone?

As you say Fiat500, finding an un-welded car from the 60s is highly unlikely. I was pleased with this car that the upper half of the car seemed good and solid, as the previous car I'd looked at had rust coming through on every panel and I know just how difficult repairs to roof skins and alike can be.

When I bought the car my plan was to fix up the front panel, and repair what was necessary with the mechanicals to do a rolling restoration. But having had a better look at the previous repairs, and with the car already in bits I decided I'd only regret it later if I didn't do it properly now.

I will be leaving any repairs that I feel are safe / decent, for example the floor pans, but all of the substandard repairs will be cut out and replaced. Where possible, I will make new repair sections of my own. I only have basic metalworking tools so this will be limited to the unseen bits of the car with no compound curves! Where necessary I will buy repair sections or whole panels for the outer skin of the car.

I'm not aiming to finish with something that feels like a new car, I still want it feel like it's lived a little, so I will save and repair what I can, but equally I'd like something that I can feel proud of and something that reflects the amount of hours I will have put into it :p
 
A final quick-fire update brings us up to date with where the car currently stands.

I decided to start underneath the car, to build on the strength in the floors, before starting to take larger sections the shell apart. After the Daimler I swore that I didn't want to do another major restoration lying on my back under the car. So when I bought this project I had a mind to buy / build a rotisserie...

But while reading about 500s I saw several builds, including a couple on this forum, where instead the shell was just flopped on to a mattress. It seems kinda crazy, but when I felt how light the bare shell was it seemed worth a shot. As it happens I had a spare old mattress waiting to go to the tip, so I had nothing to loose! It was easy enough to roll over on my own and I've got great access to the underside now.

I started by investigating the large ugly patch at the front edge of the floor. As expected, when I cut the patch off the rotten original floor was still there. It is typical of the patch repairs on this car, where there should have been two layers of metal welded together in several points to create a box section giving the front of the floor some strength, instead there were 4 layers overlapping each other and not joined at the critical stress points.

So I removed the two original rusty layres, exposing the underside of the new floor and leaving it ready to make a patch to the toe board / bottom edge of the front bulkhead / whatever you want to call it!

At the same time I started the laborious task of scraping away all the old underseal. I'm using a sharp chisel to scrap the worst of it off then running over it with a wire wheel to finish and giving it a quick coat of primer to stop any corrosion starting. I've got about 1/2 the floor done and will keep chipping away it as and when I've got a few minutes.
 

Attachments

  • IMG_7772.jpeg
    IMG_7772.jpeg
    197.3 KB · Views: 117
  • IMG_7729.jpeg
    IMG_7729.jpeg
    402.9 KB · Views: 119
  • IMG_7684.jpeg
    IMG_7684.jpeg
    293.2 KB · Views: 118
A final quick-fire update brings us up to date with where the car currently stands.

I decided to start underneath the car, to build on the strength in the floors, before starting to take larger sections the shell apart. After the Daimler I swore that I didn't want to do another major restoration lying on my back under the car. So when I bought this project I had a mind to buy / build a rotisserie...

But while reading about 500s I saw several builds, including a couple on this forum, where instead the shell was just flopped on to a mattress. It seems kinda crazy, but when I felt how light the bare shell was it seemed worth a shot. As it happens I had a spare old mattress waiting to go to the tip, so I had nothing to loose! It was easy enough to roll over on my own and I've got great access to the underside now.

I started by investigating the large ugly patch at the front edge of the floor. As expected, when I cut the patch off the rotten original floor was still there. It is typical of the patch repairs on this car, where there should have been two layers of metal welded together in several points to create a box section giving the front of the floor some strength, instead there were 4 layers overlapping each other and not joined at the critical stress points.

So I removed the two original rusty layres, exposing the underside of the new floor and leaving it ready to make a patch to the toe board / bottom edge of the front bulkhead / whatever you want to call it!

At the same time I started the laborious task of scraping away all the old underseal. I'm using a sharp chisel to scrap the worst of it off then running over it with a wire wheel to finish and giving it a quick coat of primer to stop any corrosion starting. I've got about 1/2 the floor done and will keep chipping away it as and when I've got a few minutes.

That is quite horrible in places, but looks better already.
 
I've made good progress this week on the car, chipping away little and often.

The first job was to finish cleaning the old under seal off. A long and tedious task, but one that is now pretty much complete (well till I start on on the rest of the car ;)) and the main floor pans are now clean and primed.

With that done, I could start putting some fresh metal back into the car. It was time for some CAD... Cardboard aided design. I made up the first of many cardboard templates. This one for the missing brace to go across the centre of the floor. Once I was happy with the card template I transferred it into steel and then welded it in place.

It's always a nice feeling to start building back up rather than just tearing down. :)
 

Attachments

  • IMG_7780.jpeg
    IMG_7780.jpeg
    315.7 KB · Views: 95
  • IMG_7782.jpeg
    IMG_7782.jpeg
    191.4 KB · Views: 91
  • IMG_7784.jpeg
    IMG_7784.jpeg
    160.4 KB · Views: 99
  • IMG_7785.jpeg
    IMG_7785.jpeg
    192.4 KB · Views: 96
The next bit of new metal to go in is a small patch to the centre of the front of the floor. I wanted to try and replicate the factory pressing.

I tried cutting out a little plywood form and using my press, but it wasn't really strong enough, you can see in the attached picture of the original floor and my test piece that the edges are much too soft. Still the shape was roughly right ,and with some clean up with a hammer and blunt chisel, the final patch came out nicely.

With that patch welded in, I could now rebuild the bottom of the kick panel. Sadly it was just a couple of inches too wide for my little metal folder, so I had to make it up in two halves. Still it came out fairly well and is a massive improvement over the previous repair.

Finally for this update, I also ordered the first batch of repair panels for the car this week. So while working on the floor, I welded on the two new front floor supports and the 4 seat belt anchors / spreader plates.

In other news, a kind forum member pointed out to me that my car appears to be an '8 bolt' model, so one of the first batch of 500Fs. Aside from having 8 bolts holding the doors on, can anyone shed any light on whether there are any other differences between this and a later F that I should be aware of when buying parts?
 

Attachments

  • IMG_7816.jpeg
    IMG_7816.jpeg
    195.4 KB · Views: 102
  • IMG_7811.jpeg
    IMG_7811.jpeg
    177 KB · Views: 99
  • FE461283-C283-4BFE-841D-D3B419C1F2F9.jpeg
    FE461283-C283-4BFE-841D-D3B419C1F2F9.jpeg
    138 KB · Views: 94
  • IMG_7794.jpeg
    IMG_7794.jpeg
    193.5 KB · Views: 96
  • IMG_7793.jpeg
    IMG_7793.jpeg
    193.5 KB · Views: 99
The next bit of new metal to go in is a small patch to the centre of the front of the floor. I wanted to try and replicate the factory pressing.

I tried cutting out a little plywood form and using my press, but it wasn't really strong enough, you can see in the attached picture of the original floor and my test piece that the edges are much too soft. Still the shape was roughly right ,and with some clean up with a hammer and blunt chisel, the final patch came out nicely.

With that patch welded in, I could now rebuild the bottom of the kick panel. Sadly it was just a couple of inches too wide for my little metal folder, so I had to make it up in two halves. Still it came out fairly well and is a massive improvement over the previous repair.

Very nice metal-shaping and welding. :)
 
Thank you :) Each car I do, the metal work gets a bit tidier, as every bit of experience helps. My Mazda Rx7 which was my first welding project was a bit more rough and ready! haha.
 
I have been making some more progress in the past few days. While the car is on it's side the next problem area to deal with is the rear spring mounts.

As you can see in the first picture, there was a nice ugly MOT patch over the top (not very well welded as large chunks of the weld just peeled back when I went at it with a chisel), the bump stop bracket appears to be a couple of inches away from where it should be and the actual spring platform itself is rotten through. So out with the grinder!

I ended up chasing more of the rear seat pan back than expected, but its a simple enough repair. You can now also see another reason why the original patch was poor, there's lots of layers of the inner structure of that rear crossmember that should be welded to the wheel arch, but were in fact just welded to the rusty remains of the original arch under the patch and as such were adding no strength.

Now I could see what I needed to rebuild, lots of cardboard templates was the next stage.

The old bump stop bracket wasn't salvageable, and given that it's a pretty simple construction, I decided to just fold up some replacements. The guys from Project Binky (a great YouTube build of a crazy mini with Celiac GT4 running gear if you've not seen it!) would be proud of the bracketry! :p

I then got all of the card templates transferred to steel, cut out, drilled for plug welds and given a coat of weld through primer. You can see just how many plug weld points there are in that wheel arch patch! Should be back to full factory strength in that corner.

Lots of welding later, and thats another good chunk of the underbody welding ticked off.

In the last photo you can see I've started cutting out for the jacking point repair, which is the last bit of underfloor work on this side of the car. The passengers side rear spring mount and jacking point needs all the same work, but I think I need to roll the car on to the other side to get better access to it.

I've also got some repairs to do in the front wheel arches near the spring mount/cross member, I'm trying to work out if I'm best tackling them with the car on it's side still, or better waiting till its the right way up and doing them when I deal with the rest of the front end metal work.
 

Attachments

  • IMG_7843.jpeg
    IMG_7843.jpeg
    351.6 KB · Views: 102
  • IMG_7845.jpeg
    IMG_7845.jpeg
    251 KB · Views: 108
  • IMG_7852.jpeg
    IMG_7852.jpeg
    283.4 KB · Views: 105
  • IMG_7859.jpeg
    IMG_7859.jpeg
    159.8 KB · Views: 107
  • IMG_7883.jpeg
    IMG_7883.jpeg
    162.5 KB · Views: 100
  • IMG_7882.jpeg
    IMG_7882.jpeg
    199.7 KB · Views: 103
  • IMG_7860.jpeg
    IMG_7860.jpeg
    233.5 KB · Views: 100
Life has been a bit busy, so not much has happened on the Fiat, and I’m only just getting round to having a browse of the forums and doing a few updates!

Picking up where I left off, a few days later I received a new jacking point in the post and it was pretty simple to weld that on with a couple of small patches to complete that rear drivers side floor corner. It was nice to get that jacking point off and see another little area of the car fully repaired.

The last major underfloor area to do was the passengers rear spring mount. I was able to turn the car over on to its other side with the help of a friend, and was faced with almost exactly the same mess.

It’s a bit boring doing exactly the same repair on both sides of the car, but at least I knew how it would layer up and where to start. I soon got it cleaned off and had the rust cut out and made a near identical set of repair sections to the other side.
The next evening I started welding them in, and was making steady progress…

… at which point my wife went into labour. So tools were downed and I’ve not had chance to pick them up again since!

So small Fiat has to take the backseat for a bit, but I’m hoping it won’t be too long till I can start grabbing a few minutes here and there to go out and do a bit of work on it. Part of the plan when I purchased the car was that it would be something I could just potter at slowly when I had some spare moments, and something to escape to once in a while once the small people were born. So it’s going to be a slower build and I’m just going to try and enjoy each session working on it for its own merit, rather than racing towards the finish line like I normally would :)
 

Attachments

  • E874F2D8-B5DB-456D-AD83-1D45917144D0.jpeg
    E874F2D8-B5DB-456D-AD83-1D45917144D0.jpeg
    1.8 MB · Views: 84
  • FFBC176C-3828-4C1B-9353-182AA2F18FED.jpeg
    FFBC176C-3828-4C1B-9353-182AA2F18FED.jpeg
    2.9 MB · Views: 89
  • 22D0BC8D-B512-4DF8-8D2F-55BB9B73695C.jpeg
    22D0BC8D-B512-4DF8-8D2F-55BB9B73695C.jpeg
    4.4 MB · Views: 79
  • 43D083B8-37CE-4FC3-B118-DDEBA3A7E696.jpeg
    43D083B8-37CE-4FC3-B118-DDEBA3A7E696.jpeg
    2.4 MB · Views: 88
Life has been a bit busy, so not much has happened on the Fiat, and I’m only just getting round to having a browse of the forums and doing a few updates!

Picking up where I left off, a few days later I received a new jacking point in the post and it was pretty simple to weld that on with a couple of small patches to complete that rear drivers side floor corner. It was nice to get that jacking point off and see another little area of the car fully repaired.

The last major underfloor area to do was the passengers rear spring mount. I was able to turn the car over on to its other side with the help of a friend, and was faced with almost exactly the same mess.

It’s a bit boring doing exactly the same repair on both sides of the car, but at least I knew how it would layer up and where to start. I soon got it cleaned off and had the rust cut out and made a near identical set of repair sections to the other side.
The next evening I started welding them in, and was making steady progress…

… at which point my wife went into labour. So tools were downed and I’ve not had chance to pick them up again since!

So small Fiat has to take the backseat for a bit, but I’m hoping it won’t be too long till I can start grabbing a few minutes here and there to go out and do a bit of work on it. Part of the plan when I purchased the car was that it would be something I could just potter at slowly when I had some spare moments, and something to escape to once in a while once the small people were born. So it’s going to be a slower build and I’m just going to try and enjoy each session working on it for its own merit, rather than racing towards the finish line like I normally would :)
Congratulations on the new member of the family---I am sure that all the forum will join me in hoping that all went well, and that mum and rugrat are doing just fine. What colour will the spanner set be---blue or pink?
 
Back
Top