image0 - Copy.jpeg

500 (Classic) New Canadian Bambino!

My 1967 500 F which has definitely seen better days. Neglected and stored away, it made its way to Canada, and is undergoing the restoration it deserves.

Introduction

Hi folks,

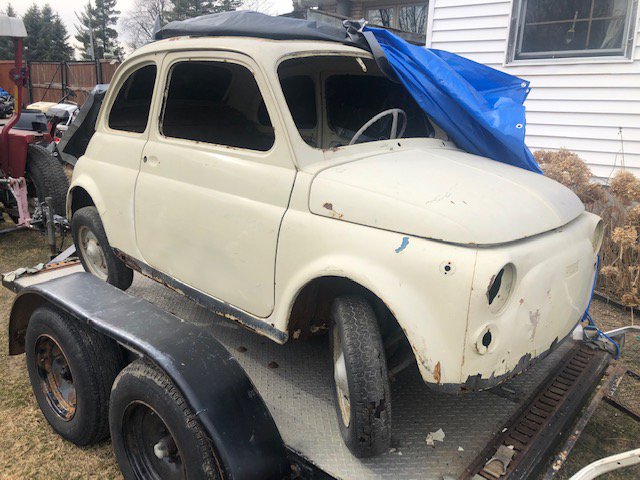
New member but long time lurker here. I have been on the hunt for a cinquecento for over 3 years now. Ive been a classic car enthusiast since i could remember and it was time to add some Italian flare to my overly German and American garage collection. I got the 500 bug for after servicing and enjoying a 500 that a friend of mine owns. I finally was able to get my hands on a 67 500F, and im overly joyed. I just finished a resto and full rebuild on a 75 911S, and kept on finding myself wanting to drive my friends Fiat over the Porsche. The Porsche is gone, and i needed to fill the empty void.

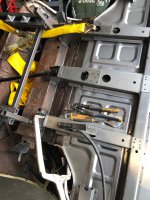
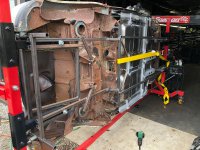
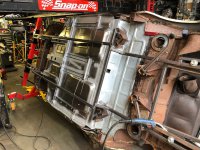
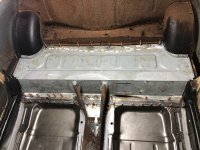
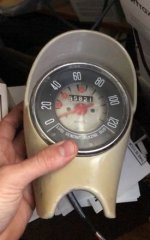
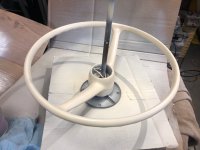
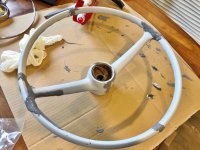
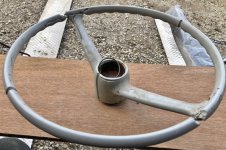
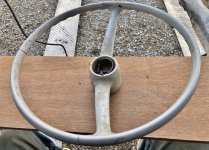
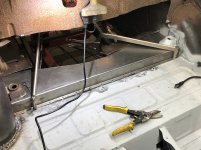
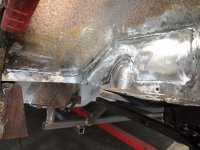
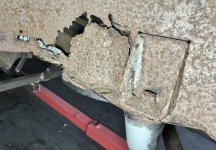
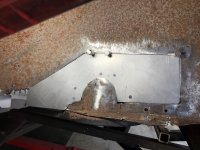
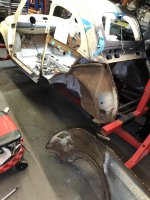
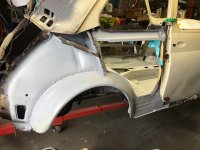
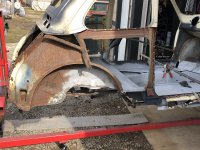
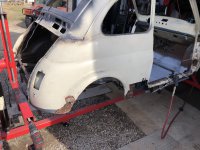
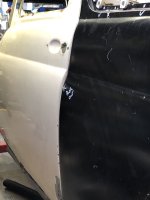
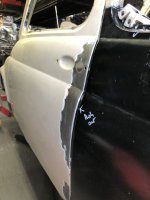
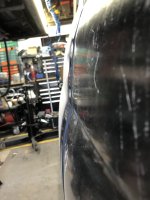
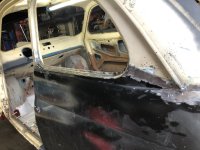
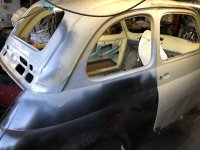
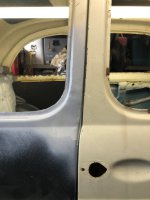
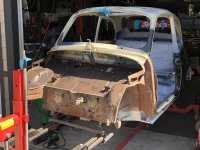
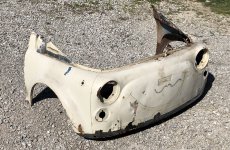
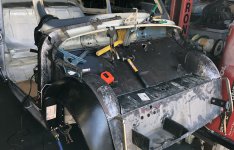
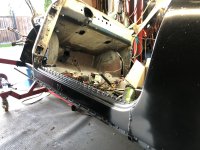
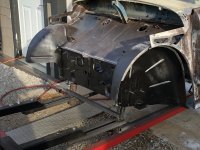
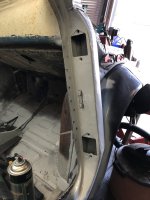
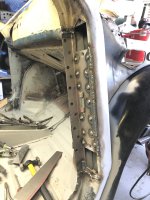
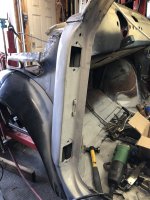
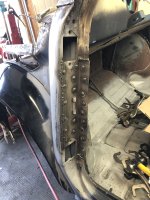
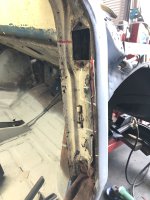
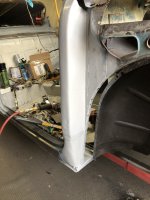
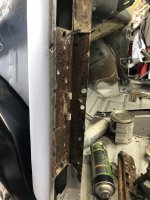
The car itself needs some TLC, and had been disassembled and partially sandblasted before "supposedly" its previous owner gave up on it. From my recollection, the car had not been on the road at all since it was brought in to Canada, and the engine had work done to it back in 92, more then likely back home in Italy. It is a bit of a basket case, as it has had some hackery done to it in its previous repairs. But its in safe hands now.


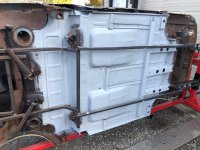
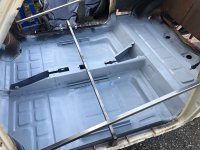
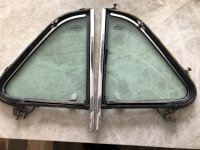
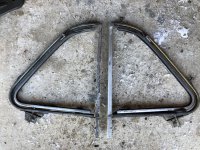
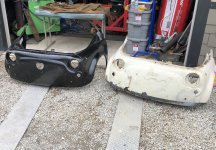
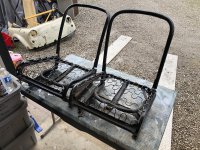
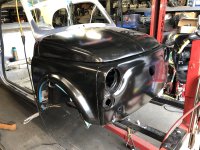
I am in the process of tallying all body panels needed (basically all lower panels, all fenders, all inner fenders, floor pans, etc the works. And slowly making a list of parts to order from the UK.

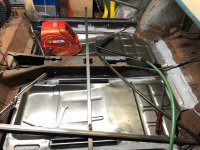
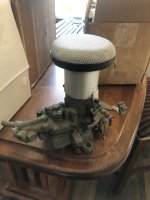
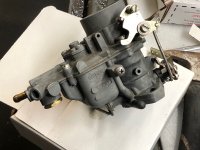
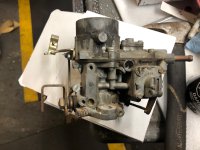
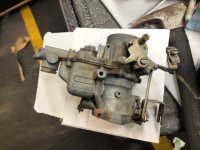
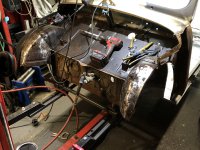
I couldn't wait to dig into the engine, and was able to clear a bench to start the tear-down process. The motor had a 540cc 70mm cylinder upgrade done to it in its past life, but had also seen some abuse. The cyl and pistons are in great shape, but the tappets and case cam holes need R&R, i ordered some C932 bronze stock, and will be machining insert sleeves for the cam. I plan to do some port/polishing and tweaking to this 540. I have forged 118mm connecting rods on their way as a "safety" insurance, for the fun it will see.


In a few years im planning a trip to Italy, family friends have a summer home just a hr away from D'Angelo Motori, and i will definitely be visiting them for some more spice to add. Coupled with a 650 block that im sure is much easier to find overseas then here in Canada. But in the mean time im going to enjoy the original 500/540 block to its full potential.

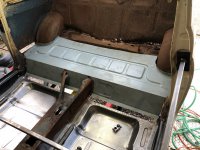
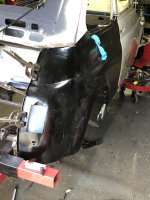
The car itself is an original F, someone had changed the front sheet metal in its early life. I will be restoring it back to its formal mustache glory. The car was originally "453 Medium Blue". I am leaning more towards keeping a blue, but going with more of an aqua marine shade. I have a paint sample "Frozen Blue K5J " from the 2018-2020 Porsche Taycan. Its a very mild metallic/pearl. So should still keep with the "solid/classic paint style" with some added depth. Again this hasn't been set in stone, and might change as i progress with the resto.
Alot has happened the past few weeks :D

First the CV joints... I began to fiddle with the joints I purchased and modified, yes these will technically work, however im not pleased with how they will work. Overall fitment is not ideal, the splines in the joint are just ever so slightly a tight fit. The peaks and valleys of the spine do not fit well onto the 500's drive shafts, either this is a problem with the brand of the shaft (Meyle supposed to be good), or a design issue where the "involute" of the splines are not a perfect match. For now its going to sit on the back burner. With that said, i had mentioned there was a Tripod style cv joint. I ended up tracking down the company in Poland that makes them. They manufacture them in small batches, but they had just completed a set and i snatched one up. I can share details once it arrives. (y)

The car!
Well, the past week we have had fantastic weather, and it had given me the motivation to jump into the metal work on the 500, hoping to get the hard stuff done before the car gets stored for the winter. I have made some insane progress.


To make the overall restoration slightly easier/comfortable and to help keep the car square and straight, a rotisserie was definitely the only way to do it. Scored a deal on one, and began to fab up the frame mounting jig to hold the car to the rotisserie. Once that was set, the fun began. To keep the car as structurally square as possible, i spent a bit of time figuring out my plan of attack, and how i wanted to do the overall panel replacements. It came down to, doing the interior bits first, then doing the exterior parts after. The rockers, floor pan, rear seat pan, and bits add alot of structural rigidity to the car. I was anxious and excited to see how the full size 126 floor pan would fit into the 500 with/or without modifications. A fully new floor pan in a 500 would be a dream.

I'll save everyone the details, but day after day, night after night i cut out all the old cancer from the car. And grafted in the new. Starting with tacking in the inner rockers, then the floor pan. The floor pan fits fantastic! with a slight modification, it fits great, and adds a significant amount of reinforcement that the 500 never had, especially at the front cross member. its slightly shorter then the original 500 pan, but a filler strip will need to be added between the rear seat pan and floor pan, not a big deal imo Folks bite the bullet and do the whole pan if your already planning to do left and right side.

The center tunnel was left connected to the rear seat pan, to help hold alignment, and all the spot welds were drilled connecting it to the center pan section. I am now working away on replacing the rear seat pan as it was severely "swiss'ed". Some of the "reproduction" parts are not the best fit, or different from the original mounting style.. But cant win everything on a 50+ yr old italian car.

I added supports and alignment plates on the frame jig to locate the rear swing arm mounts as they had to be removed from the old seat pan. Took me a few hrs to remove the 3 layers of sheet metal that were spot welded to them. But they made it out in one pc :worship:


After welding in the joints (some spot welded, some rosette welds), ive sprayed in some high zinc content paint to act as a corrosion barrier. Even though the whole car is going to get a good epoxy primer once done, adding the zinc paint helps in the lap joints where the epoxy probably wont get into. Corrosion protection that these cars wish they had back in the day lol.


I have many many more photos, but these give the overall jist of it. I really wish someone hadn't had sandblasted the undercarriage and they didn't coat it with something. Lots of surface rust to naturalize. Luckily anything w thru holes i have new panels to replace it with.

The first photo you can see how the 126 pan fits onto the 500. The 3 braces fit perfectly against the front spring cross member. This will add loads of structural rigidity to the front of the car, especially the center rib, that coincides perfectly to the shape of the center tunnel, adding a decent reinforcement tie-in down the center of the car.
 

Attachments

  • IMG_5382.JPG
    IMG_5382.JPG
    332.4 KB · Views: 117
  • IMG_5401.JPG
    IMG_5401.JPG
    335.2 KB · Views: 123
  • IMG_5421.JPG
    IMG_5421.JPG
    389.5 KB · Views: 119
  • IMG_5433.JPG
    IMG_5433.JPG
    336.6 KB · Views: 122
Last edited:
This past week, things are getting closer to where i would like before i store it for the winter. I hate not having the heat installed in the shop yet for this year :bang:

I was able to massage the rear seat pan in, im not overall thrilled by its fitment. And will require some small sheet metal spacer to finish up around the fender shells, and in the inner side panel sills. I have to finish up my metal shear and brake project (a whole other story), in the spring so i can begin fabbing up the more technical sheet metal parts. (fender and side spacers, rear-front control arm reinforcement plates on the front seat pan)...


But its welded in, and i was able to also sandwich the filler strip for the length issue between the 126 floor pan and rear seat section. Everything aligned up perfectly, the center tunnel is now fully secured and all the joints are treated with the zinc spray. The way the joints were layered from the factory, and the way i am doing it during this resto is critical. They need to be layered in a way so that the open edges of the flanges on the bottom exterior, face towards the back of the car. This helps prevent water ingress between the flange face as the car is moving forward. Obviously all the seams are going to get sealer, but its a general design concept, and fiat did this as much as they could with the clever design of this car. There is one exception i couldnt re-design, how the rear seat pan sits on the rear spring perch. The material was badly corroded there, and it took some finessing to get to sold metal. I had no choice but to place the pan ontop of the perch and secure it in. I will take great care in this area when applying primer and seam sealers. Its not like this car will ever see much rain but you never know.

Thruout all of this, i can really hear the difference in the overall structure of the car. The odd bang or smack into it the tone of the sheet metal definitely has a more rigid sound.


One suggestion to anyone doing panel repair, get yourself a bunch of those copper coloured "cleco fasteners" i have been using them thru out this resto, and they work better then expected. I still use long throat clamps for hard to reach area and/or where i plan to weld panels together, but they help alot with getting the troublesome thin gauge floppy panels where they belong. More so, when nearly replacing over 1/2 the car like i am doing.

Doing this "one panel at a time" method has kept the car relatively square and true during all of this. After finishing the pan, i rechecked all my referenced body shell dimensions i had taken before cutting into this.. Everything is still within a 1/16". I couldnt ask for more. The door fitment was perfect before, im doing my best to keep it that way lol.
 

Attachments

  • IMG_5469.JPG
    IMG_5469.JPG
    417.1 KB · Views: 101
  • IMG_5470.jpg
    IMG_5470.jpg
    331.1 KB · Views: 108
Last edited:
I've just read all the way through, looks like it's going to be a seriously well sorted car when it's done! Some proper engineering gone into that engine.

It's a lovely feeling isn't it, when the new metal starts going back into the shell and it starts to feel properly solid and strong again. Shame about the surface rust from the sand blasting, at least you've caught it now, before it turns into something more serious. I can attest to how well the high zinc weld through primer works, I've used it on many projects over the years.
 
Thanks, trust me i have a goal for the car to be on the road mid next summer, i just dont want to rush it. It all depends on my schedule, but i really want to enjoy it at least for a couple rides next year. 2022, there is plans of starting up the "Italian Car day" which is one of the largest Italian car shows in Canada so i do plan to have this there.


Update time ;)

I have stopped the metalwork for now, weather is gettin chilly, and i have alot of prep to do and get things ready for the winter lockdown. A large order arrived last week with the rest of all the parts i needed. I only have a small list of bits&pcs i might need once i begin assembling the car. I ordered a chrome metal 3pc badge for the front, what an absolute pc of art, definitely a stunning addition to the car once my little pepperoni is done.

I got the bug to begin restoring the gauge cluster and other interior tidbits. The glass for the rear-view mirror was completely de-laminated, i was able to source a replacement. I wanted to restore the gauge cluster, mirror, and wheel to a ivory colour. They were originally grey, but i was never a fan of it, iirc early cars were ivory??.. Went down to the paint shop and began snooping thru their colour chips. Found a code that i liked, once it was mixed i checked the label and by coincidence it was called fiat white, fate i supposed.

The original cluster was rough, heavily faded and worn. I pulled the entire cluster apart, and began cleaning the insides, there was some mold growing on the internal gauge face, i was able to clean up 99% of it without damaging the silk screen. The plastic was in good shape and just needed a polish, a new chrome ring was needed, the old was badly pitted. Sand, filler, prep, prime paint. Im overjoyed by the outcome of the cluster.. Next was cluster lighting. When i drove my friends 500, i did a decent amount of driving in night, and remembered how pathetic the gauge lighting was. I am a bit of a fanatic when it comes to lighting and led's in general when done correctly. I have a long history with them, this was going to be one of those projects. Im on version 4 of the backlighting, i have some 4300k and 3000k high CRI leds on their way, but im liking the outcome. I might do a fresh design on a fit in flexible PCB and offer it as a group buy on the forum. Thing is its an overall expensive part (small batch local made pcb's and SMD component assembly) and i dont think many folks would be willing to go down this route. I do plan to add dimming capability to it. Just a feeler.

Led cabin lighting is next on the to do list, and will require some work inside the rear mirror.


Cluster is now readable! the odo lighting isnt as bright as it might seem in the photo, these were my test photos experimenting with different intensities.

I also got an earlier style column, and painted it to match. The look of the chrome lever and such i think is more fitting of the car then the original plastic style (which was broken on mine).

Right now im restoring the wheel, ill have a full writeup once im done.
 

Attachments

  • cluster4.jpeg
    cluster4.jpeg
    204.3 KB · Views: 85
  • cluster3.jpeg
    cluster3.jpeg
    109.5 KB · Views: 84
  • cluster2.jpeg
    cluster2.jpeg
    46.7 KB · Views: 75
  • cluster1.jpeg
    cluster1.jpeg
    149.5 KB · Views: 81
Last edited:
With the cold settling in, work on the car's shell has slowed down. Today we finally had a decent last day with temps in the double digits, and i was ready. Some final surface grinding of the center tunnel and prep. Then the whole floor pan top and bottom got cleaned up with grease and wax remover. A good coat of 2K epoxy primer to protect the fresh pan. I am finally relived. I knew if i went thru the winter with just the "stamping" oils on the floor pan, it was definitely going to grow some surface rust during the temp and humidity swings we get during our winters. Even with it in the garage.

I still need to weld in the seatbelt attachment inserts, rear swingarm inner support plates, and do some sheet metal repair on the front of the center tunnel, but those can be sanded, and spot sprayed with new epoxy primer when the time comes.

Other then that, I spent some time checking fitment of a 126 steering rack unit, and how/if any modifications are needed to fit the front swingarm coilover kit. I determined i will need to slightly trim and "re-box" 2 of the new floor pan support ribs to allow the swing arm side nuts to be accessible. Not a big deal. A small sheet metal job in the spring.


My indoor time as been basically spend finishing the steering wheel repairs (sand and prime). As well as planning the wintertime task of the interior work for all the seat covers and door cards. I had a silly inclination and wanted to go crazy and do leather interior on the 500 on a whim. I mean, why not. the poor fiat was a bottom of the barrel price eco box which came with basic vinyl seat coverings, why not tastefully jazz it up with some Gucci-Armani-Versace "Milan" style materials. lol

For curiosity sake I thought i would wander in to a local leather supplier just to snoop around, they sometimes have some neat offcuts or swatch samples to get the imagination going... Well around the first corner; the perfect match was sitting there waiting for me.:devil: It matched the carpet perfectly, "i must have it!" was my only justification. :D
Never thought i would be walking out with all the leather for the seats and panels. With some rough calculations in hand, it would take about 4x 1/2 pelts to do the entire car (front and rear seats, door cards, rear side panels, knee pad, sun visors). They had 5 from the same lot batch, so i snatched them up. Honestly price wasn't too bad (had a special), and with availability issues on anything and everything this year, I grabbed it an ran. My mom has been doing sewing for many decades, especially heavy duty stuff like marine interiors and covers. She sure was thrilled I threw a new project her way, but was honestly easy to convince for this one. ;)


Im sure at some point ill realize how this project went from a simple 1 to 11 very quicky. lol
 

Attachments

  • IMG_5790.JPG
    IMG_5790.JPG
    830.9 KB · Views: 81
  • IMG_5793.JPG
    IMG_5793.JPG
    681.4 KB · Views: 80
  • intleather parrot.jpg
    intleather parrot.jpg
    321.1 KB · Views: 73
Last edited:
Small update today.

Finally got to finishing the steering wheel. This one was a bit of a challenge, but turned out great. The wheel was in bad condition, and was severely cracked. Looks like someone in the past had the bright ideal to use the wheel to push the car up a hill..
After some straightening of the hoop, the grinding began.
I ground a v-groove in all the cracks using a rotary tool and a carbide v-burr.
I then filled the cracks with a 3M product; 04240 - Semi-Rigid plastic repair urethane. To crate a permanent repair, the fact that the original plastic had been compromised, and will most likely contract and expand at those crack points in the future due to temperature changes. I thought that something that stayed mildly flexible, yet still a strong epoxy base would be ideal. I talked to a few CS reps at 3M and discussed my application, and to clarify this would work, they agreed it would.

I didnt fill the cracks completely to the top, even though it was hard to control using the gun applicator. After that the final filler i used was a 3M 05887 easy sand flex putty filler. Its a sand-able flexible finishing sealer.

After a few hours of sanding and sculpting the shape of the original wheel, 3 coats of 2k primer were applied, 3 coats of "fiat white" and 3 coats of 2k clear.

It sat for about a week for the layers to fully cure. All i have to do is some mild wetsanding and polishing and its ready for many new miles of road.

I saw the beautiful horn ring on a few 500 photos out in the wild, i thought it looked fantasic and was definetly a iconic design cue from the american cars of the mid century. I have something very special on its way to finalize the wheel and fabricate for the center horn cover.
 

Attachments

  • IMG_5933.jpg
    IMG_5933.jpg
    754.4 KB · Views: 77
  • IMG_5909.JPG
    IMG_5909.JPG
    353.3 KB · Views: 78
  • img_5908.jpeg
    img_5908.jpeg
    593.7 KB · Views: 70
  • IMG_5553.JPG
    IMG_5553.JPG
    701.7 KB · Views: 77
  • IMG_5551.JPG
    IMG_5551.JPG
    800.6 KB · Views: 75
Small update. Finally after waiting almost 2 months, my final parts order arrived, and among that was the center badge for my steering wheel project.

I wasn't too thrilled about the look and prices of the factory black horn button. I picked up the vintage style horn ring, and i couldn't bring myself to installing the simple black horn center. There are other alternatives out there, but none i could find had that original look and feel. Mostly everything was race or sport oriented. There needed to be a center piece to all this glitz and glam.

I quickly machined a center adapter out of aluminum, and was able to bolt the badge to the center, and press fit it into the horn ring. Some lengthy polishing of the aluminum to make it look like it was nearly chromed, and a quick coat of clear powder coat to lock in the shine was all that was needed. I honestly cant wait to showcase it in the car once I begin to rap it up.

The center texture and infill of the badge matches very closely to the metal badge for the front of the car. I couldnt be more pleased on how it all turned out. The before/after is a big change
 

Attachments

  • DSC_1630.jpg
    DSC_1630.jpg
    572.1 KB · Views: 80
  • DSC_1634.jpg
    DSC_1634.jpg
    406.3 KB · Views: 68
Finally the snow is melting, and i can finally get back to working on my little nugget.

I did some inner rear fender repairs. There was some bad spots in and around the spring perch, cut out all the bad, and welded in fresh new metal. More finessing is in order, but for now the new metal is in, and holding well, i wasnt able to save the original bump stop perches, new ones are on their way. Photos make it seem worst then it is, there is alot of surface rust on the bare metal from a neglected previous sandblast/forgotten project. it is all slowly being removed and treated.

The rear cross brace cover was also badly rotted on this car. This whole back area was pretty bad, and seems to be a recurring theme on F models.. I suspect its due to the fact that the F models had rubber floor mats and covers with a foam/padding backer which really holds in moisture if water was to ever get into the car. Vs L models which had carpet, and could breathe??.. Trapped moisture quickly accelerates rust, especially in this back area.
I had to make a new pan cover. This is also a good opportunity to treat and prime the metal hidden behind this cover, as well as welding in studs for rear seat belts, still left to do on another nice day.


On the off days, i was able to restore the 2 vent windows. Sadly my car was missing the passenger vent window, and tracking one down was not the easiest task. Took a few months to hunt one down and get it into my hands.
This is where i had my first encounter with poor aftermarket parts. I had ordered 2 window mount trims (inner), knowing that it would probably be best to replace them in the future before gluing in new glass. With the aftermarket beside the originals, the poor quality was honestly unacceptable. The chrome finish, as well as the metal gauge was not something i was going to put on this car. The original frames were tarnished, but luckily none had any serious rust or corrosion. After removing the glass, i spend a fair bit of time buffing and polishing the chrome, to a near new finish. Alot can be said for decent chrome quality of products back in the day. even when they were destined for the economy market.

New seals, new glass, they look good as new. Just awaiting new locking handles as it turns out i have a mismatched pair between year revisions.

Last but not least, i got my hands on one of those Weber ICH 34 carbs, it might be way overkill for my current 540cc engine, but its something i will test with once the engine is finally assembled.
 

Attachments

  • IMG_7057.JPG
    IMG_7057.JPG
    444.7 KB · Views: 70
  • IMG_7009.JPG
    IMG_7009.JPG
    703.5 KB · Views: 74
  • IMG_6927.JPG
    IMG_6927.JPG
    796.2 KB · Views: 72
  • IMG_6746.JPG
    IMG_6746.JPG
    551.5 KB · Views: 73
  • IMG_5507.JPG
    IMG_5507.JPG
    523.8 KB · Views: 70
  • IMG_6705.JPG
    IMG_6705.JPG
    1.3 MB · Views: 73
  • IMG_7003.JPG
    IMG_7003.JPG
    824.8 KB · Views: 71
Finally the snow is melting, and i can finally get back to working on my little nugget.

I did some inner rear fender repairs. There was some bad spots in and around the spring perch, cut out all the bad, and welded in fresh new metal. More finessing is in order, but for now the new metal is in, and holding well, i wasnt able to save the original bump stop perches, new ones are on their way. Photos make it seem worst then it is, there is alot of surface rust on the bare metal from a neglected previous sandblast/forgotten project. it is all slowly being removed and treated.

The rear cross brace cover was also badly rotted on this car. This whole back area was pretty bad, and seems to be a recurring theme on F models.. I suspect its due to the fact that the F models had rubber floor mats and covers with a foam/padding backer which really holds in moisture if water was to ever get into the car. Vs L models which had carpet, and could breathe??.. Trapped moisture quickly accelerates rust, especially in this back area.
I had to make a new pan cover. This is also a good opportunity to treat and prime the metal hidden behind this cover, as well as welding in studs for rear seat belts, still left to do on another nice day.


On the off days, i was able to restore the 2 vent windows. Sadly my car was missing the passenger vent window, and tracking one down was not the easiest task. Took a few months to hunt one down and get it into my hands.
This is where i had my first encounter with poor aftermarket parts. I had ordered 2 window mount trims (inner), knowing that it would probably be best to replace them in the future before gluing in new glass. With the aftermarket beside the originals, the poor quality was honestly unacceptable. The chrome finish, as well as the metal gauge was not something i was going to put on this car. The original frames were tarnished, but luckily none had any serious rust or corrosion. After removing the glass, i spend a fair bit of time buffing and polishing the chrome, to a near new finish. Alot can be said for decent chrome quality of products back in the day. even when they were destined for the economy market.

New seals, new glass, they look good as new. Just awaiting new locking handles as it turns out i have a mismatched pair between year revisions.

Last but not least, i got my hands on one of those Weber ICH 34 carbs, it might be way overkill for my current 540cc engine, but its something i will test with once the engine is finally assembled.
Hi Jacques; I am fitting a 34 ICH onto my '695' engine---it is basically the Weber equivalent of the Solex 34PBIC that Abarth fitted on both the 595SS and the 695SS models. I have also been able to find a different version of the choke operating linkage, so that works in exactly the same direction and manner as it does on the (original) IMB carb. By hunting for 2nd hand ICH carbs, I have been able to find this linkage--it just fits straight on, the only 'modification' that has to be done is to drill and tap the little casting on the side of the carb for the choke cable to fit in---same as on the IMB carbs. Do you want me to try and find one of these linkages for you---I can send you a picture of what they look like if you so wish.
 
Hey Tom, ive attached photos of my carbs, i snatched up 2 during my online hunting. Please let me know if these already have what your talking about?. If not. a picture tells a thousand words. I would appreciate it.

Thanks
 

Attachments

  • image0.jpeg
    image0.jpeg
    541.1 KB · Views: 66
  • image1.jpeg
    image1.jpeg
    553.4 KB · Views: 64
  • image2.jpeg
    image2.jpeg
    676.9 KB · Views: 63
  • image3.jpeg
    image3.jpeg
    667.4 KB · Views: 65
Hey Tom, ive attached photos of my carbs, i snatched up 2 during my online hunting. Please let me know if these already have what your talking about?. If not. a picture tells a thousand words. I would appreciate it.

Thanks
Hi Jacques;
Looking at your pictures, you have the 'normal' ICH' choke arrangement, where the choke cable comes into the carb on a little 'supporter' and the cable pulls the choke linkage backwards from the top. On the version that I have been able to find. the cable is held in the little casting that has the 'Phililps' screw in it (picture 1) and the choke is worked by pulling at the bottom of the operating linkage forwards---exactly as on the little IMB carb that is the standard on all the 500/126 engines. Having this 2nd variation of choke linkage makes for 'as per standard' choke operation. I will get my carb out tomorrow and take some photos of it for you. I would also get rid of that 'shut-off' idle jet, and put a normal jet in. I will let you know what jet I have in my carb,which is set-up for a 1300/1600cc VW (1/2 of 1300 is----650) where the normal set-up is to use 2 of these carbs, 1 for each bank of cylinders. When I measured the top of my carb, I realised that the diameter on my version of the carb is 2 inches, so I have fitted a short HS8 SU carb trumpet, complete with gauze. By taking off its mounting flange, the trumpet JUST fits on. I have had to go for the 'short' trumpet as there is not enough space above the carb to fit the 'long' trumet, even with a spacer fitted in the engine mount.
 
So, a small update.. Well kinda a bigger one, i plug away at the car as time permits, and progress builds up over a month.

Interior wise, i finally replaced the entire rear firewall. This was an interesting task. It really showed the lack of quality for aftermarket parts. The abit "expensive" rear firewall commonly available is a very poorly fitted and designed part. Absolutely no way would it be a drop in replacement into a 500. The flanges are way over sized, the overall dimension doesn't even match that of the original. I spend hrs planning and trying to decide how to fit it without hacking away the car. I dont know how someone could mfg such a part without any sort of "accuracy". so plan B. Luckily the flanges on the original firewall were still good so it was a slightly straight forward cut and graft method. overall it turned out decent. I don't have many photos of that experience. lol. The joys of

With the interior basically complete, it was time to take the plunge and begin the exterior work. I stared at the rear passenger fender planing my steps, and went for it. Again even though they are in poor condition, i am trying to save them somewhat to make a trailer. Obviously just for the cosmetic exterior shape, not structural. Some surgical cuts, and it was off. Nothin super scary behind, just some surface rust to be neutralized, nothing bad honestly. Now began the task of cleaning up the flange edges, and the daunting task of getting the new fender panel to fit. Again, these aftermarket panels don't fit the best, but i was able to get it to a point that i could work with. Next was setting the lower flange height, and rebuilding the entire inner rear rocker (ahead of the wheel well, beside the rear seat). After some tweaks, it fit together well, a few filler pcs were required. The rear seat pan which mates to this, was also not the best fit. I start to wonder if these aftermarket parts were made to fit different revisions of cars, not knowing if early 70's 500's were built differently behind the skins. I got all the jack points fitted, and welded in.

So, one thing i wanted to resarch on, and possibly try is panel bonding the fender arches. It is a growing trend in the oem world, as epoxy technology has excelled and developed over the years. Folks would be surprised how many oems actually panel bond vs welding as a bonded panel has more contact surface area vs a spot weld, and can provide a much stronger seam. One direct experience i have is with the honda factory (civic and crv), they panel bond the roof panels and it provides a stronger panel vs spot welding and doesn't cause heat warpage and metallurgy changes. There are many very critical specs when doing oem and insurance panel repair for these types of cars, and the products and application methods are very specific for repairs of these types of panels. The benefit i see in regards to the 500 is, it would be much stronger fit then the oem spot welds, and it will provide a completely sealed joint for the inner fender arch and eliminate water ingress between the seams. The product i decided upon using is 3M 08115 panel bond. Its designed specifically for these types of application use and location. Im not saying glue the entire 500 together, but using modern products correctly can help keep it lasting longer. I prepped the surfaces, apply the bond, then positioned the panel, clamped and continued welding the panel to the car.

To replace the foam damping pad (vertical foam strip photo 2 and 4), once the panel was finished, a bead of 3M 08463 (flexible foam) was adheared to add to the body damping and noise reduction. I was surprised to see this used in a OEM application back in the 60's.

With the rear left side basically complete, time to move on to the right hand rear.
 

Attachments

  • IMG_7400 - Copy.JPG
    IMG_7400 - Copy.JPG
    702 KB · Views: 77
  • IMG_7360 - Copy.JPG
    IMG_7360 - Copy.JPG
    604.5 KB · Views: 78
  • IMG_7330 - Copy.JPG
    IMG_7330 - Copy.JPG
    640.1 KB · Views: 80
  • IMG_7235 - Copy.JPG
    IMG_7235 - Copy.JPG
    888.8 KB · Views: 79
  • IMG_7233 - Copy.JPG
    IMG_7233 - Copy.JPG
    744.7 KB · Views: 80
Last edited:
The panel bonding stuff is definitely interesting. It’s not something I know a lot about, but I presume the surface prep of the metal panels themselves must be perfect or it might not adhere so well?

Does it also require very accurately fitting panels where the seams are consistently closely aligned to keep the thickness of the sealant down to a minimum? It would be a lot of work to get aftermarket repair panels down to that level of tolerance?

I’m not trying to put the idea down, I’m just interested about the challenges!
 
Yes the surface prep is critical. The 3m data sheet lays out all the requirements for application. One of the important parts is surface prep. They recommend contact surfaces be prepped with 36-50 grit surface to add to the bite of the product.

I did a fair bit of research before planning this method. Again ive seen it used in oem applications, and obviously this wasnt a product that existed back in the 60's. But when used correctly and to spec, its a great alternative. I wasn't looking forward to spot welding the inside of the fender lip (even though i built a welder for it), and then figuring out how to seal the seam where water would definitely ingress.

Now heres a neat tibit of info regarding these types of adhesives. Adhesive thickness plays a big role in overall panel strength, more specifically the "absolute minimum" thickness. Where having too thin of a bond contact can significantly reduce bond strength. This 3m product, and as im sure others are now doing (SEM also has a similar product). Have imbedded micro beads that prevent the panels from physically making contact and providing the minimum bond thickness. Kinda cool. Its impossible to see, but you can feel it in the mixed epoxy.

I dont have any photos of me doing the application, hands were kinda full. But i know for certian this is magnitudes stronger then the factory spot welds. I must say, some of the factory spot welds ive encountered have been borderline questionable. lol. But they held the car together for this long, so they worked.

The only spots i will be using this is for all 4 fender lips. Everything else will get traditional treatments.
 

Attachments

  • 3m-panel-bonding-adhesive-08115-technical-datasheet-en-eu_0820.pdf
    333.7 KB · Views: 44
Last edited:
Update time folks.

So, with the spring always being a super hectic time for me, i was able to find some alone time with the fiat here and there. And pick away at the project.

I finished fitting the right and left rear panels, as well as finished the replacement of all the left inner rear rocker fitment parts. Overall it went decently smoothly. I initially had an issue getting the door profile reveal to match the location of the aftermarket panel (the small body length crease), after a bunch of adjusting to no avail, a little voice in my head said to pull out the surface stripping grinder, sure enough nearly 1/4" of bondo on the darn door, after removing it alignment was much much better. What blew me away was that, there was no reason for it at all to begin with the door is not damaged or requires any repairs on the main face, looks like someone was too lazy back 20 years ago to spend time getting the door hinge just right.

Alot of work and time i spent making sure that everything fit as best as possible. These aftermarket panels are not the best, the stampings have soft blends and edges which really make it a pain to get alignment right on mating factory pcs. More so around the rear door pillar. The shape of the profiles was to my opinion not acceptable as a aftermarket part. There should me more accuracy in these stampings. Its honestly a joke. With that said, i was able to finesse, trim, adjust and weld to a decent fit. The door gap if left as is would not be acceptable to a level of restoration that i am envisioning this project to finalize to. Restoring a 500 without using a drop of filler is unfortunately a extremely unlikely outcome. When using these aftermarket panels, you have no choice when needing to finesse the finer details. I am going to look into traditional lead filler techniques to get the door gap absolutely perfect. Again the gap is not bad honestly, i spent a fair amount of time to get the panel darn close on both sides. But your at the mercy of 5 other points aligning up on the panel, and have to give/take a little on all fitment aspects. so many 500's ive seen that have absolutely wanky door fitment. Before i go any further getting the door adjusted and gaps fitted, i ordered all new hinge pins and bushings. this should help with getting initial alignment set, and being repeatable when the door comes off/on for painting and the like.

With all that said, its super nice to spin the car on the rotisserie, and see nice fresh rust free parts for nearly the entire bottom end of the car. What a journey so far.

I also wasnt thrilled with my first attempt at doing the lower rear window panel replacement, cut it out, and put in a new pc, with magnitudes better result.

Now the big leap, removing the front. After planning my incisions, like a skilled surgeon, off came the happy yet sad face of the fiat. This gave me great access to finally remove the last bits of the rocker, and get into inspecting the front door hinge pillars. As in typical fiat fashion, lots of hidden rust. Driver side wasn't too bad actually, just a few panels to repair, and once the rocker is in, a final tie-in and added reinforcements to the floor pan.
The passenger side, was definitely in need of some more extensive sheet metal repair. There would be no easy way to access this common corrosion spot without front fender and inner fender removal.
I decided to remove as much of the nonstructural metal, and treat the good material with orhtophosphoric acid. I had been using the loctite stuff for parts previously mentioned, but for the more extreme surface rust, and areas, the orthophosphoric acid seems to work wonders. Its not as fast to work with though (takes a few days to fully work, activate and dry to a primer ready finish). But a phosphate coating will work wonders in these hard to reach and coat places. Basically similar to modern e-coats that a classic fiat never dreamed of having. lol

To wrap thing up as of last weekend, i got the rockers fitted, and adjusted, then welded in. Again, im not thrilled with the quality of these parts, but honestly we have no choice basically any more. Finding all these parts in NOS fiat original panels i would assume to be darn near impossible. I just cant get why the mfg of these panels, cant do basic adjustments and really put some effort into making some 1/2 decent panels to purchase. I also find it very hard to believe that these parts came off of original yet worn dies. Some of the shapes/contours are not even close, nor would wear in those areas from original dies.

Wait till i go off on the rant about the rear inner window trim ring that i paid over 170£ which is one of the most useless parts ive purchased for the car. Absolute trash. I will be making my own prototype stamping die to re-create the inner lower radius pcs that actually have some form of resemblance to the original profile. Not some monkey with a hammer attempt.

But things are progressing... :)

Im super happy with how the side rear passenger window frames fit. I made a template before removing the original fenders, and got the shape absolutely perfect. The metal does have a slight wave to it due to the heat, but i was really able to smooth it out and get it darn close to a decent transition. It will all go away and smooth out with the final application and sanding of the high build primers. Highly unlikely those areas will need any filler or glaze to smooth out the transition.

Im also planning the re-inforcement for the front a-arm suspension system with coilovers, i have a pretty cool plan to strenghthen up the inner front fenders to accept coil over shocks.
 

Attachments

  • IMG_7450.JPG
    IMG_7450.JPG
    396.8 KB · Views: 70
  • IMG_7452.JPG
    IMG_7452.JPG
    487.4 KB · Views: 72
  • IMG_7453.JPG
    IMG_7453.JPG
    455.8 KB · Views: 68
  • IMG_7473.JPG
    IMG_7473.JPG
    587 KB · Views: 70
  • IMG_7494.JPG
    IMG_7494.JPG
    625.4 KB · Views: 72
  • IMG_7495.JPG
    IMG_7495.JPG
    426.2 KB · Views: 70
  • IMG_7626.JPG
    IMG_7626.JPG
    666.4 KB · Views: 72
  • IMG_7627.JPG
    IMG_7627.JPG
    911 KB · Views: 70
  • IMG_7633.JPG
    IMG_7633.JPG
    794.4 KB · Views: 70
  • IMG_7634.JPG
    IMG_7634.JPG
    593.4 KB · Views: 75
  • IMG_7644.JPG
    IMG_7644.JPG
    693.6 KB · Views: 71
  • IMG_7732.JPG
    IMG_7732.JPG
    649.6 KB · Views: 72
  • IMG_7664.JPG
    IMG_7664.JPG
    688.8 KB · Views: 80
  • IMG_7717.JPG
    IMG_7717.JPG
    340.2 KB · Views: 72
Last edited:
It's coming along well! It's a scary step cutting the front off...

The filler in the door is so annoying. I've been there several times before with cars with poor panel gaps only to find the problem is just a covering in filler for no apparent reason. The old fashioned 'bash the panel down to make room for the filler' approach is the worst though. Just makes a small rust repair into a whole panel replacement job sometimes.

Working with lead is a whole other skill set! Fair play if it's something you can pick up. I think the idea of generally getting my home shed covered in bits of lead dust and filings scares me a bit, haha.

I'll be interested to see your plans for reinforcement for the coil overs. I've heard (read!) it mentioned various places that some reinforcement is necessary but I've not seen what approaches people take.
Whose coil-over units are you using Jacques? I have GAZ units, built in England (in Basildon, just outside Southend, in Essex)--great service and help from the Company. The units are designed for the 126, but also fit the 500 perfectly. I had to fit 126 inner wings which look stronger than the 500, so all I have done is fit a D'angelo cross-brace---as you will see shortly! One thing that you must be careful about is spring "settlement"----they settle a lot more than you think they will; gave me a few heart-stopping moments! so start with them looking far too high--they WILL settle.
 
Whose coil-over units are you using Jacques?
Thats a good question, its from the front suspension a-arm kit that axel gerstl sells. Luckily i was able to snatch it up before prices went crazy. Ill have to look at it more closely and see if its branded. I did partially dissasemble them somewhat, they look to be decent build quality, overall machinging and fit are very good. and the shock portion looks like its rebuildable if needed.

For the rears however, i decided to not go the coil over shock/spring unit route as we discussed a while back. I got a set of the "logotech" (supposedly german made) progressive lowering springs, and a pair of spax adjustable shocks for lowered applications. I would hope the car will handle well and have a nice lowered look. Im more then certain ill have to make some shims to get the overall setup just right in the rear. luckily the fronts are adjustable once they settle in. These with the 126 steering rack in the front, this car is going to be a fun little street menace.
 

Attachments

  • 9e2a0c5e8f8251c2dfaabf383ecb3411.jpg
    9e2a0c5e8f8251c2dfaabf383ecb3411.jpg
    71.7 KB · Views: 53
  • 23494.jpg
    23494.jpg
    297.1 KB · Views: 59
Well the past few weeks have been quite eventful ;)
With work keeping me busy, a quick trip, and any free time dedicated to the fiat. its been busy to say the least.

To start off, i finished seam sealing the inside of the inner rockers, and began to fit the outer rockers. I wanted to get this done asap so i can re-fit the doors and begin checking and finessing door gaps. Before fitting the doors i looked closer at the hinge pillar. I noticed some bubbling behind the metal, and this is a double layer area which could be very susceptible to corrosion between the sheets. Sure enough, i knew this was going to set me back a few additional days of work. I really wanted to get the front face fitted, but no area would be "un-turned" on this project.

Im glad i did, there was significant corrosion going on, and the front covering was extremely pitted and corroded. I cut out all the old, removed the rust and treated all surfaces with the phosphoric acid coating.. Then formed up new cover pcs. Although they were not identical to the originals with the small out-dent, its still magnitudes stronger. I also added some additional reinforcements from the thick hinge plate to the lower rocker and floor pan, these door pillars are much more sound then original.

I then finished off both hinge pillars by mating up the lower outer rocker around the pillar. This is not a seen part as it is covered up by the fender, so esthetics was not top priority, but i think it turned out pretty good. With those complete, i could finally weld in the inner/outer fender wells. Again, one of the reproductions fit well, the other, not so much.

Next finally was fitting the doors with gaskets to begin fine tuning door adjustment before fitting the front face... About that, i had literally over the past year ordered every part i could imagine i would need for this build. I swear i had ordered a roll of door seals, but could not find them. Thankfully, just a few days later I was visiting the UK for a week. I was grateful for Tom helping me track down the seals in my short time frame. It was a fantastic trip, got to meet a few 500 enthusiasts and stock up on some 500 parts. If you thought i was joking, im not. This was a 50/50 fiat part scouting trip/visiting some old & new friends trip. I got to meet Tom, and had an absolutely fantastic time talking cars and mods. Seeing the fantastic countryside, and going for a ride in his little rocket 500. Definitely gave me the motivational boost to keep on plugging away on my little fun nugget.

When i returned back with suitcases full of goodies, it was full steam ahead on the car. After a day of selective language and banging around in the garage, i finally had the front face fitted, and was very happy with its fitment. Some final massaging is still needed, but overall once i fitted the hood the gaps are pretty decent without any adjustments yet. Finally a ray of sunshine from these aftermarket panels. There was a point during that time i was fitting the front, that i was close to calling it quits..:cry: I know.:ROFLMAO:
I also was able to source a 2nd reclining seat frame. The F models only coming with one reclining seat, it would be nice to have passenger side reclining also for comfort. With some selective rivet drilling i was able to fit an entire seat into my luggage, and spent 1/2 a day re-assembling and priming the frames for their new upholstery journey.

Now im back to doing the small detail things. I still need to cut and fit the rear center tunnel thru panel (where the clutch cables, e-brake cables and the like run thru the rear floor pan. Then continue down the "to-do" list.
 

Attachments

  • IMG_8054.JPG
    IMG_8054.JPG
    1.1 MB · Views: 71
  • IMG_8036.JPG
    IMG_8036.JPG
    668 KB · Views: 73
  • IMG_7806.JPG
    IMG_7806.JPG
    508.2 KB · Views: 72
  • IMG_7805.JPG
    IMG_7805.JPG
    566.3 KB · Views: 75
  • IMG_7803.JPG
    IMG_7803.JPG
    646 KB · Views: 71
  • IMG_7801.JPG
    IMG_7801.JPG
    692.4 KB · Views: 70
  • IMG_7783.JPG
    IMG_7783.JPG
    551.7 KB · Views: 66
  • IMG_7782.JPG
    IMG_7782.JPG
    662.5 KB · Views: 69
  • IMG_7768.JPG
    IMG_7768.JPG
    617.7 KB · Views: 70
  • IMG_7732.JPG
    IMG_7732.JPG
    655 KB · Views: 71
  • IMG_7634.JPG
    IMG_7634.JPG
    1.6 MB · Views: 77
  • IMG_8075.JPG
    IMG_8075.JPG
    1.1 MB · Views: 76
Last edited:
Back
Top