

You are using an out of date browser. It may not display this or other websites correctly.
You should upgrade or use an alternative browser.
You should upgrade or use an alternative browser.
Technical Well, that explains the rattle...
- Thread starter JumpJet
- Start date
Currently reading:
Technical Well, that explains the rattle...

the hobbler
Distinguished member
- Joined
- Jul 25, 2012
- Messages
- 4,069
- Points
- 1,011
I really don't know whether it is the power enhancement that causes this problem, or the crap quality of 'pattern' parts. I have a 659cc TUNED 126 engine in the back of my car with the original (factory!) fan, and never had a moment's problem. You are not the first person to suffer this. When you look at the design of the fan's drive, the AMOUNT of power shouldn't make any difference, but maybe the RATE at which that power is being applied, which makes the difference and the increase in wear. I may have a spare fan in my 'parts dept', so before you fit an aluminium fan, let me look in the workshop tommorrow and see what I have got. I will contact you direct Matt.
Argh???
Guess the old stock fan couldn’t handle the new power. Upgrade? Is the aluminum one the de facto improvement? Removing it without pulling the engine wasn’t fun, so I want to do this right (and only once).
Hi Matt, funny that you have just had the exact same problem as I have - and yes it did rattle (a lot!) when worn. I did have to fit my fan using spacers and I wonder if that has somehow contributed to the cause, or maybe as Tom says it's down to to c**p parts !!!!
")
My hybrid engine has over 50% more power than standard and maybe the fan material cannot take spirited use over time ??? Anyway a replacement part has been fitted (thanks Tom) I just hope that it lasts
Just a thought, but my 'Hotter' engine is using an alloy Fan and no problems - yet
Ian.
Attachments

OP
OP
Ian,
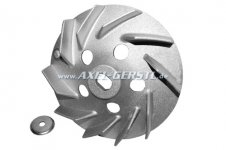
Oof. Either yours went quickly or I caught mine early. I've had the rattle for a little while, but in the back of my mind I suspected something about the fan assembly, I kept putting it off because I knew I didn't want to tear into it again. When you say 'alloy' fan, do you mean the cast aluminum one or a stock pattern design?
After researching the Italian forums, it seems the reinforced and balanced stock pattern fans are preferred, so I'm leaning that way, but shipping to the US is a bear. The aluminum one is readily available here, but not the uprated stock design. Either way, I'll likely try to weld a patch hub on the old one as a spare.
the hobbler
Distinguished member
- Joined
- Jul 25, 2012
- Messages
- 4,069
- Points
- 1,011
Hi Matt; when we say alloy on this side of the big pond, we mean the aluminium version---the basic, standard versions are made of steel. I sent you an e-mail suggesting a possible, and more economical, method of repair which might just also give you a much stronger centre to the fan. Your comments would indicate that you are thinking along the same lines. If that repair works, use that fan, it is bound to be stronger than any 'pattern' part
OP
OP
Hi Matt; when we say alloy on this side of the big pond, we mean the aluminium version---the basic, standard versions are made of steel. I sent you an e-mail suggesting a possible, and more economical, method of repair which might just also give you a much stronger centre to the fan. Your comments would indicate that you are thinking along the same lines. If that repair works, use that fan, it is bound to be stronger than any 'pattern' part
Tom, thank you for the email. I was going to respond directly, but yes, I think I'll take your advice for a reinforced mount. If nothing else, I'll order a new one and reinforce the old as a spare so I have time to sort out the repair and check the balance.
Tom, thank you for the email. I was going to respond directly, but yes, I think I'll take your advice for a reinforced mount. If nothing else, I'll order a new one and reinforce the old as a spare so I have time to sort out the repair and check the balance.
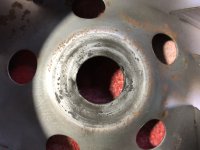
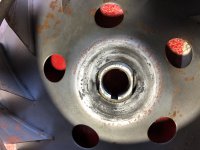
Hi Matt, can you please keep me informed re your mod/repair/reinforcement of your fan wheel, I am considering much the same. My Alloy fan is the same as in the lower pic.
Ian.
Attachments
OP
OP
Hi Matt, can you please keep me informed re your mod/repair/reinforcement of your fan wheel, I am considering much the same. My Alloy fan is the same as in the lower pic.
Ian.
Ian,
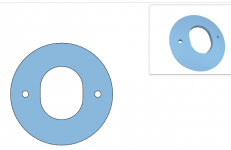
Will do. I drafted up the below spacer and am exploring getting a couple laser cut to play with. It's 0.135" thick (10ga), probably cold-rolled steel. I put two 3mm pilot holes in the design for either an index pin or a couple countersunk rivets to hold it while it's welded. We shall see.
I have the .SVG and .DXF file if anyone wants it and has access to the machinery, but it won't let me attach that format here. It's 48mm OD, the cutout is 25mm long and 20mm wide (flat to flat). It doesn't seem to look right when compared to the spacer - the flats seem more pronounced to me, but I measured it 3 times, so I think it's just an optical illusion.
Attachments
Last edited:
the hobbler
Distinguished member
- Joined
- Jul 25, 2012
- Messages
- 4,069
- Points
- 1,011
Very clever Matt---the advantages of modern technology! Don't forget, you will need to put the spacer on the NUT side of the fan---if you put it in the alternator side you might end up with a 'spacing' problem.
Very clever Matt---the advantages of modern technology! Don't forget, you will need to put the spacer on the NUT side of the fan---if you put it in the alternator side you might end up with a 'spacing' problem.
Hi Tom, I wonder if it would be better to just weld the shaft adaptor into the fan, but balancing would be a question to answer I suppose ???
Ian.
OP
OP
Hi Tom, I wonder if it would be better to just weld the shaft adaptor into the fan, but balancing would be a question to answer I suppose ???
Ian.
Ian, I'd considered that as well. It'd probably be pretty easy to balance, as I'd imagine it'd be easier to spin balance with a properly round hole. The issue that stopped me trying that is the likely difficulty in removing the fan. With the convex nature of the backside of the fan, it'd be near-impossible to get something in there to pry the collar off it necessary. If you cut some slots in the adapter's collar (clear of the fan itself, you may be able to get a puller in the grooves to pull it off.
Ian, I'd considered that as well. It'd probably be pretty easy to balance, as I'd imagine it'd be easier to spin balance with a properly round hole. The issue that stopped me trying that is the likely difficulty in removing the fan. With the convex nature of the backside of the fan, it'd be near-impossible to get something in there to pry the collar off it necessary. If you cut some slots in the adapter's collar (clear of the fan itself, you may be able to get a puller in the grooves to pull it off.
Hi Matt, I agree that a welded adaptor would be simple to balance, but I think that if I were to weld it all I would try to complete both sides of the fan neatly and not worry about trying to salvage the adaptor if things go wrong!! A bit of a risk I know. It may be better to just replace the fan anyway - it's only money!!
Ian.
OP
OP
The more I think about it, the more I'm considering modifying that patch plate I drew and countersink it. Then, drill corresponding holes in the adapter plate itself and thread them and screw through the patch and fan and into the adapter. That would give a little additional shear resistance and not affect the balance since they're directly opposed. It would save the welding and rebalance troubles.
the hobbler
Distinguished member
- Joined
- Jul 25, 2012
- Messages
- 4,069
- Points
- 1,011
The main reason that I can think of for NOT welding the fan to the shaft adapter is the disparity in metal thickness. The fan is a thin piece of steel---the adapter is a lump of steel, therefore the heat needed for the fan and the adapter will vary a great deal. Removeing the fan in the futire would also be a major concern.
OP
OP
Hey guys.
Just to make sure: Did you use the rubber spacer (sorry, not sure if that is the correct English term). I think those are supposed to reduce the stress on the metal...
Cheers,
Rob
Rob,
They were installed... and I’m a little curious about their usefulness. I can’t see how they’d help at all. I feel like they’d impart flex into a system that’s ostensibly balanced. I feel like it’d be more likely to loosen and flex to some degree with them and am debating leaving them off when I reinstall it. Curious what everyone thinks.
Funny you mention this. I am tearing down and doing a full R&R on my engine, and the fan/cooling system is my next target. Ive been eying the cast aluminum fans, but have heard differing results on them. I have a spare new fan also; the original one on the motor looks pretty out of balance, and i dont feel comfortable enduring it to some higher rpm stress.
In a few weeks ill be tearing down the fan assembly and ill try and give my 2 cents to this. I have a full machine shop and would be down to testing your ideal. Im just considering if i should also order a aluminum fan and keep "just in-case".
Also does anyone have any photos or specs on what a "reinforced" fan actually entails. Ive look at how the original fan is assembled, and im not overly enthusiastic about the stamped fastening system used to hold the blades in, considering that some of us will be "spirited" in the rpm it will see.
OP
OP
Every ‘reinforced’ one I’ve seen have the tabs welded on both sides. That’s the only difference I’ve seen in that regard. I wish it had a beefed up flange to prevent the shear failures posted here, but nothing I’ve seen points to that. The aluminum one looks to have a pretty thick flange area though.
I suspected that they just welded the tabs. I have yet to discover on the web to see if that was exactly the case. Most of the sites that sell them, just use a stock photo.
Have you been able to find a balancing company in NA that would be willing to undertake such a small fan. Most of the balancing companies i have quickly searched up in Ontario only do larger industrial fan units.
As far as fastening the flange on, a rivnut, or peened rivet might do the trick. I agree that flange welding can warp the thin sheet metal. And you will more then likely have propagating fracture cracks from the weld points over time thru the center sheetmetal.
Last edited:
the hobbler
Distinguished member
- Joined
- Jul 25, 2012
- Messages
- 4,069
- Points
- 1,011
Here's a curved ball for you all----in this modern age of having the chassis of VERY quick cars glued together, has anybody given a thought to GLUING the strengthening piece to the fan?
Before the original FACTORY made fan is insulted too much, I have never seen an ORIGINAL fan strip out its centre! Abarth used a 'tin' fan on the factory built 595 and 695 variants and I can assure you, they were driven hard in the day---when they were built, people didn't buy them to have the car as part of a "collection" Look at all the record runs Abarth did with 500 engines---all with 'tin' fans.
The answer might be a combination of skills and materials; buy a modern 'tin' fan (or find an original scrapper), cut out the basic required shape internally, (but exact externally), glue it on to the 'nut' side of the fan and then very carefully finish off the shaping so that it a good firm fit on the adapter, using the shape already built into the fan as a guide. Wher the centre has already been striped out, I will concede using the fan as a guide would be difficult, but using the information Matt (jumpjet) has provided will help.