

Although I’ve been involved with Fiat 500’s for almost 40 years and I’ve been restoring and driving Murf since 2009, I haven’t ever needed to mess about with the steering box; in fact, I have always found the steering on my car to be very precise and the box does not leak oil, even after 50 years of usage. However, I have read quite a few messages on this forum which lay doubt on the “limitations” which the box places on steering precision; at least one owner has gone to the trouble of fitting a steering-rack as the box proved impossible to repair.
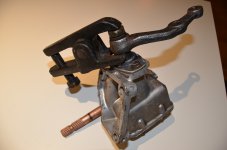
So, just for fun, having acquired a spare, clean-looking, RHD steering-box for not ridiculous money, I treated myself to the learning curve entailed in stripping and rebuilding the box. I have photographed the processes I went through by reconstructing the methods used once the hard work had been done and the box was ready for a rebuild.
The Haynes manual makes this sound easy and although I set out to prove that this is a straightforward job which should not deter anyone from attempting, there are some challenges which are brought about by a combination of the age of the components, the need for a good vice and a few bits and pieces of tools which not everyone will have access to.
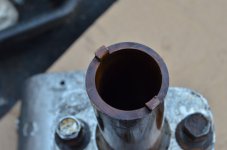
First you need to remove the drop-arm from its tapered, splined shaft. Once the nut is loose it’s standard practise to leave it at the end of the threads. This both protects those fine threads and prevents the arm from pinging off into your face or elsewhere, once you achieve what will shortly seem impossible to do. I used a very heavy-duty ball-joint splitter, lots of heat from a blowtorch and lots of penetrating oil to do this. It was held really tight and I left it under tension overnight. It may be tempting to do the traditional thing and to whack the tool or the shaft, under tension with a heavy hammer, but avoid this because if you do, you may damage the precision gears inside.
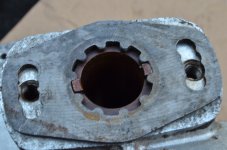
With the arm removed you can now take off the oval cover containing an oil seal, followed by the adjuster-plate and the “O”-ring under that. The large plate at the opposite side can now come off; you may then wish to free up the locknut which secures the adjuster for the end-float of the steering sector. The sector will then easily withdraw from the box, possibly needing a little help from a soft-faced hammer on the threaded end.
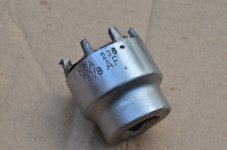
The part which I found most challenging was the removal of the “castle” or “crown” nut. It’s been discussed on the forum previously. The best solution I have seen was to commission the making of a removal tool. I have seen such an item listed on one website, but this was out of stock in any case. After trying several methods which were advised in various places, using lots of heat, lots of oil, lots of sweat and a small amount of blood, rather than just crying about it I made my own tool. With some polyester bodyfiller I made a rough casting of the internal pattern of the nut and transferred this to cut up an old ½”-drive socket using a Dremel and my angle-grinder. Even with this well-fitting tool, the nut would not budge. So the next move was to cut right across the diameter of the nut; this was mainly achieved by drilling a line of holes. Once this action had broken the tension of the nut, the offending item slowly began to move. I confess that my actions were not all done with 100% precision and some threads were damaged. But there is a good depth of thread and on replacement, the new nut was helped by using a threadlocking compound in addition to the split-pin.
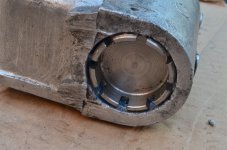
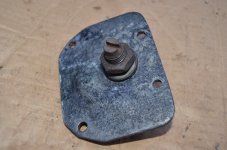
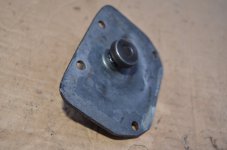
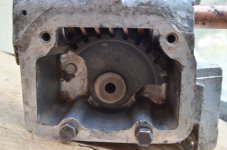
The spiral gear can now be tapped downwards and out through the castle-nut hole. The seal at the opposite end can be levered out and the bearing shell, which remains in the box, can be tapped inwards for removal using a small tapered or pin-punch; an access slot is machined into the aluminium.
Removal of the tapered races from the shaft is probably meant to be done with a proper extractor. You will see machined slots behind the bearings designed to allow a tool to fit behind. I found that a tapered punch, used with care, was sufficient to remove them.
It’s frequently said that the steering-box is prone to oil leakage; I’m not sure this needs to be the case. It’s possible to buy a gasket kit which includes the seals, but I used my favourite instant gasket product on the flanges of the cover-plates. I bought the 30202 bearings from eBay at a snip of the price they would have cost from a fiat dealer.
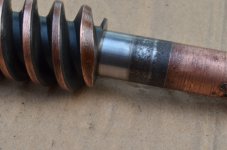
The spiral gear is made from copper and I presume this is because it is relatively easy to machine; it may also be because it is a more compliant and resilient metal. The shaft is chrome-plated on the gear-surfaces and where the bearings seat. I tapped the bearings home on the shaft using a tube which had just the right internal diameter. One outer shell is tapped from inside the box into the steering input end. Then the spiral gear is inserted and the second shell tapped in the castle-nut end. I used an appropriately sized socket to push the shell in far enough to approximately preload the bearings. The castle-nut is then screwed in to maintain this pre-load. No specification is given for this, but I tightened it as far as I could whilst ensuring a smooth turning action to the gear. To help this, the rollers and all other bearing surfaces were given a light coating of molybdenum grease during assembly.
The sector gear needs to be centralised with the spiral gear, but when the gears are the originals in the original box this is not necessary, so I placed the thrust-washer on the shaft, with the side with the relieved edge facing the gear. The offset bush is fitted in its tube with the lugs uppermost. If the shaft only slides in a part of the way because the gear-teeth aren’t properly aligned, you need to rotate the bush until the parts easily slide together. Then replace the cover with the four screws, remembering that two of them are shorter than the others as they have shallower tappings. The thrust screw needs inserting before fitting the plate and whilst fitting the plate, make sure the sector gear and its thrust washer are not disturbed. When the plate is secure you can nip up and lock in place the thrust-screw.
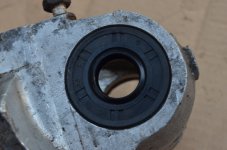
The notched adjuster plate is fitted with an “O”-ring beneath. The plate gives several choices of alignment with the two lugs on the bush. Loosely fit it in place and turn the steering input shaft from lock to lock. If it feels stiff at any point (probably at the extremities of movement) turn the plate to rotate the bush slight clockwise and re-check. If it feels very smooth, see if you can turn the bush anti-clockwise to reduce free-play without inducing any tightness. Trial and error will find the optimum position. At that point, having already inserted the seal, you can fit the cover-plate and secure through the notched locking plate. It pays to use masking-tape and a bit of grease over the splines of this and the sector-shaft before inserting through the seals. I noted that the running surfaces on the shafts in this box were micro-pitted, which might lead to a certain amount of oil-leakage.
Elsewhere I have read that it might be necessary to keep running through the various adjustments to get things perfected. But as far as I can see, if you ever need to adjust the bearings then you need to fit new ones and there’s no real reason why the end-float of the sector should ever become loose. So, once those items are sorted, you only need ensure that the offset bush is correctly located.
I found that the steering action is very precise in the centre of its range, which is what really matters. There is a certain amount of slack as you reach the extremities, and this appears to be designed-in.
Having seen the action of the gears and the design of the box in detail, I would err towards following Fiat advice and using EP90 gear oil rather than any sort of liquid grease as is suggested by some people. There are simultaneous sliding and rotating forces acting on the gear surfaces and extreme pressure will apply.
Overall, this cleverly designed, mechanical device is very easy to reassemble but could be very tricky to disassemble. This one has been put back together with no intention of me ever being the one who will be inside there again, so all screws have been threadlocked against leakage and for security. I would recommend anyone to give this a try before embarking on the even more challenging task of fitting a steering-rack from a later car.
So, just for fun, having acquired a spare, clean-looking, RHD steering-box for not ridiculous money, I treated myself to the learning curve entailed in stripping and rebuilding the box. I have photographed the processes I went through by reconstructing the methods used once the hard work had been done and the box was ready for a rebuild.
The Haynes manual makes this sound easy and although I set out to prove that this is a straightforward job which should not deter anyone from attempting, there are some challenges which are brought about by a combination of the age of the components, the need for a good vice and a few bits and pieces of tools which not everyone will have access to.
First you need to remove the drop-arm from its tapered, splined shaft. Once the nut is loose it’s standard practise to leave it at the end of the threads. This both protects those fine threads and prevents the arm from pinging off into your face or elsewhere, once you achieve what will shortly seem impossible to do. I used a very heavy-duty ball-joint splitter, lots of heat from a blowtorch and lots of penetrating oil to do this. It was held really tight and I left it under tension overnight. It may be tempting to do the traditional thing and to whack the tool or the shaft, under tension with a heavy hammer, but avoid this because if you do, you may damage the precision gears inside.
With the arm removed you can now take off the oval cover containing an oil seal, followed by the adjuster-plate and the “O”-ring under that. The large plate at the opposite side can now come off; you may then wish to free up the locknut which secures the adjuster for the end-float of the steering sector. The sector will then easily withdraw from the box, possibly needing a little help from a soft-faced hammer on the threaded end.
The part which I found most challenging was the removal of the “castle” or “crown” nut. It’s been discussed on the forum previously. The best solution I have seen was to commission the making of a removal tool. I have seen such an item listed on one website, but this was out of stock in any case. After trying several methods which were advised in various places, using lots of heat, lots of oil, lots of sweat and a small amount of blood, rather than just crying about it I made my own tool. With some polyester bodyfiller I made a rough casting of the internal pattern of the nut and transferred this to cut up an old ½”-drive socket using a Dremel and my angle-grinder. Even with this well-fitting tool, the nut would not budge. So the next move was to cut right across the diameter of the nut; this was mainly achieved by drilling a line of holes. Once this action had broken the tension of the nut, the offending item slowly began to move. I confess that my actions were not all done with 100% precision and some threads were damaged. But there is a good depth of thread and on replacement, the new nut was helped by using a threadlocking compound in addition to the split-pin.
The spiral gear can now be tapped downwards and out through the castle-nut hole. The seal at the opposite end can be levered out and the bearing shell, which remains in the box, can be tapped inwards for removal using a small tapered or pin-punch; an access slot is machined into the aluminium.
Removal of the tapered races from the shaft is probably meant to be done with a proper extractor. You will see machined slots behind the bearings designed to allow a tool to fit behind. I found that a tapered punch, used with care, was sufficient to remove them.
It’s frequently said that the steering-box is prone to oil leakage; I’m not sure this needs to be the case. It’s possible to buy a gasket kit which includes the seals, but I used my favourite instant gasket product on the flanges of the cover-plates. I bought the 30202 bearings from eBay at a snip of the price they would have cost from a fiat dealer.
The spiral gear is made from copper and I presume this is because it is relatively easy to machine; it may also be because it is a more compliant and resilient metal. The shaft is chrome-plated on the gear-surfaces and where the bearings seat. I tapped the bearings home on the shaft using a tube which had just the right internal diameter. One outer shell is tapped from inside the box into the steering input end. Then the spiral gear is inserted and the second shell tapped in the castle-nut end. I used an appropriately sized socket to push the shell in far enough to approximately preload the bearings. The castle-nut is then screwed in to maintain this pre-load. No specification is given for this, but I tightened it as far as I could whilst ensuring a smooth turning action to the gear. To help this, the rollers and all other bearing surfaces were given a light coating of molybdenum grease during assembly.
The sector gear needs to be centralised with the spiral gear, but when the gears are the originals in the original box this is not necessary, so I placed the thrust-washer on the shaft, with the side with the relieved edge facing the gear. The offset bush is fitted in its tube with the lugs uppermost. If the shaft only slides in a part of the way because the gear-teeth aren’t properly aligned, you need to rotate the bush until the parts easily slide together. Then replace the cover with the four screws, remembering that two of them are shorter than the others as they have shallower tappings. The thrust screw needs inserting before fitting the plate and whilst fitting the plate, make sure the sector gear and its thrust washer are not disturbed. When the plate is secure you can nip up and lock in place the thrust-screw.
The notched adjuster plate is fitted with an “O”-ring beneath. The plate gives several choices of alignment with the two lugs on the bush. Loosely fit it in place and turn the steering input shaft from lock to lock. If it feels stiff at any point (probably at the extremities of movement) turn the plate to rotate the bush slight clockwise and re-check. If it feels very smooth, see if you can turn the bush anti-clockwise to reduce free-play without inducing any tightness. Trial and error will find the optimum position. At that point, having already inserted the seal, you can fit the cover-plate and secure through the notched locking plate. It pays to use masking-tape and a bit of grease over the splines of this and the sector-shaft before inserting through the seals. I noted that the running surfaces on the shafts in this box were micro-pitted, which might lead to a certain amount of oil-leakage.
Elsewhere I have read that it might be necessary to keep running through the various adjustments to get things perfected. But as far as I can see, if you ever need to adjust the bearings then you need to fit new ones and there’s no real reason why the end-float of the sector should ever become loose. So, once those items are sorted, you only need ensure that the offset bush is correctly located.
I found that the steering action is very precise in the centre of its range, which is what really matters. There is a certain amount of slack as you reach the extremities, and this appears to be designed-in.
Having seen the action of the gears and the design of the box in detail, I would err towards following Fiat advice and using EP90 gear oil rather than any sort of liquid grease as is suggested by some people. There are simultaneous sliding and rotating forces acting on the gear surfaces and extreme pressure will apply.
Overall, this cleverly designed, mechanical device is very easy to reassemble but could be very tricky to disassemble. This one has been put back together with no intention of me ever being the one who will be inside there again, so all screws have been threadlocked against leakage and for security. I would recommend anyone to give this a try before embarking on the even more challenging task of fitting a steering-rack from a later car.
Attachments
-
 NOV_0446.JPG3.8 MB · Views: 207
 -
 NOV_0451.JPG4.4 MB · Views: 76
 -
 NOV_0453.JPG4.3 MB · Views: 71
 -
 NOV_0454.JPG4.6 MB · Views: 72
 -
 NOV_0455.JPG4.8 MB · Views: 76
 -
 NOV_0459.JPG4 MB · Views: 74
 -
 NOV_0462.JPG4.4 MB · Views: 72
 -
 NOV_0471.JPG4.4 MB · Views: 65
 -
 NOV_0472.JPG3.9 MB · Views: 72
 -
 NOV_0474.JPG3.7 MB · Views: 90
 -
 NOV_0465.JPG4.5 MB · Views: 92
Last edited:
") ...it has the EP additives too. I would just be a bit concerned about lubrication getting to the top bearing as it's not very splashy.
...it has the EP additives too. I would just be a bit concerned about lubrication getting to the top bearing as it's not very splashy.