Technical Barrels/Pistons scoring. Salvageable?

Currently reading:
Technical Barrels/Pistons scoring. Salvageable?

JumpJet

Established member
Joined
Jan 11, 2015
Messages
398
Points
195
Location
Kansas City
As a winter COVID project, I'm tearing into my spare 500R motor with plans to rebuild it as a mildly-sporty 595 mill. With advice from thehobbler, I'm going to have the head skimmed and 34mm intake valves fitted and a 75/35 cam. I was hoping/planning to leave the barrels and bottom end alone, but tearing into it, I discovered some mild scoring wear. Pics are attached showing the worst barrel and both pistons. Is this normal wear on these? None of the barrel scoring is significant enough to catch a dental pick and I think it could easily be honed out.

With a little honing, do you think these pistons would suffice? Possibly some 73.9mm rings? I'm trying to avoid a money pit motor, but still gaining/keeping power and reliability.

Thoughts? Thanks in advance.
 

Attachments

  • IMG_3137.jpg
    IMG_3137.jpg
    317.3 KB · Views: 161
  • IMG_3136.jpg
    IMG_3136.jpg
    1.4 MB · Views: 92
If these engines are relatively well looked after the bottom will go on for a good mileage. Depending on use it is the top end may wear first although I know of one 594cc engine that went over 100,000miles with only following a normal servicing schedule. Scoring of the bores tends to be axial rather than radial. If you remove one of the piston rings and set it in one of the bores you can check the ring gap to test for wear with a feeler gauge. The tolerances are shown in the workshop manual. If worn then I would go for a light hone and new rings.if within tolerances a light hone and reassemble.
This is my home made honing tool, a folded sheet of wet or dry held in a shaft with small rods. Then run it in my electric drill.
 

Attachments

  • 8824B3B8-10A7-4A27-B4E1-571E0E100745.jpeg
    8824B3B8-10A7-4A27-B4E1-571E0E100745.jpeg
    1.5 MB · Views: 121
Like Dave, I don't think those marks are from the pistons or rings, but maybe from someone previous to you who manually tried to create some rudimentary honing? It's amazing how long the original honing marks will stay on a cylinder wall.

I've used pistons with similar scoring on them as long as they measured-up OK. Accurate measurements are the key thing to ensure that you have a good rebuild which leaves you without slight misgivings. That's not always possible for everyone, but I have only ever had a rebore when it was obvious that an old engine had seized and then corroded.

This is a link to the before and after of my 594 with a few minutes with a honing tool.

https://www.fiatforum.com/500-classic/479180-594-engine-rebuild-2.html?p=4523169
 
Last edited:
I would be tempted to give the bores a good clean and a light hone---give the pistons a good clean and then measure both the bore and the pistons in order to ascertain what the piston/bore clearance is. On the '595'engine it should be:--between 2.8thou and 3.5thou (0.070mm to 0.090mm)---this is measured 2-1/2ins (57.15mm) down from crown of piston. On post 1974 engines,the clearance went up to between 3.1thou and 3.9thou (0.08mm to 0.100mm). If the piston/bore clearance is within those tolerances put it all back together with new piston-rings.
 
Just had a quick look 'on-line'--if the bores are too scored to use with the old pistons, Axel Gerstl in Germany has 0.6mm oversize pistons (part number:-01224/2) listed and, there is a pair of oversize (by 1mm/40thou) 595 pistons available on e-bay, number:--252459616516. If you needed either of these to get you out of trouble,getthe pistons and THEN get the machine shop to re-bore the barrels to match the pistons with the appropriare clearance.
As I have mentioned before, in the US of A it might be easier to get a bike shop to rebore the Fiat barrels.
 
I'm a little out of my depth here in that I don't have in depth knowledge of the 500 - I did help my friend look after his back in the early '70's but we never had the engine in pieces. Remember lots of problems with drive shaft splines though!

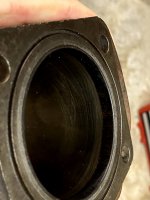
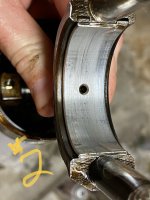
I do though have quite a bit of experience rebuilding Hillman Imp engines at home in my own garage and also I used to "mess about" a lot with old British motor cycles (so air cooled engines) I find it hard to understand how any running wear could cause the scoring you show in the bore and I'm in agreement with those above who say that it's more likely someone has previously "attacked" it with some, pretty rough, emery? I think you need to give them a light hone and see how they turn out. Doesn't look like there's much of a wear ridge at the top which is good.

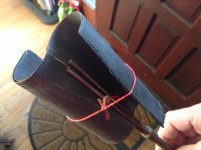
I love your DIY hone. I too made one for myself - to be specific I drew up a picture of what I wanted and then my friend who ran courses in hobby lathe use, when I did the evening classes in car maintenance and welding, machine up the triangular "business end" and threaded it concentrically to tale the drive rod. I made the retaining plates for the emery cloth and drilled and tapped the other fixing holes. It works very well indeed and I'm very proud of it!

P1090466.JPG

P1090465.JPG

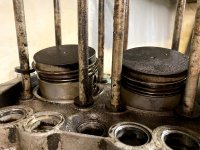
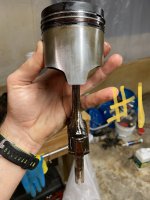
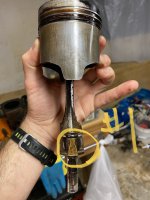
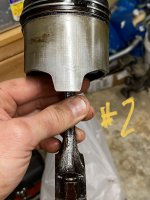
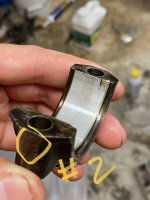
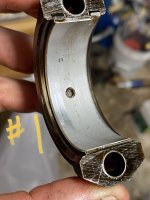
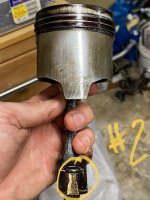
The pistons, from what I can see, look pretty good. I would be giving everything a really good clean up - so the rings need to come off and any deposits in the bottom of the grooves cleaned out. You can use an abrasive paper on the piston crowns and, if you're careful, on the lands between the ring grooves but absolutely not on the piston skirts. This is because some grit from the abrasive is likely to become embedded in the aluminium of the piston and the skirt is in direct contact with the cylinder wall! The piston diameter where the lands are is usually just slightly smaller in diameter, by just a few thou, than the skirt so won't contact the bore wall.

With everything nice and clean check all the dimensions and clearances. First try the pistons in the bores, without rings fitted, gently just by hand, and see if they move full stroke easily without any sign of binding. stop immediately if they bind anywhere to avoid scoring. Then, as suggested above, check with your feelers for skirt to bore clearance as if that checks out OK you don't need to start looking at whether it's pistons or bores which have the wear. Ring gaps need to be checked well down the bore (maybe 3/4 towards the bottom of the bore - never near the top where bore wear will be greatest. - for the same reason the piston skirt to bore clearance should always be checked well down the bore too) also the ring must be absolutely square on to the bore or the gap will not be able to be correctly measured. To achieve this put the ring in the bore and then insert a clean piston upside down - so crown first - into the bore and use this to chase the ring down. This, of course, only works with a piston which had a flat crown! If that all comes out OK then check ring to groove clearances with your feelers.

A rather "strange" wee thing that can catch you out if you find you have a wear ridge at the top of the cylinder but decide it's not enough to warrant a rebore but find your ring gaps indicate new rings would be a good idea is that you may just find you have a small "Knock" after reassembling it with the new rings. What can happen it that the new rings, being completely unworn, will lightly contact the wear ridge when at TDC. It sounds a bit like a worn little end bush. The Anglia engine I rebuilt suffered this and it took me two strip downs to find it. To get over this you can buy ring sets with "Ridge Dodger" top rings. My favourite manufacturer is Cords, here is their brochure which shows the ridge dodger concept: http://www.mayphil.co.uk/creo_files/upload/files/cords_brochure.pdf

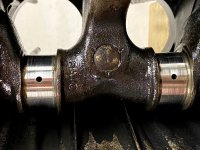
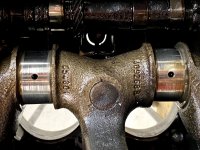
Sorry if I'm telling you "how to suck eggs" above but I've rebuild quite a number of engines - from a 2.0 litre "O" series Ambassador (by gum that was a heavy lump) to several Imp engines, a few "A" series BL units, a 997cc Anglia and a few 2 cylinder DAF "boxer" engines. Also motorcycle and moped engines (the hone would be too big for a moped barrel but probably not relevant as most of them were chromed bores so either absolutely fine to reuse or the chrome surface breaks up and the cylinder is just scrap. There's probably one or two I've forgotten about over the years too. (A VW engine in a beach buggy with head sealing problems comes to mind - that engine doesn't use head gaskets). Your components look, from the pics, to be good enough to reuse. I've used rougher looking components to rebuild everyday "runaround" engines which have subsequently run satisfactorily for years. The big thing has to be cleanliness though - cleanliness is next to ? as the traditional saying goes, and it's never truer than when building engines and gearboxes.

Good luck with it all, do let us all know how it all pans out please - with more pics if possible.
 
Last edited:
Much appreciated gents! I’ll get to honing, pulling the rings, and do a bit of cleaning and measuring today if I can. Here’s to hoping the rod bearings look good when the end caps come off!

Thanks,
Matt
 
Much appreciated gents! I’ll get to honing, pulling the rings, and do a bit of cleaning and measuring today if I can. Here’s to hoping the rod bearings look good when the end caps come off!

Thanks,
Matt

Be aware that the big end caps are numbered on the cam shaft side and must go back as they were. Do you know the mileage on this engine?
 
Wise words Jock---one must never be to old to learn! Where about in Edinburgh are you? My wife and I lived up there for 9 years (until I was made reduntant by Gerald Ronson from Heron Rossleigh at the Gylemuir).We initially lived in the old tenement building opposite Leith Hospital (Great Junction Street--right above the chippie)) before moving out to just outside Davidsons Mains.
 
I do not.

I asked because I think that all too often people just replace big end shells as a matter of course because they are cheap. The factory originals are best quality , nicely run in but they can discolour on the bearing surface which is often seen as wear.
 
Wise words Jock---one must never be to old to learn! Where about in Edinburgh are you? My wife and I lived up there for 9 years (until I was made reduntant by Gerald Ronson from Heron Rossleigh at the Gylemuir).We initially lived in the old tenement building opposite Leith Hospital (Great Junction Street--right above the chippie)) before moving out to just outside Davidsons Mains.
Hello hobbler, I don't (hobble that is) so much since they gave me new knees!

When we first moved back north after our days in London we bought a house in Cousland. I worked in garages to the south and east of the City at that time but when I took up a post in training I needed to be based in North Edinburgh so we moved and we've had two houses in this area over the years. Now about a 20 minute walk from Newhaven harbour and very happy with our house and the neighbours, I don't think we would move again - until the kids consign us to a home anyway!

I know exactly where you are when you talk of Great Junction Street but I don't think your tenement is there today and the nearest chippy certainly isn't opposite the old hospital. Probably the Gold Sea on Ferry road is now the nearest but I may be wrong as we seldom frequent chippies due to Mrs J trying to make me eat "healthy" food! However I've been known to sneak the occasional mince pie - that's a Scottish meat pie, for those who don't know, not a Christmas type mince pie - out the door of Mason's bakery on the roundabout by Newhaven harbour. If you're ever in the area you have to try one, their pies are legendary, but Shhh, don't tell Mrs J! Opposite the old hospital is now new(ish) build residential so probably your chippie went when they were built.

For those reading who will not know, Rossleigh were an Edinburgh institution and well know for luxury cars - Jaguar, Rolls Royce, Daimler, etc. Did you work for them when they had the old workshops in Annandale street? An absolute warren of a place with lots of ramps etc - bit like a multistory car park - easy to scrape one of these large cars on a barrier!

Davidson's Mains I've driven through often but never stopped. However, in the summer, we often take the grandchildren down to the side of the Forth just north of there (We park where that length of dual carriageway is that goes nowhere) and then walk along the promenade with the pram and older ones on their bikes to Cramond where we buy ice creams and look out to the island. The older children are now beginning to ask me to walk out to the island with them: https://en.wikipedia.org/wiki/Cramond_Island but the causeway is in quite poor repair these days and I'm not too sure I would make it there and back. Of course the "old man's curse" might be a limiting factor too as there are no loos out there and always too many people about to risk looking for a bush! All a bit academic now though with all this covid "stuff" It would be nice just to give them all a cuddle again.
 
I forgot to ask, if you don't mind saying, where in Maryland are you? My daughter and her husband were based there for nearly 5 years and had a house just outside Leonardtown: https://leonardtown.somd.com/

We spent many happy hours using it as a base to explore all around and do lots of "touristy" things.
Kind regards
Jock

Small world. We live in the Solomons area while I'm stationed here for another couple years. It's a little rural for me, but better than my last station and it'll suffice until retirement.
 
Hmm, Putting "Stationed" and "JumpJet" together could we link "Petuxent" as well? That's where my son in law was.

That's the one... aka Pax River.

Ok... here are some teardown pics. So far, everything is looking good, and some initial measurements seem well in the box. I'm waiting on a honing tool on order to hone the barrels, then recheck the measurements, but pre-hone, everything looks nice and tight, so I'm hopeful for the short block. I plan on doing a little head work regardless. Once I get a 32mm socket, I'll pull the rest of it apart so I can hot-tank clean it and start putting it back together.

Couple questions... what are the allen-keyed plugs in the block? There seem to be 3 around the timing housing/oil pump and 2-3 more on the sides of the block/inside by the cam. Most are highlighted in the pics, but all but one are rounded out, so if I want to pull them, I'll need to extract them and get new ones. Is that necessary or what?

Thanks!
 

Attachments

  • IMG_3155.jpg
    IMG_3155.jpg
    200.1 KB · Views: 36
  • IMG_3154.jpg
    IMG_3154.jpg
    294 KB · Views: 30
  • IMG_3153.jpg
    IMG_3153.jpg
    320 KB · Views: 49
  • IMG_3152.jpg
    IMG_3152.jpg
    342.5 KB · Views: 32
  • IMG_3151.jpg
    IMG_3151.jpg
    407.6 KB · Views: 33
  • IMG_3160.jpg
    IMG_3160.jpg
    293.2 KB · Views: 46
  • IMG_3159.jpg
    IMG_3159.jpg
    179.6 KB · Views: 39
  • IMG_3158.jpg
    IMG_3158.jpg
    260.5 KB · Views: 44
  • IMG_3157.jpg
    IMG_3157.jpg
    179.3 KB · Views: 33
  • IMG_3156.jpg
    IMG_3156.jpg
    206 KB · Views: 35
  • IMG_3161.jpg
    IMG_3161.jpg
    302.7 KB · Views: 36
  • IMG_3162.jpg
    IMG_3162.jpg
    763.2 KB · Views: 89
  • IMG_3163.jpg
    IMG_3163.jpg
    492.8 KB · Views: 37
  • IMG_3164.jpg
    IMG_3164.jpg
    797.8 KB · Views: 44
  • IMG_3165.jpg
    IMG_3165.jpg
    785.3 KB · Views: 52
  • IMG_3167.jpg
    IMG_3167.jpg
    589.6 KB · Views: 36
  • IMG_3166.jpg
    IMG_3166.jpg
    629.1 KB · Views: 65
Everything seems to be pretty well OK. Phew! The aluminium plugs are (I think) casting plugs---they are screwed in. The trick is to (gently) hammer in the nearest, next size up, 'imperial' allen key as they easily deform. I would not take them out until you have their replacements! I tend to leave them in.
 
I believe those plugs are there to cover the holes needed in the manufacturing process / drilling then plugged and not intended to be removable which is why they are so tight. The thread is M12 x 1.5. You can get small sump plugs in this size if you get yours out.
 
That's the one... aka Pax River.

Ok... here are some teardown pics. So far, everything is looking good, and some initial measurements seem well in the box.

Yup, Pax River, indeed! I'm going to pm you shortly if that's OK? I was chatting to my son in law last night and he said the "Aero community" is a pretty small one so if you are a Brit at Petuxant you may well know him, or know of him. Anyway I'll try to get the time to do it by the end of today.

Regarding your engine. It is looking pretty good visually isn't it. Hope your measurements come in on spec.

Probably the biggest and most involved rebuild I did at home was the Ambassador which I bought very cheap from another dealer because, although it's body was in excellent order, it had a serious gearbox problem which ended up in a complete rebuild of the box (luckily very doable on the garage floor with not too many parts needed as the problem was due to someone who didn't know what he, maybe she? was doing, having been in there before me) Of course the Ambassador power unit was like a great big Mini with the gearbox in the sump. So, as I had access to the bottom end with the gearbox removed and as i fancied I heard a very slight knock when the engine was running I pulled all the bottom end bearing caps. I was amazed to find almost new bearing shells all round. The mains were fine but one of the big end caps had been put on back to front so when you looked closely there was a very slight offset between the rod and cap (ie there was a step where the cap and rod meets) Reversing the cap so it assembled as it should appeared visually to solve that problem but the soft bearing metal had wiped out on the journal and scored it. I took the shaft and con rod/piston down to George Browns engineering on The Shore at Leith for them to check out. Their recommendation was to take the big end journals to undersize and asked me to get the shells before they ground the journals - I was very impressed by this as it ensured I wasn't left with an undersize shaft I couldn't get shells for. They said the con rod was fine. They said there was nothing wrong with the main journals but recommended polishing them. By now I was getting quite friendly with the chap actually doing the job and he asked to see the mains shells. His opinion was they would probably do but if I could afford it to just buy a new set - which I did. When I got the shaft back I was most impressed. The surfaces of both big end and main journals were mirror like with beautifully formed corner radii. In the past I've seen some quite poorly formed corner radii on reground shafts which, of course, is not good as stress concentrations can cause fractures later in use. This particular company have also done a couple of Imp shafts for me and always the quality of work was excellent. It's been a number of years now though since I've needed a shaft ground or a head faced but I'd go back to them with confidence.

I was just thinking that even if all your journal sizes check out AOK it might benefit you to find an engine specialist who could do a polish job on them. I don't know how Browns did the polishing but I suspect, having polished journals myself using very fine grade emery, that they used something considerably more sophisticated and precise. The Ambassador ran faultlessly for many years and later, when I traded it in for a Mk2 1.8 SRI Astra Estate, saw duty as a taxi!
 
1) The teardown continues and everything looks good thus far. Only the crank is left to remove. So... what have you guys used to remove those phillips screws on the front main bearing holder? I don't have any screwdrivers close to large enough and fear those will easily round out if I try something else. Since I can't easily bring the whole motor to the hardware store to test the fit, is there a specific # that fit them?

2) So two of those plugs I asked about earlier - one in the timing cover, the other in the block, are obvious oil passages, one in the feed to the oil pump - it tees at the pump input with the sump pickup - and the other comes off the front camshaft oil feed. Can those be used to tap into for a remote, conventional oil filter? All the kits I see have other hookups on the timing cover, but can you not use those two lines? Something like patching in a filter between where I'm holding that piece of clear hose in the pics. I can't find an oil feed diagram anywhere online to validate this.

3) Since I was at an impasse, waiting on a honing tool and lacking the proper phillips head, I decided to try a little old-school hot-rodding style on the spare tin work. With the new motor, I plan to fit a conical filter directly to the carb intake neck, so no need for the original air filter housing, so I cut it off and cut out the bottom half of the top cover. I'll grind it clean, get a circular patch welded on, clean it up, and see what it looks like. A lot cheaper than some of the fancy cast aluminum ones. What do you think? Feel free to chuck spears. lol.

Cheers,
Matt
 

Attachments

  • IMG_3173.jpg
    IMG_3173.jpg
    1.3 MB · Views: 43
  • IMG_3174.jpg
    IMG_3174.jpg
    787.4 KB · Views: 31
  • IMG_3175.jpg
    IMG_3175.jpg
    715.7 KB · Views: 39
  • IMG_3176.jpg
    IMG_3176.jpg
    1,015.5 KB · Views: 53
  • IMG_3170.jpg
    IMG_3170.jpg
    1.9 MB · Views: 61
  • IMG_3177.jpg
    IMG_3177.jpg
    1.2 MB · Views: 34
  • IMG_3178.jpg
    IMG_3178.jpg
    1.3 MB · Views: 36
Back
Top