Technical Barrels/Pistons scoring. Salvageable?

Currently reading:
Technical Barrels/Pistons scoring. Salvageable?

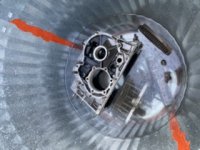
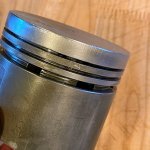
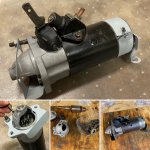
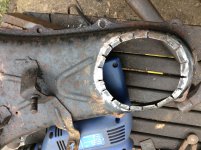
The trick with the 2 phillips screws that hold the bearing housing to the crankcase is to use an "impact screwdriver". This is a screwdriver where you hold the screwdriver into the screw, twist the body of the screwdriver in the direction you want it to turn and then wack it with a large hammer (remembering to keep your fingers out of the way!). The impact loosens the screw and turns it in the direction you want it to go and at the same time forces the srewdriver head into the head of the screw. The replacement screws are 'cap-head' these days---if you want a couple, I will put some into the post to you.
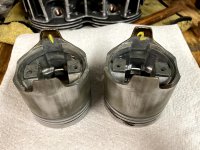
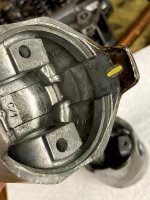
With regard to the airfilter top, that is a common trick, and if you are fitting the twin-choke side-draught carbs, essential. I have a Dellorto FZD on my engine and to make it look neater, also taken the top of the filter housing off. I also removed the air 'scoop' underneath the top cover as it is no longer required. Agreed--much cheaper than the expensive alloy versions!
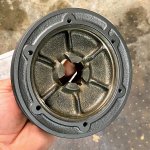
I will try and find a picture of the piping for the remote oil-filter that you are prposing to fit, although to be honest, you might just be surprised as to how efficient the standard 'centrifugal' filter is---they used the same system (and same size) on both the 600D the 850 engines.
 
With the impact driver thing I would not use the impact driver on the main bearings but use the large Phillips head screw bit from the set in conjunction with an 8mm socket. It is easy to crack the main bearing housing and you have more control that way. I also ignore the torque rating on those screws. I tighten and torque the 4 hex head bolts first with the countersunk screws loose then just tighten the screws to my satisfaction.
I have done a few of those top covers and prefer the simple modified tinware one. I drilled out the spot welds to remove the air filter housing then slit the upstand with a thin grinder, hammer it flat and spot weld a plate over the top.
 
Top cover in progress
 

Attachments

  • 46964D87-1CDD-4A6F-8FD4-0A5E1C2C4475.jpeg
    46964D87-1CDD-4A6F-8FD4-0A5E1C2C4475.jpeg
    1.9 MB · Views: 63
I was able to track down a #4 Philips screwdriver at the hardware store and, as luck would have it, the handle fit nearly perfectly in the 32mm socket I bought for the crank nut, so I was able to use my breaker bar to get them out. The motor is totally broken down at the moment and the crank journals all measure within tolerances. Sadly, the front bearing has some minor scoring and the rear has two small nicks on the edges, so it looks like I'll be replacing those. I had hoped to avoid it, but at least I won't need to turn the crank and figure out undersized. Just a minor polish and she'll be good as new.

I'll hot tank and pressure wash the block this weekend, hone the barrels, measure them up, and figure out one big, expensive order from Ricambio (best pricing I've seen thus far).
 
I'll hot tank and pressure wash the block this weekend, hone the barrels, measure them up, and figure out one big, expensive order from Ricambio (best pricing I've seen thus far).

If you are referring to the London based Ricambio they are quoting £60 plus vat each for standard main bearings. I can do better than that :)
 
Hot tanked the block, timing cover, head, and bellhousing today. While they cooked, I cleaned up the bores with the flex-hone tool that arrived today. After that, some careful masking and a little blasting to clean up the rust on the fins. Now, to do some measurements on the pistons/rings and wait on some parts so I can drop the head at the machine shop and work on the assembly.

So strange that this doesn’t have a bearing for the camshaft. I’ve seen the repair bushings, but what’s the wear tolerance before that’s necessary? Steel cam against an aluminum block... seems they’d want a removable bearing to begins with.
 

Attachments

  • 16EF8751-A9EA-46EC-AC36-D12276A1E519.jpeg
    16EF8751-A9EA-46EC-AC36-D12276A1E519.jpeg
    28.5 KB · Views: 44
  • 24B22FCA-34AE-4F97-82E5-70FD926E41D1.jpeg
    24B22FCA-34AE-4F97-82E5-70FD926E41D1.jpeg
    29 KB · Views: 37
  • FA68E526-0344-4592-9217-ACD7448B7A2D.jpeg
    FA68E526-0344-4592-9217-ACD7448B7A2D.jpeg
    22.2 KB · Views: 37
  • 2CD963CF-6FDD-4913-A08E-B3DA4BE308BC.jpeg
    2CD963CF-6FDD-4913-A08E-B3DA4BE308BC.jpeg
    34.7 KB · Views: 55
  • 8A64EBC9-30E3-4EAA-A880-6C525343C0FD.jpeg
    8A64EBC9-30E3-4EAA-A880-6C525343C0FD.jpeg
    29.8 KB · Views: 34
  • F52D5257-B657-45DE-8925-9F3FE08E7466.jpeg
    F52D5257-B657-45DE-8925-9F3FE08E7466.jpeg
    44.4 KB · Views: 57
Hey, those bores have cleaned up really nicely haven't they. Does that first picture show your hot tank? If so can you show us a bit more of it? I'm wondering if it's an economic home proposition for the occasional use I would give one when working on my wee horticultural engines. I'm just making a start on the wee Villiers 2 stroke (or should I say 2 cycle?) on my latest project which is an elderly Ransomes cylinder mower and a hot tank would be very useful.

I'm enormously enjoying your posts. Please do keep on with them - and lots of pictures too please.

Kindest regards
Jock
 
Jock,
It is. It’s a propane burner from a turkey fryer kit and a 30 gallon galvanized steel trash can. The can’s seams are sealed on the inside with high temp gasket maker (red Permatex). I used the pictured Simple Green aircraft cleaner at 15:1 and cooked it for 3 hrs or so. In the past I’ve used a smaller can (10 gal?) that fit better on the burner but wouldn’t hold the block. The bigger cans circumference is greater than the burner’s, so I used jack stands to support the lip so it wouldn’t collapse with heat+weight. Lesson learned: tie rope or string to the parts so you can retrieve them when they’re done. Pressure wash upon removal. Not perfect, but good enough for my purposes.
 

Attachments

  • 16B82456-A70D-4717-9D5A-40491BD4270F.jpeg
    16B82456-A70D-4717-9D5A-40491BD4270F.jpeg
    28.1 KB · Views: 32
  • 88D3CAE7-B34E-4D2B-A529-B875717563E7.jpeg
    88D3CAE7-B34E-4D2B-A529-B875717563E7.jpeg
    33 KB · Views: 35
  • 99C42F00-77BC-4DAE-86FF-406D115F877C.jpeg
    99C42F00-77BC-4DAE-86FF-406D115F877C.jpeg
    33.1 KB · Views: 81
  • 7ED842BC-B4A0-4DF9-9780-3496EE7DA953.jpeg
    7ED842BC-B4A0-4DF9-9780-3496EE7DA953.jpeg
    45.3 KB · Views: 41
  • 140B5414-1550-4F32-90BA-2A3960C49A68.jpeg
    140B5414-1550-4F32-90BA-2A3960C49A68.jpeg
    47.6 KB · Views: 24
Jock,
It is. It’s a propane burner from a turkey fryer kit and a 30 gallon galvanized steel trash can. The can’s seams are sealed on the inside with high temp gasket maker (red Permatex). I used the pictured Simple Green aircraft cleaner at 15:1 and cooked it for 3 hrs or so. In the past I’ve used a smaller can (10 gal?) that fit better on the burner but wouldn’t hold the block. The bigger cans circumference is greater than the burner’s, so I used jack stands to support the lip so it wouldn’t collapse with heat+weight. Lesson learned: tie rope or string to the parts so you can retrieve them when they’re done. Pressure wash upon removal. Not perfect, but good enough for my purposes.
I absolutely love this! It's just the sort of innovative, cost effective, Heath Robinson device which greatly appeals to me! In fact I've got one of those old galvanized rubbish bins in my shed which I had to pension off when they introduced the plastic shaped bins which work with the collection system on the refuse lorry. It may have rusted, but I'll be hauling it out and inspecting it.

In fact this is all very timely as I've been thinking lately that I might buy a gas torch (since I mothballed some of my welding gear I now only have my MMA welder) So now I'll be looking for one which works with a larger gas bottle - like yours - rather than just a screw on cartridge. So thanks for all that.

PS thanks for the tip about the string - so easy to do but so easy to forget or not think about in the "excitement".
 
Last edited:
PS thanks for the tip about the string - so easy to do but so easy to forget or not think about in the "excitement".

Previous times with the smaller can, it wasn't necessary - I could just pour out enough to reach parts. This time with the 30-gal can, I neglected to do it and had to go fishing with a tie-down strap with a hook on it. It took a bit of doing, but I was able to fish out all the parts eventually. Next go-round, I'll use string.
 
Speaking of pistons... I was a little gun shy to remove them from the rods, but figured what the hell. The gudgeon pins, as most of you cal them, came out easily enough with a wooden dowel and a couple good whacks. After a little soda blasting - I ran out of soda after doing one - and 45 minutes in the ultrasonic cleaner, they look pretty good. You can see the line where the cleaner stopped. Most importantly all the ring lands are clean and in good shape. Weighed them out of curiosity’s sake and they are within 2 grams of each other. Just waiting on some parts and still sourcing machine work before the reassembly can begin.
 

Attachments

  • F2472C88-D23C-4D0E-BDC1-143EC44804D4.jpeg
    F2472C88-D23C-4D0E-BDC1-143EC44804D4.jpeg
    181.3 KB · Views: 22
  • EC5EEDE4-2E89-4942-B34D-B4E6A9C13D29.jpeg
    EC5EEDE4-2E89-4942-B34D-B4E6A9C13D29.jpeg
    139.3 KB · Views: 24
  • E9ABCF0C-05B6-4A3D-9F9B-86EEECCDC37B.jpeg
    E9ABCF0C-05B6-4A3D-9F9B-86EEECCDC37B.jpeg
    140.4 KB · Views: 22
  • DBEC7964-A258-4417-A07B-AFBFBC09A3C9.jpeg
    DBEC7964-A258-4417-A07B-AFBFBC09A3C9.jpeg
    181.2 KB · Views: 22
  • IMG_3216.jpg
    IMG_3216.jpg
    1.3 MB · Views: 25
  • IMG_3217.jpg
    IMG_3217.jpg
    583.1 KB · Views: 23
  • IMG_3218.jpg
    IMG_3218.jpg
    458.8 KB · Views: 24
Last edited:
Or 'wrist pins' as you lot call them! A sneaky way to put the pins back in is to leave the wrist-pins (aka Gudgeon-pins) in the freezer for 24 hrs. then when you are ready to refit the pins and con-rods, heat the piston up to about 180F (in a pan on the cooker is the simple way--but maybe when 'er indoors has gone out) and the gudgeon pins will then slide in. Remember to mark the piston so that you know which way the con-rod is to be fitted--the last thing that you want is with a gudgeon pin warming up, and a piston cooling down to be fiddling around trying to remember which way the ruddy thing fits! Looking at the piston towards the gudgeon pin, you will notice that it is slightly offset with regard to the centre-line of the piston. The off-set is on the OPPOSITE side of the piston with regard to the camshaft position, and the positonal numbering on the con-rod journals. Don't forget to have some heat-proof gloves; (a) so that you don't warm up the wrist-pin and, (b) at 180F, the piston is ruddy hot!
 
Or 'wrist pins' as you lot call them! A sneaky way to put the pins back in is to leave the wrist-pins (aka Gudgeon-pins) in the freezer for 24 hrs. then when you are ready to refit the pins and con-rods, heat the piston up to about 180F (in a pan on the cooker is the simple way--but maybe when 'er indoors has gone out) and the gudgeon pins will then slide in. Remember to mark the piston so that you know which way the con-rod is to be fitted--the last thing that you want is with a gudgeon pin warming up, and a piston cooling down to be fiddling around trying to remember which way the ruddy thing fits! Looking at the piston towards the gudgeon pin, you will notice that it is slightly offset with regard to the centre-line of the piston. The off-set is on the OPPOSITE side of the piston with regard to the camshaft position, and the positonal numbering on the con-rod journals. Don't forget to have some heat-proof gloves; (a) so that you don't warm up the wrist-pin and, (b) at 180F, the piston is ruddy hot!

Good gouge! I put the paint marks on the cam-side, along with the stampings on the connecting rods. Hopefully that's idiot-proof enough for me when the time comes!
 
Still waiting on parts before I can begin any real assembly, so I've been cleaning up what I can and detailing misc parts. Today I picked up the block, timing cover, and bell housing from the soda blasters. They did a great job cleaning out the block. I wish it would've evened out the color/shade a bit more, but hey, it's soda.

Minor concern/question - pictured are 3 photos of the front cam bushing. You can see some minor concentric scoring. Everything seems to be within spec from what I can measure, but I'm curious about wear tolerances here. Being an aluminum block and a steel cam... ? The original cam looks perfect. I've seen the 'repair' bushings, but is this a common need or can this simply be honed out (within tolerances) since there doesn't appear to be a dedicated sacrificial layer.

In the downtime I cleaned, rebuilt, and painted the starter and cleaned, very carefully masked and blasted & painted the crank pulley as well. No more annoying rust on that bit.

Many thanks to all for the constant assistance on this project.
 

Attachments

  • E3096271-B88C-4EE7-BB7C-B696EFEA238C.jpg
    E3096271-B88C-4EE7-BB7C-B696EFEA238C.jpg
    803.7 KB · Views: 39
  • C6ECF64F-3D3A-43BF-B648-1258B5DFB7A0.jpg
    C6ECF64F-3D3A-43BF-B648-1258B5DFB7A0.jpg
    732 KB · Views: 33
  • IMG_3282.jpg
    IMG_3282.jpg
    626.2 KB · Views: 27
  • IMG_3283.jpg
    IMG_3283.jpg
    616.2 KB · Views: 24
  • IMG_3284.jpg
    IMG_3284.jpg
    663 KB · Views: 30
  • IMG_3244.jpg
    IMG_3244.jpg
    1.6 MB · Views: 25
  • IMG_3243.jpg
    IMG_3243.jpg
    1.5 MB · Views: 26
You're now getting to the exciting bits. All those nice clean bits and pieces to play with! Looking pretty good isn't it. Starter looks very nice, even the pinion teeth look nice and "sharp". I've seen poorer looking stuff on the shelf at retailers.

Your images are good enough to take quite a bit of magnifying and I've been looking at those cam bearing surfaces in the block. Apart from the scores, they seem to have a rather matt look to them which I presume is the result of the soda blasting? - I would have expected these surfaces to be shiny from the action of the cam journal spinning inside them? As to the scoring, I think you either leave them well alone - they have likely been caused by a foreign body in the oil which, now it's all been so thoroughly cleaned, should cause no further scoring - Or you ream them right out and sleeve them down.

You probably know this, but what you must not do is smooth them with abrasive paper or a wee ball hone or anything containing an abrasive (I'm thinking of something like a brake cylinder hone) because, with the aluminium being a soft material, you may well impregnate the surface with abrasive which will then damage the cam journals over time. I have a set of bearing scrapers for doing white metal bearings which I bought when I had a 1936 Morris 8. I learned to scrape bearings in college (now that dates me doesn't it) but I've actually never used the scrapers "in anger" as the company which remetaled the rods for me also scraped them to fit the crank journals. All I've ever done with them is use them for smoothing softer metal surfaces so I'd be tempted to just, very lightly, "kiss" the inside of the bushing surface to ensure there are no high spots without actually removing any metal from the flatter areas.

On the other hand, as you say the cam journals look fine with no scoring so presumably are not being affected by this marking and they are dimensionally within tolerance, I'd just leave them completely alone, they are not "text book" perfect but I've put motor cycle engines back together in the past with slightly worn "stuff" like this and they've run just grand for years.
 
The blasting didn't change the surface at all; it was worn in a matte finish, so that aspect doesn't concern me. That was the reasoning for using soda blasting - no harm or imbedding in the aluminum. I might've snapped those pics before I gave the block a good washdown, so it might be some soda dust, I can't recall.

I do need to carefully remove some casting flash from the replacement main bearings. I can see what others mean about the repro quality concerns. Clevite these aren't. Everything will get a healthy coating of RedLine Assembly Lube when going together and multiple oil changes for the run-in.
 
I have a set of bearing scrapers for doing white metal bearings which I bought when I had a 1936 Morris 8. I learned to scrape bearings in college (now that dates me doesn't it) but I've actually never used the scrapers "in anger" as the company which remetaled the rods for me also scraped them to fit the crank journals.
.

I had a 1936 Talbot 10hp years ago that had the same type of big ends and main bearings with white metal poured directly into the pockets in the crankcase and the con rods. That scraping was one job I avoided but kept the con rods. They were interesting as it was based on a Hillman engine but the rods were German made and had swasticas on them. I put them on eBay years ago and a guy in Canada contacted me. I realised that he must have a very early car and discovered that he had the 1935 Tourer, chassis number 1 that was the display car at the London Motor show that year. It had been thought that the car was long lost.
 
Back
Top