The information that
Veloman518 obtained as shown a couple of posts previously didn't give any more data than I had already but the explanations he obtained were enlightening.
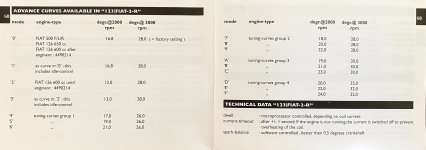
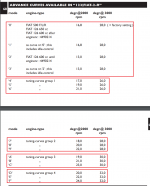
So with the confidence it gave me I went ahead with trying an alternative setting to the standard on my current 594cc engine.
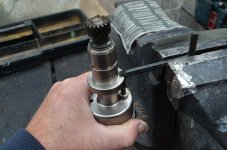
I discovered that changing the settings is far from easy and definitely can't be done with the distributor in-situ. The allen-socket screw is removed with a 5mm key. The screw is very hard to shift as it is threadlocked and that part of the job might actually have been easier whilst still fitted to the engine. It revealed to me the reason for the non-standard cutout in the mounting flange which is to allow access for the allen key and then for a screwdriver. I didn't want to put the unit in the vice so I clamped the allen key and gripped the distributor body in order to turn it. The screw was very tight so I remembered to use Loctite when replacing as I guess this must be important.
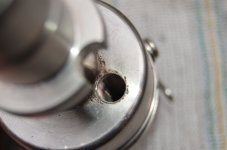
Photographing the adjustment disc, deep down inside the opening was beyond my technical ability. In fact I found it hard to even see the settings and needed a bright torch, my specs and the help of a madnifying glass until I had identified the layout.
You need a long and very thin, flat-blade screwdriver to get at the arrowed slot for adjustment. It's not very positive and a bit of care is needed to be sure you have the right setting.
I know what standard is like so I've gone for setting 7, which has upped the advance a tiny amount at 2,000 rpm and nothing more. The engine runs well, it possibly shows a bit more eagerness in taking off, but with no negative effects in terms of noise or in other obvious respects. I'll live with this for a while and then push on to the next setting.
")