Last week I removed and cleaned out my fuel tank, unfortunately I pulled off the leads going onto the indicator relay whilst doing it, at some point someone had fitted a 5 pin Nagares ITA/5-12 FLASHER unit, the pins are numbered 2*4*8*6 & 5 in the centre i have tried no end of times to 're wire the leads but cannot get it to work so I have up and bought a 3 pin old fashioned relay just with 3 pins L X & P ,however i still can't seem to get it to work, so guess what I went out & bought a Durite 0-744-36 flasher unit with 5 pins hoping it would wire up straightforward these are numbered C2 31 49 49a & C. but still can't work it out ! The wires coming out of the loom are 1-pink or mauve, 2 x light blue with black trace joined together, 1 x white or yellow with black trace and black lead that is earthed on the fuel tank sender unit. I cannot believe the units are all faulty but can anyone let me know where I am going wrong? Plus If it is possible to fit a hazard flasher I would but I will be happy just to just go out and use my indicators.confused


You are using an out of date browser. It may not display this or other websites correctly.
You should upgrade or use an alternative browser.
You should upgrade or use an alternative browser.
Technical Indicator wiring
- Thread starter ClassicFiat500
- Start date
Currently reading:
Technical Indicator wiring
Last week I removed and cleaned out my fuel tank, unfortunately I pulled off the leads going onto the indicator relay whilst doing it, at some point someone had fitted a 5 pin Nagares ITA/5-12 FLASHER unit, the pins are numbered 2*4*8*6 & 5 in the centre i have tried no end of times to 're wire the leads but cannot get it to work so I have up and bought a 3 pin old fashioned relay just with 3 pins L X & P ,however i still can't seem to get it to work, so guess what I went out & bought a Durite 0-744-36 flasher unit with 5 pins hoping it would wire up straightforward these are numbered C2 31 49 49a & C. but still can't work it out ! The wires coming out of the loom are 1-pink or mauve, 2 x light blue with black trace joined together, 1 x white or yellow with black trace and black lead that is earthed on the fuel tank sender unit. I cannot believe the units are all faulty but can anyone let me know where I am going wrong? Plus If it is possible to fit a hazard flasher I would but I will be happy just to just go out and use my indicators.confused
You seem to have odd colours that don’t match any of the diagrams for the F or L unless it has had a new wiring loom at sometime in the past? The Black wire as you say should go from the nut that holds the flasher unit to the body to the fuel tank sender and it also acts as the earth for the wipers. On the original 3 pin flasher unit you should have 2 x black yellow wire going to X, a black white to L and a Green to P.
In your case as you have 2 x light blue black I would try connecting those to X, 1 x white black to L and finally pink/mauve to P. It’s the only logical way I can think of connecting it? Also obviously check you haven’t blown the fuse which is no 5 should be marked 15/54.
Tony
OP
OP
Hi Tony i will give it a go today & let you know. Thanks for your help.
Barry
Barry
OP
OP
Hi Tony almost works on the 1st suggestion 2x blue/black onto X, 1x white / black onto L & 1 x pink/ mauve to P however when I flick the switch down or up on the indicators light up but won't flash! Would you know if there is a way of testing the 3 pin flasher unit? Or would I be able to use the Durite relay I mentioned in my 1st posting now you seem to have sorted out the correct wires. My other option is o either use old fashioned hand signals , being a 500 I can at least put my arm out through both windows! Or flick the stalk up and down! Many thanks again for your valid assistance Barry
the hobbler
Distinguished member
- Joined
- Jul 25, 2012
- Messages
- 4,067
- Points
- 1,011
Check that you have the correct bulbs in the indicator units---all the 'pattern' lights need to use 'twin-filament' bulbs. On the continent the lights are also used for side-lights, hence the need for the 2nd filament. Only 1 filament is used, but you need 'twin-filament' bulbs. Also, check that you have the feed and the earth wires the correct way round on the light units.
OP
OP
Just noticed the dashboard green light is on all the time even when the indicator arm is in central position. This is using the 3 pin relay,. The indicators were working ok prior to me losing the connections!so I assume the bulbs are correct.
Thanks again to all trying to help.
Thanks again to all trying to help.
Hi Tony almost works on the 1st suggestion 2x blue/black onto X, 1x white / black onto L & 1 x pink/ mauve to P however when I flick the switch down or up on the indicators light up but won't flash! Would you know if there is a way of testing the 3 pin flasher unit? Or would I be able to use the Durite relay I mentioned in my 1st posting now you seem to have sorted out the correct wires. My other option is o either use old fashioned hand signals , being a 500 I can at least put my arm out through both windows! Or flick the stalk up and down! Many thanks again for your valid assistance Barry
Hi Barry
X is actually a + so that is your 12v’s in, so in your case 2x blue/black.
1 x white/Black onto L that goes to the indicator switch.
1 x pink/mauve onto P that goes to the indicator light on the dash.
The way to test the 3 pin flasher unit is to connect 12v to X and then earth L. So if you had a 12v car battery just connect two wires to X and L. Connect X to + positive and L to - negative and you should hear the flasher unit ticking, as the contact opens and closes.
On the Durite
49 would be your 12v in so your 2 x blue/black
31 would be earth so you need to connect the black wire to it.
49a would be white/Black to switch
C would be pink/mauve to the indicator light on dash.
Tony
Just noticed the dashboard green light is on all the time even when the indicator arm is in central position. This is using the 3 pin relay,. The indicators were working ok prior to me losing the connections!so I assume the bulbs are correct.
Thanks again to all trying to help.
Just seen this after the post I just sent. Can you pull the pink/mauve wire off and just confirm the dashboard green light goes out? That will just confirm that the pink/mauve is indeed the dash green light wire.
OP
OP
Pulled of pink/ mauve the light went off dashboard
I tested the flasher relay & it is working fine
I tested the flasher relay & it is working fine
Last edited:
Pulled of pink/ mauve the light went off dashboard
I tested the flasher relay & it is working fine
Hmmmm? So we know which wires are which and it’s got a good flasher relay? Another question I assume when you move the indicator switch/stalk to either left or right it’s only those indicator lights on the appropriate side that are permanently on. I.e. left and all left hand side indicators are on and vice versa. What happens with the dash light when you move the stalk left or right?
OP
OP
Hi yes if i move the switch UP the correct lights outside STAYS on then if I press down the other side stays on but all the time the dashboard green light is on.
Last edited:
Hi yes if i move the switch UP the correct lights outside STAYS on then if I press down the other side stays on but all the time the dashboard green light is on.
The only thing I can think of is flasher unit is working when it has no load, as per when you tested it but when put it under load it is not functioning. The fact that the lights come on suggests that the contact inside is closing but it is not releasing.
There is a heat wire inside the flasher unit that when it has current flowing through it when you switch the indicator stalk to either side. When the current flows, the heat wire lengthens and allows the contact to close which switches the lights on. When the contacts close it allows the current to flow via the contacts and it bypasses the heater wire. The heater wire cools and as it does it shortens, as this happens it pulls the contacts apart and the lights go out and this process repeats, contacts open current flows via the heat wire again, lengthens and closes the contact etc, etc. As you can imagine this heat wire is pretty fragile and can get easily damaged. Yours is closing but the heat wire is not pulling the contacts apart again.
I would try the Durite relay and see if that makes any difference. Just take an additional earth from the black wire connected to the bolt holding the flasher unit to the bodywork for the pin 31 on the Durite.
OP
OP
Hi Vitesse , many thanks i will try it in the morning & let you know. Thanks for the advise.
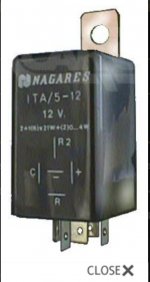
On the original Nagares ITA/5-12 FLASHER unit. It should look like this according to what I can find on the internet.
The centre pin marked - would be a black wire.
+ marked pin would be your 2 x blue/black.
C would be pink/mauve to the indicator light on dash.
R would be white/Black to switch.
I would imagine that the - pin is actually connected internally to the metal bracket that secures it to the car. If you have a meter you could check the continuity between the two to confirm this? If so then you would only need the black earth wire that is secured by the bolt that holds it on to the car and wouldn’t need to connect it to the - pin.
Attachments
OP
OP
") Hi Tony & The Hobbler MAGIC! I flashed all the way up the road this morning the suggestion with the Durite did the trick, when the indicators flashed this morning it was like getting 3 lines on the lottery. With the many different cars i have owned, I have always join the owners club when possible and found the help has been far better & more satisfying when you get a result like this rather than hanging around in a garage & paying the earth.
Hi Tony & The Hobbler MAGIC! I flashed all the way up the road this morning the suggestion with the Durite did the trick, when the indicators flashed this morning it was like getting 3 lines on the lottery. With the many different cars i have owned, I have always join the owners club when possible and found the help has been far better & more satisfying when you get a result like this rather than hanging around in a garage & paying the earth.All the very best and once again THANKS! stay safe!
OP
OP
Following the brilliant advise to sort out my flasher relay last week, can anyone advise how i can improve the green indicator lights on the centre of my cash 500L (not the round dash). Is it easy to remove the whole speedo unit & fit an LED bulb? I would like to clean the inside of the Speedo lens at the same time or even replace the lens as it has a small split of crack in one corner.
Also as I have used the Durite flasher unit (see above post) , can I run a small buzzer or bleeper (easy to find on ebay) from one of the pins on the relay? If so which pins?
Also as I have used the Durite flasher unit (see above post) , can I run a small buzzer or bleeper (easy to find on ebay) from one of the pins on the relay? If so which pins?