Technical 594 Engine Rebuild

Currently reading:
Technical 594 Engine Rebuild

Joined
Mar 7, 2005
Messages
6,239
Points
1,615
Location
Nairn
Inspired by the guys at Project Binky, who have now reached the exciting, DOHC, Toyota Celica engine stage: https://youtu.be/cN8DYQIuW9Y, I decided it was time to get to grips with the much more sophisticated Fiat 594cc engine which has been lying around in bits for ages.

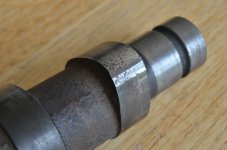
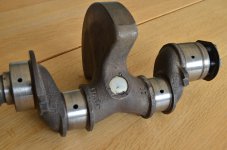
The crankshaft had already been surface cleaned with white spirit and wiped with lint-free paper-towel. Today I did a more thorough job and then blew it dry with the compressed air. I alternately taped over the oilway drillings for three out of the four journals and blew in at the end of the crankshaft. The result looks pretty clean (by my standards ;)) although it will get some final wiping and blowing before assembly.

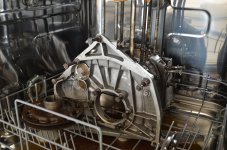
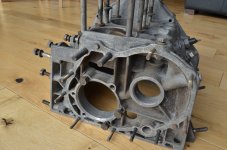
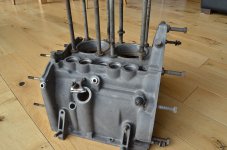
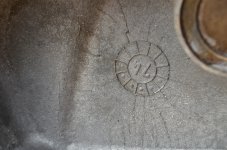
I cleaned the crankcase twice using white-spirit and then put it in the dishwasher as with previous engines; who needs an ultrasonic cleaner?:D It's come out looking better than my previous 652cc crankcase; part of that is because the casting is more precise, having been made in Italy in June 1974.

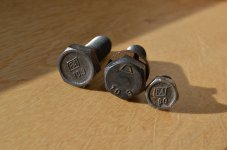
I had bought some new main bearings but the old ones measured up with minimal wear, being only 0.002mm greater in diameter than the new ones. Given that the construction of the originals seems better I cleaned them and they are ready to go back in.

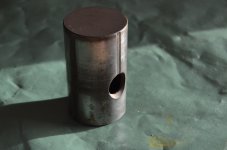
So I'm ready for the straightforward process of assembling the crankshaft back into the case and then I'll get stuck into the pistons and barrels.
 

Attachments

  • NOV_4700.JPG
    NOV_4700.JPG
    2.3 MB · Views: 354
  • NOV_4689.JPG
    NOV_4689.JPG
    2 MB · Views: 42
  • NOV_4694.JPG
    NOV_4694.JPG
    2.7 MB · Views: 48
  • NOV_4695.JPG
    NOV_4695.JPG
    2.6 MB · Views: 40
  • NOV_4699.JPG
    NOV_4699.JPG
    2.7 MB · Views: 40
Last edited:
.............................. I decided it was time to get to grips with the much more sophisticated Fiat 594cc engine which has been lying around in bits for ages.

.................................................................

Don't forget the compulsory Aluminium replica Abarth bits....

then I would suggest White Stripes down the sides.....
Not The White Stripes.... just the stick on ones....
 
I cleaned up the camshaft, which on the face of it seemed to be in good condition. But then I put on my specs and noticed that the No.2 exhaust cam-lobe is heavily pitted. Given that this was the same lobe of the camshaft that was completely worn on my last engine, I'm not taking a chance on it and will replace with a new, standard camshaft I bought quite some time ago. This will mean I need new cam-followers as well.

Costs are mounting.......:cry:
 

Attachments

  • NOV_5278.JPG
    NOV_5278.JPG
    1.9 MB · Views: 33
I cleaned up the camshaft, which on the face of it seemed to be in good condition. But then I put on my specs and noticed that the No.2 exhaust cam-lobe is heavily pitted. Given that this was the same lobe of the camshaft that was completely worn on my last engine, I'm not taking a chance on it and will replace with a new, standard camshaft I bought quite some time ago. This will mean I need new cam-followers as well.

Costs are mounting.......:cry:
referring back to your "Engine rebuild business idea"..
I wonder how many of these cheapo builders would replace such a worn part!!

Your attention to detail shows the points we should all look for.....
 
referring back to your "Engine rebuild business idea"..
I wonder how many of these cheapo builders would replace such a worn part!!

Your attention to detail shows the points we should all look for.....

Exactly right. My previous big encounter with the engine innards has proved me right in practise. Everyone concentrates on making things shiny and does the relatively easy thing of automatically reboring, fitting new pistons etc.

I found that whilst you obviously need those things to be within tolerances and you might as well replace piston-rings and bearings, it's everything to do with the valve-train that makes the difference on this engine; the difference being better starting, a quieter engine and reduced need for frequent adjustments. So I choose to proportion money towards cam-followers etc. The next thing is to work out what I have amongst a large collection of rocker-arms etc., that will be the best combination of parts.

Admittedly I got this engine very cheap, but the basic,oily lump, as purchased, has so far only cost me about 20% of the total amount I have spent. It has now jumped to the position where it owes me about £400. But when it is finished it will be powerful and smooth and reliable
 
Due to the fact that a lot of modern oils have had the zinc taken out of them, may I suggest that you use a "High zinc break-in" oil for the initial 1,000 miles that the new engine does. This high amount of zinc is good for protecting 'flat' tappets.
 
Due to the fact that a lot of modern oils have had the zinc taken out of them, may I suggest that you use a "High zinc break-in" oil for the initial 1,000 miles that the new engine does. This high amount of zinc is good for protecting 'flat' tappets.

That sounds a great idea and I completely agree and understand the reasons for it. I've had a look and this one has oodles of the stuff...almost four times what is in my normal oil; even though I use a synthetic motorcycle oil which is well-laden with the lovely "vitamins".

https://www.ebay.co.uk/itm/5L-Break...DDP-Running-In-Oil-Flat-Tappets-/112847890025

When you think about the pressure being put on those cam-lobes it's obvious that the extreme-pressure additives need to be in good supply all of the time...not just when running-in.

When I find someone who delivers to The Highlands I'll nab a bottle of it.:)
 
This post contains affiliate links which may earn a commission at no additional cost to you.
That oil is one option Peter. Another is 'Lucas' and yet another option is by Millers oils. They do a '30' running-in oil and it is available from 2 companies within 20 miles of you, in Inverness. H & M Hydraulic Services Ltd and:- Precision Engine Services Ltd
 
That oil is one option Peter. Another is 'Lucas' and yet another option is by Millers oils. They do a '30' running-in oil and it is available from 2 companies within 20 miles of you, in Inverness. H & M Hydraulic Services Ltd and:- Precision Engine Services Ltd

Thanks for that Tom; I never think of getting things from actual, real-life places anymore.:D
The latter company is one I will be visiting next week in any case; I'm thinking that with a brand new head bought very cheaply, it might be a good move to invest in having hardened valve-inserts fitted from scratch...they are the local specialists.
 
Glad to be of help Peter. Don't forget though, even with hardened valve seats fitted to enable you to use modern fuel, you will still need to put 'anti-ethanol' additive into the fuel. I have always used Tesco 'Momentum' fuel (99 Octane) and thinking that the small amount of ethanol wouldn't have any side effects didn't put the 'gunge' into the fuel---mistake! Ethanol makes a fair mess of the inside of an aluminium cylinder head--it looks like you have thrown grit into it!
 
^^^ And it'll get worse if E10 (petrol containing 10% Ethanol) is introduced as some of the 'powers that be' are currently considering....

Al.
 
Re:- additives in engine oils.

There was a discussion on another forum of which I'm a member about some of these additives separating out from the oil if stored for long periods. Some oil companies, when questioned, said their oil should be fine for 2-3 years.

Many of old car enthusiasts have stocks of oil. Can you remember when you purchased each container of oil? How long could it have been is storage before purchase? 2-3 years could easily be surpassed in the normal course of events.

I now store my containers of oil upside down to ensure that what comes out first is the 'good' stuff (i.e. has plenty of additives), and what's left over is the not-so-good stuff, to be used in oil cans for general, non-critical lubrication, (doors hinges, control cables etc.).

I've thought of bringing my containers of oil to my local DIY store and asking could I give them a whiz on their paint mixing machine but they probably wouldn't let me :D

Al.
 
----------------------------------------
---------------------------------------
---------------------

When you think about the pressure being put on those cam-lobes it's obvious that the extreme-pressure additives need to be in good supply all of the time...not just when running-in.

---------------------------

Given that you've now found damage to the same cam lobe on 2 camshafts?
maybe it would be good idea to investigate if there is an oil supply/lack of splash lube to this cam lobe. Perhaps there's something blocking/deflecting the oil splash? Some engines have a side hole in the cam follower (tappet) which allows oil draining down the pushrod hole/tube to help lube the cam follower/cam lobe contact area.

On some Fiat gearbox casings, I've noticed some large raised 'V's on the upper internal surface, I suspect these are to trap oil splash and direct it to where it's needed, possibly by causing the oil to drip down?


On the Newman Cams website, www.newman-cams.com there is very good information under the Info/Advice section. This includes advice about camshaft and cam follower material selection and compatibility. There's mention of Fiat having gotten it wrong with their camshaft material selection in the 1970's, leading to problems. Maybe this has some bearing on your cam lobe wear?

Al.
 
Last edited:
On the Newman Cams website, www.newman-cams.com there is very good information under the Info/Advice section. This includes advice about camshaft and cam follower material selection and compatibility. There's mention of Fiat having gotten it wrong with their camshaft material selection in the 1970's, leading to problems. Maybe this has some bearing on your cam lobe wear?

The Newmans Cams website is excellent...very helpful.(y)

If there's anything wrong with cam lubrication then it's a design fault because both of these issues were on different engines, but I'll have a look and think about it. The cam-followers do have a slight groove on one side to help the drip-drip of oil.

When dismantling things, when appropriate I place fasteners back in their threaded holes or over the studs as soon as possible in order not to loose them or forget where they go. With the amount of shifting about this engine has had whilst dismantled I lost one of the main bearing securing setscrews. I thought I could get away with a generic "Fiat" screw of which I have a good selection. But close examination showed that it was a very high tensile strength screw labelled 10.9. So that meant digging around in a spare engine to get a spare. They are available on eBay, mainly for BMW engines and are £3 or £4 a pop.:eek:

Whilst I had my specs on I checked the M6 screws for the sprocket on the camshaft....they are 8.0, which is very high for such a small diameter.

So two lessons there; wear spectacles or even have a magnifying glass handy whilst engine-building and don't just assume that if a setscrew or bolt fits the job that means it's the right one. Maybe a third lesson; if you dismantle something, try to rebuild it in a shorter time-frame than three years!
 

Attachments

  • NOV_5288.JPG
    NOV_5288.JPG
    2.1 MB · Views: 33
Perhaps a more helpful suggestion Peter would be to get a selection of 'zippy top' bags, group bolts,put them into a bag and label the bag--it is what we do at the classic car garage i work at.
A good place to obtain high tensile bolts (and stainless)is "Westfield Fasteners"---sensible prices and first class service.
 
The Newmans Cams website is excellent...very helpful.(y)
Maybe a third lesson; if you dismantle something, try to rebuild it in a shorter time-frame than three years!

Yes agree about Newman cams, they were very helpful and efficient advising on and carrying out cam reprofiling.
I like to see the right bolts in the right place where it is important and I think it is a sign of an original or well rebuilt engine. I have kept all of my Fiat fasteners separate and have collected quite a few over the years if you come up short.
Some time ago an owner asked me to rebuild his 126 gearbox which had been stripped down years before and left out in the weather so some bits were rusty and some had got lost. I completed the challenge and when the guy came back to collect it he proudly announced that he had the 126 engine in his car and it had been totally rebuilt.
From a distance the engine looked very shiny then close up my suspicions were raised mainly by the fixings. One example being the flywheel being held in place by only 5 socket head bolts instead of the 6 hex head originals. When the guy had the engine and gearbox back in the car the engine refused to turn over even with a tow in a high gear. Turned out the engine had been so badly assembled the crankshaft was locked solid.
 
Perhaps a more helpful suggestion Peter would be to get a selection of 'zippy top' bags, group bolts,put them into a bag and label the bag--

....a good suggestion and probably best practise all round. I did box-up and label all the sub-assemblies of the car when I restored it, but that was more about keeping things in good condition. I prefer my way despite the chances for losses because here can be no confusion when there are small detailed differences in fixings that look very similar; for example, the three slightly longer setscrews on the timing-chain cover; it forces me to think more carefully. :).
 
I have kept all of my Fiat fasteners separate and have collected quite a few over the years if you come up short.

....I'll bear that in mind.

Labouring the point about those bearing carrier bolts I mentioned earlier, I noticed that the torque setting is 22 ft.lb whereas on the 499cc engine it is 17 ft.lb. So that might even mean that the specification of the fixings was upgraded on the bigger engine?

In any case, Ive torqued and Loctited them all up and at this stage at least, the crankshaft turns over smoothly.:D
 
The official Fiat workshop manuals usually devote a page or more in the Engine section to tightening torques and also gives the part no. of each fastener, it's thread diameter and pitch, and the material used which includes it's strength rating e.g. 50, 80, 100 etc. (so bolt head might be marked 5.5, 8.8 or 10.9). There's also similar information pages at the end of each chapter e.g. Clutch/Transmission, Axle, Steering, Front and Rear Suspension etc. for fasteners used in these areas.

Be particularly careful concerning flywheel mounting bolts - these may be (depending on application) 120 to 135 (12.9 or above) and are often Nickel-Chromium-Molybdenum. Some Fiat flywheel bolts (the type with 6 deep lines radiating from a hollow on the bolt head) have a machined recess under the head, this causes the head to distort slightly when correctly torqued, which acts as an anti-loosening feature. Also, these v.high tensile strength of bolts are typically found on Crownwheel to Differential Cage mounting.

Gearbox selector fork bolts are often 100 strength, (can also be 10.9 on bolt head), despite being only 6x1mm thread.

One word of caution - many enthusiasts replace fasteners with stainless steel equivalents for appearance/rust prevention reasons. Be aware that stainless steel is not as strong as some of these higher rated bolts used in critical applications. St/St is fine for normal stuff but not for critical, highly loaded areas etc. If in doubt, best to seek advice from the fastener experts.

Also I've heard that St/St when in contact with aluminium can cause serious corrosion to occur, essentially welding the part together. So again, best check with the experts.

Al.
 
Last edited:
Back
Top