Technical 704cc 'HOT' Engine Build

Currently reading:
Technical 704cc 'HOT' Engine Build

I'm no expert (clearly) in the dark arts of engine CR. Whats the pro's and con's of having a higher CR?
R
 
Put simply, the higher the compression ratio, the greater the potential for more power. For a given capacity, the higher the compression ratio, the more the 'sucked-in' fuel/air mixture is squeezed, which will release more 'bang'. The downside of a higher compression ratio is that you HAVE to use a higher octane fuel. In the UK, the 2 highest octane fuels are BP 'V' and, unexpectedly, Tesco's 'Momentum'---both are 99 octane. I try to use 'Momentum' all the time. (as a bonus, it has a low level of ethanol in it). It must be pointed out however, that 'just increasing the compression ratio' is not a guaranteed short-cut to more power. The higher C/R must be used as part of a package which includes different valve timing, the higher octane fuel, improved air-flow through the cylinder head, altered ignition timing, better exhaust extraction and a fuel supply system (be it carbs or fuel-injection) that will supply the extra fuel required that will allow all the above, when used in conjunction with each other, to release that extra power.
 
It sounds like you can't take anything for granted with this build. I'm trying to get my head round the Catch-22 you must have when you're trying to get the height of the barrels just in that sweet-spot.:bang:

Hi Peter, Catch 22 indeed (n)(n) The fundamental problem I have is that rather than having all the parts at a new position, or at least a known position, I have a collection of parts both new and second hand that are largely unknown in size and fit (n)(n) It may seem manic to try to achieve the 'sweet spot' but, in terms of engine efficiency and longevity getting the Squish band right will save a great deal of heartache later. If it's not right (or damn near) the engine will suffer with over heating and detonation at least and if left you could end up with the pistons collapsing inside the barrel. The balance between Cam, C/R, valve timing and ignition is something I am only starting to understand. :confused::confused:
Ian.
 
I'm no expert (clearly) in the dark arts of engine CR. Whats the pro's and con's of having a higher CR?
R

Hi Lobster, Tom@thehobbler is correct in what he say's but also the main reason to fit a 'faster' Cam is to increase the valve timing or basically the valve overlap, so that more mixture can be induced into the cylinder in the finite time you have between all the actions during an engine cycle. Now, if you have a cam that opens the valves earlier and holds them open for longer (increasing the overlap) to achieve and increase the mixture in and exhaust out process the engine will loose efficiency and power because the valves are not fully closed early for the power stroke, thus with a higher C/R the loss with higher cam duration is smaller (y)(y)(y)
Ian.
 
Greetings All, Apologies for the delay in updating here, but the decorating had to be done, the garden had to be done and .............. I think you get the idea (n)(n)(n)
Anyway I've just had a very productive visit to my local (not very) Rolling road to get the final tweak to my carb set up. It's a 50 mile round trip so was a good drive to add a few more miles to the total since running in. The car (to my mind ) was running well with a slight propensity for the idle to run-on, but a steady run got me to the church on time!! (y)
Readers will remember the final jet settings I had arrived at in a previous post, these were a good start for the rolling road as thankfully there was not too much changing of jets required to get good clean (ish) emissions and more power than previously.

Richard of Motoscope (Northallerton) first found that the mixture circuit was still too lean and had to open both screws an extra 2 1/2 turns to get an acceptable idle, this prompted a change in both pilot jets up from 47 to 48. But, this made the running much worse and to get the best running we replaced both 47 Pilot jets again. We did have a think about the situation and concluded that the 48 jets were not working as they should have. I may obtain some 49 pilot jets later and try again. I now have both mixture screws at 4 turns open to balance the running at idle, I will have to replace the retaining springs as they are no longer putting pressure onto the screw properly (n)(n)
Once the rolling road 'drive' started it became evident that the main jets were running too lean at the top end of engine output, so we changed the main jets from 140 up to 145 and this has cured the lean out. It was a sod of a job to take the carb off to get at the underside as the clock was ticking!!! We did try advancing the timing slightly and found that a very small advancement helped to overall running.
I asked Richard to limit the power runs to 5000rpm so that my sanity and the engine could stay in one piece for the drive home, this has resulted in the following figures -
Max power at the wheels @ 5000rpm 32.0bhp
Max power at the flywheel @ 5000rpm 36.2bhp
Max torque @ 5000rpm 38.0 lb/ft
Had we gone higher with the rpm the result would be close to 40bhp @ 5500rpm according to the machinery and overall I'm pleased that the work I've had done and completed myself has given a modest increase. Now that the Solex is sorted I have to get the new engine back from the engineer and finish the job, I'll probably end up back with Richard (cannot recommend him enough) once it's run in - more later.
Ian.
 

Attachments

  • IMG_0054.jpg
    IMG_0054.jpg
    65.3 KB · Views: 63
  • IMG_0055.jpg
    IMG_0055.jpg
    37.2 KB · Views: 66
  • IMG_0056.jpg
    IMG_0056.jpg
    36.2 KB · Views: 37
  • IMG_0064.jpg
    IMG_0064.jpg
    34.9 KB · Views: 56
  • IMG_0061.jpg
    IMG_0061.jpg
    34.6 KB · Views: 65
Just a brief update, I've added a pic of my carb problem with the mixture springs now too short to apply tension onto the mixture screws, the temporary lock wire is still in place - springs are on the way (y)(y)(y)
One thing that has alarmed me a great deal during this whole process is the very high level of road dirt contamination getting into the engine bay. I have the lower engine/alternator shield in place, but still the oil cooler is taking a lot of contamination into the matrix (n)(n)(n) 
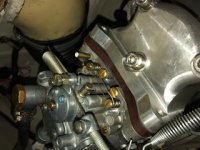
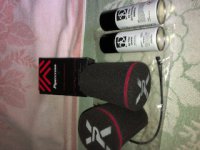
It may be due to the fan sucking it in, but the dirt is everywhere :mad::mad::mad: Given this is happening I am going to fit a set of Piper Cross filter socks onto the carb venturi. The engine is drawing in a lot of air and probably dirt as well and I don't want my work ruined by the lack of some simple filters (y)(y) More later.
Ian.
 

Attachments

  • IMG_0067.jpg
    IMG_0067.jpg
    33.7 KB · Views: 55
  • IMG_0068.jpg
    IMG_0068.jpg
    30.3 KB · Views: 25
Greetings, I have fitted the filter socks and found the process a rather messy ill fitting one (n)(n) The dirt retention fluid is liable to get all over the place unless one is careful applying it onto the exterior of the socks, but it is good for some 10,000 miles according to the leaflet ??? The socks themselves needed to be cut down in my case as the venturi are small and so the fit is at a crazy angle - not so pretty as open carb throats, but protected from dirt ingress (y)(y)
I have crunched the numbers and found that the mods (so far) have given me a 51% increase in BHP over the standard 126 engine - result (y)(y)(y)
Ian.
 

Attachments

  • IMG_0083.jpg
    IMG_0083.jpg
    28.9 KB · Views: 40
It's Back (y)(y)(y) Only been gone since December 2018 (n)(n) It seems that my little donkey has been shunted onto the back burner while other race and rally engines get completed !!!:mad::mad:
Anyway with the carb sorted on the other engine I can now get on with the original build.
I'll start with the cam and rocker adjustment that has been completed. Timing of the gear set has taken a while to get exact, but Alistair and his son have achieved cam timing to half a degree using the vernier cam sprocket (see pic) I was advised against using the original cam bolts or hi tensile socket bolts as they both have the tendency to round off under torque application. So proper M6 cam cap screws and special washers were used to prevent cam slip. The installation of the gear set is very neat and even with using larger bolts on the idler gear no fouling takes place (see pic)
As I thought the pushrods have been shortened by just over 3mm to achieve the proper rocker angle (see pic) A new set of valve springs have been fitted too. I have also obtained a set of steel heavy duty mounts to stiffen up the rocker rail - I'll show these when I rebuild the rocker assembly.
More later (y)(y)(y)
Ian.
 

Attachments

  • IMG_0204.jpg
    IMG_0204.jpg
    40.4 KB · Views: 57
  • IMG_0208.jpg
    IMG_0208.jpg
    40.3 KB · Views: 46
  • IMG_0205.jpg
    IMG_0205.jpg
    35.2 KB · Views: 70
Greetings, Moving swiftly on with the rocker rail mods I've found a problem with the rail mounting studs that are in my head. Even though the Panda head is dated mid 1983 the studs have been inserted using an M10 thread and then tapered down to M8 above the head top, not sure if this was a later mod by Fiat to give the studs more purchase, but I can clearly see that this is not a later helicoil job, it's been manufactured this way??? Anyway the essential problem is that the original cast alloy rail supports have been given a small (6-7mm) relief so that the taper from M10 to M8 is accommodated with the support flat on the head. The new steel rail support blocks don't have the 'relief' so I shall have to drill them out to suit. The rocker arms themselves have been lightened to reduce reciprocating weight and the new spring sets have been checked at full lift on the cam to have the minimum required .25 thou clearance between the spring coils to prevent binding. All in all when fitted the rocker assembly should be rigid and strong. (y)(y)(y)
Next I'll cover getting your squish right :eek::eek::eek:
Ian.
 

Attachments

  • IMG_0210.jpg
    IMG_0210.jpg
    23.7 KB · Views: 68
  • IMG_0213.jpg
    IMG_0213.jpg
    30 KB · Views: 36
  • IMG_0211.jpg
    IMG_0211.jpg
    24.9 KB · Views: 33
  • IMG_0212.jpg
    IMG_0212.jpg
    45.3 KB · Views: 37
  • IMG_0215.jpg
    IMG_0215.jpg
    36 KB · Views: 55
A most excellent thread, and great read...….


Just to pick up on something due to my unfamiliarity of Fiat components...


Am I right in saying that the head you are using is from a fiat Panda and is of a twin port inlet chamber affair and it fits directly onto a 500/650cc set up?


Rob
 
A most excellent thread, and great read...….


Just to pick up on something due to my unfamiliarity of Fiat components...


Am I right in saying that the head you are using is from a fiat Panda and is of a twin port inlet chamber affair and it fits directly onto a 500/650cc set up?


Rob

Hi Rob, You are correct in stating that the Panda 30 head will fit onto a 650 engine. The Panda 30 did indeed run a 650cc twin cylinder, but it delivered it's '30' bhp at 5500rpm rather that the precursor 126/2 engine of the same capacity, that gave 24bhp @ 4000rpm. I am uncertain if the head will fit a 500cc layout and to tell the truth why would you want to??? If Fiat went for the larger capacity with this head maybe they accepted that it was an advance to the basic engine configuration before the engine was finally killed off. (y)(y)
Ian.


Morning Ian....


Great info as usual, looks like I need to be precuring myself one of these heads then for a potential little project I have in mind...…..


If you have or know of any for sale...…
thumb.gif
 
Morning Ian....
Great info as usual, looks like I need to be precuring myself one of these heads then for a potential little project I have in mind...…..
If you have or know of any for sale...…
thumb.gif

Hi Rob,
I'm afraid I don't know of any for sale, it would be a case of searching around - the demand would be high and prices too. (n)(n)
I would council you to take care with obtaining one as there are a few things one should be aware of - These heads are known to suffer cracking between the valves in the head pocket even with the standard size valves of 34mm inlet and 28mm exhaust. The repair of a crack is known to add strength to the area. The head does lend itself to porting and polishing of both the inlet and exhaust tracts to improve the breathing and even with two head studs protruding into the inlet I am told that the turbulence caused would not upset mixture flow to any great extent. Always check that the threaded areas for the exhaust and inlet manifolds are good, even if helicoiled. The rocker rail studs required the same caution as do the spark plug threads. Depending on the year of manufacture you will find that early heads (as with my 1983 head) only have a valve stem seal on the inlet valve. Whereas the later head (as with my 1985 head) have seals on both inlet and exhaust valve. These should be replaced if you cannot be sure of their age. You must establish if the head has been skimmed or not and by how much. If in doubt measure the capacity in cc . The main reason for this is that the capacity of the head directly affects the final compression ratio and if the squish area is good or not. My two heads are both skimmed to give different final compression ratio's, but it's still a faff to arrive at your planned figure. The pushrod tubes are also a pain, it's best to change them for VW items. Finally you may find that the external shape of the head has been cut away to facilitate the correct tight fit of a fan housing of one type or another (mine have) don't be put off by this as it has probably been done for good cooling. If you have any questions let me know.
Ian.


Hi Ian


All points noted thank you, pretty much the same scenario as the VW heads with the cracking/seals etc although I will take care with the potential issue of the head been skimmed.


Thank you for the offer of further testing your grey matter.....


I note you are just up the A1 from me also
thumb.gif


Regards Rob
 
I will be fitting a 'Panda30' head onto my 'currently in-build' 695 engine, but instead of fitting the ubiquitous Weber DCOE/Dellorto/Solex twin side-draught carb I am taking a leaf out of the VW tuning book and fitting a Weber 34 ICH single downdraught carb---the same sort they fit to the early 1200/1600 VWs (1 per side). I am led to believe that the jury is still out regarding the benefit of the Panda30 head vis-a-vie the standard head---the ports are a bit too close to each other. Look at the 'after-market' twin-port heads and the inlet ports are definitely further apart, which will give a better 'flow'
 
I had a ride in a 500 with a 650 engine, Panda 30 head & carb and fast road cam. With 3 adults onboard the car pulled really well even on quite a long steep hill. I was very impressed :)
 
Greetings - moving on with "SQUISH" :eek::eek::eek:
"Squish is an effect in internal combustion engines which creates sudden turbulence of the air-fuel mixture as the piston approaches top dead centre (TDC)".
Getting the Squish band right can improve your engine performance purely by the achievement of good mixture turbulence or swirl in the cylinder that promotes good burning. The 'perfect' squish band is quoted as 0.040" or 1.016mm any smaller may cause the effect to begin too early in the cycle and any larger may cause less of an effect the bigger the space. Problems related to this are detonation, overheating, improper mixture burn and a lack of efficiency and performance. I am told that the smallest measurement is 0.030" and the largest 0.060" either side of the sweet spot. My engine is now running a squish of 0.045" or 1.1430mm we tried to get it perfect but other factors contrived to prevent the achievement of a perfect number.
If you plan on expanding the capacity of your engine at the same time as giving it a performance enhancement crunch the numbers first and for heavens sake measure all the component parts accurately because it may make a big difference. (y)(y) 
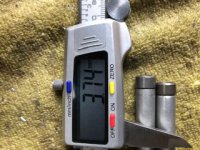
Our main problem was with the capacity of the head, in that it measured 34.2cc having had an unknown amount of material removed previous to my ownership. The required C/R was to be no more than 10.5:1, but when all of the different parts were measured we could only come up with 11.0:1 minimum, and that was a bridge too far for me as I don't want a race engine!! (n)(n)
Essentially we had known stroke and bore numbers and the deck height was known too, but the bits in between were the fly in the ointment. I had supplied a copper head gasket of 81.5mm bore at 0.5mm thick along with three different steel support plates to fit the spigot area of 85.5mm. All were measured accurately and ALL were incorrect - not by much but incorrect all the same. So the final figures if taken at face value would have been wrong. The game began with the selection of support plates to adjust the deck height with or without the head gasket and no matter what the selection was the C/R came out wrong (and too high). In the end we decided to remove a small amount of material (1.5cc) from each piston top to give an increase in capacity, thus we now have a C/R of 10.5:1 and a squish of 1.1430mm (0.045") In fact the removal of the piston material will improve the squish effect below the plug. (y)(y) All in all if you have a head that has not been butchered you can very accurately plan the C/R and squish prior to assembly. Don't just guess and throw it together, have a good idea of what you want to achieve and plan ahead - You know it makes sense :devil::devil::devil:
more later.
Ian.

CANNOT UPLOAD PICTURES?? ANYONE ELSE GOT THE PROBLEM????
 
I will be fitting a 'Panda30' head onto my 'currently in-build' 695 engine, but instead of fitting the ubiquitous Weber DCOE/Dellorto/Solex twin side-draught carb I am taking a leaf out of the VW tuning book and fitting a Weber 34 ICH single downdraught carb---the same sort they fit to the early 1200/1600 VWs (1 per side). I am led to believe that the jury is still out regarding the benefit of the Panda30 head vis-a-vie the standard head---the ports are a bit too close to each other. Look at the 'after-market' twin-port heads and the inlet ports are definitely further apart, which will give a better 'flow'


After market twin port heads you say?!?!?!……….


Perusal is required I think (or a link mate please)


Rob
 
2 suppliers that spring immediately to mind re. 'twin-port' heads for the 500 are:--"D'angelo Motori" and "Lavazza Techno". There are others, but it will take me a bit of time to sort them out (if you want me to)
 
Back
Top