General Guess what I am doing tomorrow?

Currently reading:
General Guess what I am doing tomorrow?

Vitesse

RIP
Joined
Oct 26, 2011
Messages
2,055
Points
444
Location
Westerham
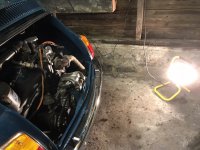
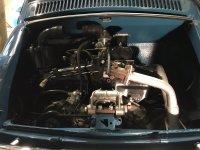
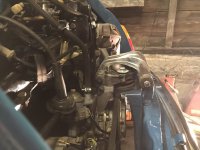
Three years after I rebuilt it I thought it was time to carry out the transplant.

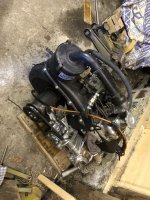
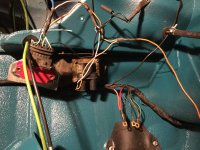
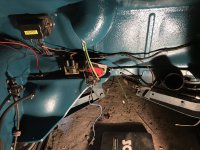
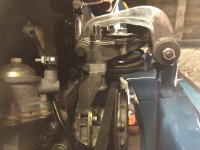
1997 650 engine without distributor, so once the old engine is out a bit of tweaking will be required to install the ignition control unit and twin coil and 850 ignition switch to start the engine.

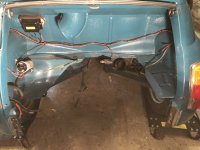
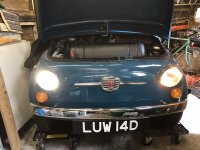
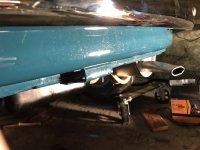
The car is sitting on some wheel dollies, so it can be moved about which should aid removal and installation.

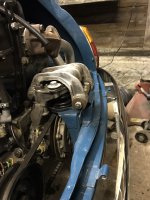
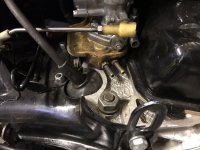
The engine has been bench tested but it needs to be road tested to prove the rebuild is good, basically it needs a good thrashing:D. It should be interesting to see how this non adjustable ignition works, it’s supposedly meant to be very efficient?
 

Attachments

  • 48034919-B685-481A-9D4D-B3C689FD9A80.jpeg
    48034919-B685-481A-9D4D-B3C689FD9A80.jpeg
    902.6 KB · Views: 71
  • C93AEA9E-EBA3-47BF-A471-19380772CF34.jpeg
    C93AEA9E-EBA3-47BF-A471-19380772CF34.jpeg
    841.8 KB · Views: 58
  • EF4546C1-2438-42A6-BE4F-0A9D8B9A0EB4.jpeg
    EF4546C1-2438-42A6-BE4F-0A9D8B9A0EB4.jpeg
    1 MB · Views: 60
It should be interesting to see how this non adjustable ignition works, it’s supposedly meant to be very efficient?

As far as I can work out, that type of engine has a precursor to a modern engine-management system fitted. So like the 123 ignition, it should never need adjusting anyway. Is it connected to any sensors other than the TDC pickup? I presume that it's internal settings set give just the right advance curve to suit the camshaft as fitted.
Now I have it properly adjusted on my car I'm pleased with electronic ignition. It is very smooth and there's never any hesitation or popping on the over-run.
You're going to be getting 60 smiles a minute out of Luigi after all that time away from him and then blasting in with that big engine.
From what can be seen of your original engine it looks almost too good to take out but I bet it's unlikely to be going back in any time soon. :)
 
Is it connected to any sensors other than the TDC pickup? I presume that it's internal settings set give just the right advance curve to suit the camshaft as fitted.

There is a vacuum sensor which is connected to the ignition control unit obviously for retarding and advancing the ignition on acceleration and deceleration.

I have extracted the old engine, it took about an hour but of course I forgot to disconnect one cable and was wondering why it wasn’t moving, there is always one!!!!!

Engine bay is a bit grubby:eek:

Next step is to make a list of what I need to do, so that I don’t miss anything out before I install the 650 engine. I have a spare voltage regulator that I got from eBay for a fiver so need to gut that for alternator conversion.

I have spent my free €100 voucher from Axel Gerstl on a 3.5 litre alloy sum, so that should turn this week and will go on the 650.
 

Attachments

  • 7CB1B4E1-7BBD-4264-9C7E-22298742DFF0.jpeg
    7CB1B4E1-7BBD-4264-9C7E-22298742DFF0.jpeg
    774.6 KB · Views: 55
  • 31768A23-F91A-48DA-8675-9ED814BF868E.jpeg
    31768A23-F91A-48DA-8675-9ED814BF868E.jpeg
    919.7 KB · Views: 57
  • 36B8DF4D-4B40-4E29-8924-E49E7A3779D3.jpeg
    36B8DF4D-4B40-4E29-8924-E49E7A3779D3.jpeg
    906.8 KB · Views: 60
May I suggest that before you fit the 'new' engine, and whilst you have the old sump off the engine, you carry out the modification to the exhaust bracket securing screws/studs. I can fully describe how to do it if you want to contact me direct ([email protected]). This is an Abarth recommended mod---I do it on ALL the engines that I build up, and as a result have never suffered any exhaust mounting problem.
 
Thanks Tom. I’ve read it a couple of times and found it on one of your previous posts.

Tony
 
Did a bit today, nothing major. I drilled some holes in the rear shelf in the engine bay to mount the ignition control unit:eek: Worked our what I need to do with the wiring but I am trying to do it so it’s a simple plug and play conversion from 500 to 650 and vice a versa, so in short no chopping of bits off the existing loom.

It’s not bolted down yet as I want to spray some Waxoyl underneath the shelf where I drilled the holes. Also the throttle and choke cable don’t snag, they are just pulled out of the way to prevent me taking my ? out.

Once it’s all bolted in I can tidy up the wiring and connect it up.
 

Attachments

  • 775917E8-10DC-4C8E-9E4F-DACF29227909.jpeg
    775917E8-10DC-4C8E-9E4F-DACF29227909.jpeg
    2 MB · Views: 44
Wiring is as good as finished, I have bolted the ignition control unit in and all connected up. I have run a new wire from the ignition switch for the starter solenoid, so it will start now with a twist of the key. Dummy voltage regulator for alternator conversion. New heater tube fitted. New alloy sump has arrived, so I need to get a can of engine oil tomorrow and get the 650 engine in, so hopefully it should be a test run this weekend!
 

Attachments

  • 51FC0A82-BC88-4A25-9223-D65906F6FBEF.jpeg
    51FC0A82-BC88-4A25-9223-D65906F6FBEF.jpeg
    1 MB · Views: 48
I also noticed one of my side light bulbs in the headlights had blown, so I thought I would order some LED replacements. They are made by Osram, so they are a decent make, I swear they are brighter than the original main headlight bulbs and these are just the little side light bulbs.

You can see below a comparison of new and old below.
 

Attachments

  • E7BF441D-887E-4199-9BE1-D1C783C65955.jpeg
    E7BF441D-887E-4199-9BE1-D1C783C65955.jpeg
    770.2 KB · Views: 43
Engine and gearbox went in easily enough but I have a problem where the exhaust is really tight against the rear cross member, so I need to either change the spring or put a spacer under the engine mount to force the engine down. It currently has an uprated spring installed, so I will try the others I have which are standard ones and I also have a 126 engine mount but I don’t think that will work.

I think a spacer is the way forward as it is literally touching the rear panel at the moment and a lesser spring is going to allow the engine to move around more, so it will probably bang on the panel while driving.
 

Attachments

  • 5F7AB60F-CB2C-4427-9D60-8991A87CB306.jpeg
    5F7AB60F-CB2C-4427-9D60-8991A87CB306.jpeg
    797.3 KB · Views: 42
  • C7AC4AAD-67EA-43A5-8962-A77E3589DE68.jpeg
    C7AC4AAD-67EA-43A5-8962-A77E3589DE68.jpeg
    739.9 KB · Views: 49
a lesser spring is going to allow the engine to move around more, so it will probably bang on the panel while driving.

I'm not so sure about that; your up-rated spring looks like it's possibly made from a thicker section of steel and is definitely not compressed as much as my standard one.

32839797604_3bc0db10ae_c.jpgMAL_3609 by Peter Thompson, on Flickr

It's worth reading Sean's comment about the spring and looking how low my engine went with a standard spring.

https://www.fiatforum.com/500-classic/438713-650-engine-rebuild-6.html?p=4253287

https://www.fiatforum.com/500-classic/438713-650-engine-rebuild-7.html?p=4253343
 
It's worth reading Sean's comment about the spring and looking how low my engine went with a standard spring.

Yeah I had a read of Sean’s thread earlier. I went and had a look again after my last post and it definitely needs a spacer as the exhaust pipe on this 650 engine doesn’t come down at such an acute angle, it is much more horizontal. The spring in my picture was an uprated one. Uncompressed it’s about 70mm high and has only about 4 or 5 turns in it. I have a much thinner gauge spring, which I think was the original and is about 120-130mm and has a lot more turns, does the latter sound similar to the one in your picture?

Fortunately Ricambio is only 30 mins away and they sell the spacer with longer studs, so I’ll probably take a trip over there tomorrow. There are a few other things that need addressing, like some wires that need extending and I’ve had to order some more fuel pipe and a metal T piece, as the only one I have is plastic and I don’t fancy putting that in the hot engine bay
 
Its not just the exhaust hitting on the rear crossmember Tony, look how close your fan belt is to the engine mount. Once that engine starts bouncing you’re in danger of the two clashing
 
Its not just the exhaust hitting on the rear crossmember Tony, look how close your fan belt is to the engine mount. Once that engine starts bouncing you’re in danger of the two clashing

Yeah I am aware of that Damian. I took the engine mount off afterwards and dropped the engine down on the trolley jack, so that it replicated how it would sit if it had a spacer installed. It gave it decent clearance on the engine mount but the exhaust, whilst it cleared the rear cross member, still only had a clearance of about 10mm. I can only try it and see what happens?
 
Yeah I am aware of that Damian. I took the engine mount off afterwards and dropped the engine down on the trolley jack, so that it replicated how it would sit if it had a spacer installed. It gave it decent clearance on the engine mount but the exhaust, whilst it cleared the rear cross member, still only had a clearance of about 10mm. I can only try it and see what happens?


I had the same problem Tony even more so when I had my boy racer exhaust fitted. I made my own spacer 12mm thick. The ones you can buy come in two thicknesses. 12mm and 18mm I think
 
Ok been to Ricambio to get a spacer and some longer studs, it wasn’t cheap for what it is!

It was an awkward thing to fit, as having extra long studs means it is impossible to get the mount over the studs because it catches on the engine tin work, especially with the spring in place, which is obviously needed. In the end I had to install one stud into the block and press the engine mount down to compress the spring so I could get a nut on the stud and hold it in place. Then install the other stud in the block with the engine mount in place. I used the original spring rather than the uprated one and it’s now got decent clearance on the fan belt, so that should be ok. The exhaust has about 15mm clearance now from the rear cross member, if I really bounce the engine around, it hits but I’ll be able to assess it better once the engine is running and I have enough spare thread on the new studs to adjust as necessary.
 

Attachments

  • 86D7A9C3-9340-4EAA-86C9-0AE574789893.jpeg
    86D7A9C3-9340-4EAA-86C9-0AE574789893.jpeg
    685.4 KB · Views: 49
  • FC3FEE41-F39D-48F4-8E43-440D74B84186.jpeg
    FC3FEE41-F39D-48F4-8E43-440D74B84186.jpeg
    616.7 KB · Views: 49
  • 90B48AE9-41A2-4727-AC20-4D40636F997C.jpeg
    90B48AE9-41A2-4727-AC20-4D40636F997C.jpeg
    655.6 KB · Views: 42
Anyone know why Fiat changed the design between the 500 and 650 engine Bakelite carb spacer? On the 500 it had a little single drip pipe that exited between the spark plugs and dripped any fuel onto the tinwork. On the 650 it has a pair of pipes that exit behind the spark plug and would drip onto the top of the block.

My neighbour was helping me prime up the fuel lines and pump today and was a little concerned that the 650 drip pipes exit quite close to the manifold. I would imagine that if Fiat were concerned that there was the potential for there to be a lot of fuel coming out of these drip pipes, they would have fitted fuel pipe to drain any excess down to below the engine.

I have seen signs of fuel having dripped down onto the tinwork on the 500 engine. But where these pipes are on the spacer it’s only ever going to be a fuel air mixture. Axel Gerstl describe them as depression connections? Are they just there to allow any left over unburnt fuel air mixture to escape once the engine has stopped running?
 

Attachments

  • 5616705A-3955-4023-B5AB-49A8BDDAAAF7.jpeg
    5616705A-3955-4023-B5AB-49A8BDDAAAF7.jpeg
    771.5 KB · Views: 37
Tony, are you sure that they are drip tubes? Mine is an earlier engine than yours and doesn't have them. It has a small hole through from the top surface of the tray and oily residues do slowly collect there from somewhere and then drip onto the cowling safely.
Both of those pipes look like they should have a flexible pipe attached. If they are drilled through and meet up in any way with the carburettor throat, uncapped I would expect them to mess up the running of the engine in any case. Is there possibly another sensor that these should be connected with?
 
Back
Top