Technical Unusual problem - engine cut out??

Currently reading:
Technical Unusual problem - engine cut out??

Ian,

Sorry to here of your latest mini catastrophy.

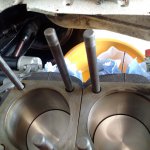
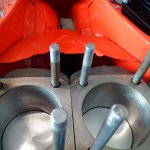
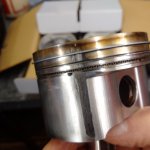
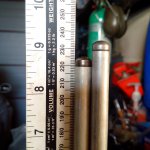
I too, reckon that the studs should be installed with the longer thread portion in the crankcase. If the studs are fitted with the shorter thread portion in the crankcase, they will likely protude too far above the cylinder head and have to be shortened to allow the domed cyl. head nuts to fit without bottoming out internally. This might be what has happened on your engine?

My approach is always to try to work with what I have and repair rather than replace if at all possible. This way you get to keep your original crankcase, with the same engine number. You also save the cost of a replacement crankcase, the cost of having it bored out to accept your larger cyl. barrels and possibly a whole lot of time?

With this in mind, another possibility with regards to fixing the stripped crankcase thread would be to have the stud hole welded up, then redrilled and a standard size thread tapped. This would be my preferred solution, but obviously cost and access to someone capable and equipped to carry out this type of repair is a factor unless you can do it yourself.

Re:- use of Helicoil inserts. 10x1.25mm inserts are available and in different lengths but as pointed out above by 'the hobbler'? (Tom) are not a 'common' thread pitch so are unlikely to be found in a kit. The installation tool for 10x1.5mm can afaik be used on 10x1.25mm inserts but you'll need a different tap (i.e. 10x1.25mm) and possibly a different drill to prepare for this tap. Helicoil used to say that a number of inserts can be used together to make up a long thread but best to try to locate a supplier of one sufficiently long insert for this application.

If the cyl. head stud was fitted upside down (i.e. short thread into crankcase) then maybe only part of the thread has been stripped. There may still be enough thread to adequately hold a stud fitted correctly (i.e. long thread into crankcase). Alternatively, it might be possible to gain sufficient thread depth to securely hold a stud by drilling and tapping the hole deeper into the crankcase, but you might then have to source/make a longer stud to fit.

I'd recommend checking all remaining cyl. head studs are installed the correct way up and that there are no cracks around crankcase stud holes.

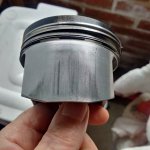
Re:- the bent pushrod and damaged valve clearance (tappet) adjusting screw. Looks to me to have been caused by the errant cyl. head domed nut becoming jammed between the rocker arm and the rocker (valve) cover. Are there any witness marks on the underside of the valve cover to corroborate this? If so, I'd recommend carefully checking the relevant cam lobe, follower and rocker arm for any further damage. Such components don't take kindly to something effectively becoming' a spanner in the works' and may have suffered stress fractures/cracking. So they need to be checked carefully, if possible employing crack-testing equipment or at least a kit if further problems are to be avoided.

Good luck with the rebuild! (y)
(I think I said this before......)

AL.
 
Last edited:
Greetings, The stud was installed correctly (long thread down) and even though there is a lot of thread remaining in the case it will not hold any torque. I've managed to source some 10 x 1.25mm inserts at 2D and 2.5D (20 and 25mm) but I shall have to be careful when drilling as they do require a small untapped area below the insert - I'll just have to measure carefully !!(y)(y)
I do intend to replace all the studs, but will have to cut two for the inlet passages.
I take your point about crack testing Al and will sort some dye penetrant from somewhere????

Ian.
 
Greetings, while waiting for the replacement parts for my engine I got to thinking about the causes of the stud pulling out of the crankcase - had I overtorqued it ??????? :eek::eek: I have two 'budget' torque wrenches and wonder about the accuracy of the setting applied to any bolt/nut (n)(n) So methinks I will get a Digital Torque Adaptor - crikey they are not cheap !! But I might just save another pulled stud - I hope :bang::bang::bang:
 

Attachments

  • IMG_20180406_154420.jpg
    IMG_20180406_154420.jpg
    1.6 MB · Views: 25
Greetings, am awaiting the studs to complete the replacement of those and the rocker gear, I'll helicoil the duff thread with a 2.5D (25mm) part that will go deep enough. Interestingly, I took a look inside the cylinders and noted something I did not wish to see :bang::bang::bang: the pics show that the pistons (new) are rubbing on the sides of the bores --- What the!!!! just what is going on here??? piston to bore clearance too tight or what???? The car has only run 65Km in mid winter, gentle running with the oil just reaching 80degC. Don't tell me it's happening AGAIN!!! HELP PLEASE!!!!!
I'm not going to fork out my hard earned again if this persists (n)(n)

Ian.
 

Attachments

  • IMG_20180408_164644.jpg
    IMG_20180408_164644.jpg
    1.5 MB · Views: 40
  • IMG_20180408_164655.jpg
    IMG_20180408_164655.jpg
    1.5 MB · Views: 45
Last edited:
Assuming that the bores are the correct size for the pistons, the only other thing I can think of is that the rings are too tight and haven't got enough gap to allow for expansion. I've rebuilt Alfa engines where pistons and sleeves come in matched sets where the rings are correctly gapped for the sleeve, but this may not be the case with all manufacturers.
 
Hi Ian,

Can you elaborate on what you mean by the 'pistons are rubbing on the sides of the bores'.

I've tried enlarging the images but all I can see wrong are some bedding-in marks and a few small up and down scratch marks (possibly caused by some grit that 'sneaked in'). Also what's with the small black patches in a few places at the top of each cylinder bore? Are these previously used cylinders that have been honed/cleaned up/deglazed and fitted with new pistons?

But if in any doubt, it's best not to continue with re-assembly and instead strip it down and examine/measure piston to bore clearance and as Hobo1960 has mentioned piston ring gap. (insufficient ring gap can result in broken rings and bore damage).

AL.
 
Last edited:
Hi Ian,

Can you elaborate on what you mean by the 'pistons are rubbing on the sides of the bores'.

I've tried enlarging the images but all I can see wrong are some bedding-in marks and a few small up and down scratch marks (possibly caused by some grit that 'sneaked in'). Also what's with the small black patches in a few places at the top of each cylinder bore? Are these previously used cylinders that have been honed/cleaned up/deglazed and fitted with new pistons?

But if in any doubt, it's best not to continue with re-assembly and instead strip it down and examine/measure piston to bore clearance and as Hobo1960 has mentioned piston ring gap. (insufficient ring gap can result in broken rings and bore damage).

AL.

Hi Al, I will try to shorten a Very Long saga that has been a thorn in my side ever since I obtained my car !! I will also attach some pics to illustrate my problem(s)
My engine has modified VW cylinders, that were 80.0mm bore originally, this was apparently a mod used when the price of '695' kits was high. The pistons fitted were from a 126 BIS of 80.0mm, now you would think that the parts would fit together, But the piston to bore gap was some 0.26mm and regarded as excessive by my engineer!! My initial problem was engine rattle (piston slap?) which gave me identical vertical scouring/rubbing and I suspect this was due to overheating. see pic1 Due to the fit I decided to rebore and obtain 80.5mm pistons, after rebuild the engine ran well until the (death rattle(thread)) returned
the result was as pic 2. The bores needed rehoning only, another new set of pistons obtained as the front piston was deformed!!! I now have the engine rebuilt and run 65Km when the stud pulled out (black marks) the light scouring or scratches are identical to the original fault and although the engine is not rattling (yet) I fear the worst. My engine man has vast experience, but I will ask for the piston to bore gap used. The Athena kit uses 0.06 to 0.08mm. I have a 4ltr sump
spin-on filter and oil cooler!!! What else must I do to have a reliable engine ????
:bang::bang::bang:
Ian
 

Attachments

  • IMG_20160810_164948_hdr.jpg
    IMG_20160810_164948_hdr.jpg
    1.9 MB · Views: 23
  • IMG_20170808_112354.jpg
    IMG_20170808_112354.jpg
    1.1 MB · Views: 22
Hi Ian,

The immediate short answer to a reliable engine might be to revert to standard Fiat cylinders and pistons.

But presumably this is not what you want to hear, given your investment.

I'm wondering if the problem is due to modifying VW cylinders? Iirc, VW cylinders have cooling fins all round and have space between them when installed. Your cylinders, modified to fit the Fiat crankcase, seem to be fitted very close together. I wonder if the cooling fins were removed to allow them to fit? If coolings fins have been removed on 1/4 of the circumference, maybe it's causing the cylinders to distort as they heat up and the pistons to catch due to insufficient piston to bore clearance in some places. This might be what has happened to cause the damage to the piston in your pic. no.2. Was this the same piston that was found to be distorted?

Normally, before assembly, a piston without rings fitted should drop when inserted into a cylinder. Maybe try this with your pistons and cylinders at room temperature, then heat pistons and cylinders in an oven to perhaps 200 degrees C. and see if the pistons still drop?

The problem might not be the actual piston to bore clearance being used but insufficient clearance at some part of the cylinder due to distortion occurring when heated. The use of the original exceptionally large piston to bore clearance might have been an attempt to overcome this problem. (running an engine with 0.26mm piston to bore clearance is not a good move, will cause piston to rock in cylinder, rings to wear-out, piston slap noise and possibly eventual piston failure).

I think it would be pointless to re-assemble this engine until the cause of this piston damage is indentified and corrected. I don't doubt for one minute the capability of your engine guy, but I think you need to move beyond measuring things when cold and experiment a little to see what might be happening to certain components as they heat up.

AL.
 
Last edited:
Hi, I've just dusted off one of my 30 year old engine technology text books. The book gives typical minimum piston skirt clearances. Depending on piston skirt design the values range from 0.005mm to 0.01mm for every cm of piston diameter. These figures appear to tally with the skirt clearance specified for the Athena pistons. Piston manufacturers usually specify what the clearance should be. Too much clearance will cause piston slap when the engine is cold and too little will cause over heating and possible piston/cylinder damage.

I think you're right to check with your engine builder to find out what clearance he used. If the clearance was correct for the pistons you'll have to look at other possible causes. As Al has said the problem may be with the modified cylinders, or it could be caused by the design of the pistons. Some piston designs are better at coping with variations in operating temperatures than others. I'm sure you'll sort the problem out and will end up with a great engine. I can remember having to rebuild an engine twice because some dirt had been left in a crankshaft oilway. I don't know how it had happened as I'd spent ages cleaning all the passages. The engine was an absolute pain to remove and I didn't enjoy having to pay for another crank regrind and a set of new bearings!
 
It is worth saying again that piston to bore clearance specified by the piston manufacturer must be adhered to.
 
Hi, I've just dusted off one of my 30 year old engine technology text books. The book gives typical minimum piston skirt clearances. Depending on piston skirt design the values range from 0.005mm to 0.01mm for every cm of piston diameter. These figures appear to tally with the skirt clearance specified for the Athena pistons. Piston manufacturers usually specify what the clearance should be. Too much clearance will cause piston slap when the engine is cold and too little will cause over heating and possible piston/cylinder damage.

I think you're right to check with your engine builder to find out what clearance he used. If the clearance was correct for the pistons you'll have to look at other possible causes. As Al has said the problem may be with the modified cylinders, or it could be caused by the design of the pistons. Some piston designs are better at coping with variations in operating temperatures than others. I'm sure you'll sort the problem out and will end up with a great engine. I can remember having to rebuild an engine twice because some dirt had been left in a crankshaft oilway. I don't know how it had happened as I'd spent ages cleaning all the passages. The engine was an absolute pain to remove and I didn't enjoy having to pay for another crank regrind and a set of new bearings!

Hi Hobo,
What do your old tech books state for a 80.5mm piston - can you give me the range of values please? (y) Not heard from the piston manufacturer yet!!!

Ian.
 
Hi, the book by Heinz Heisler gives the following as typical minimum values:-

Aluminium solid skirt piston 0.010mm per cm diameter.

Aluminium solid skirt with thermal slot piston 0.008mm per cm diameter.

Aluminium split skirt piston 0.005mm per cm diameter.

This means that an 8cm diameter piston with a solid skirt should have a minimum skirt clearance of 0.08mm.

The book was published in 1985 by Edward Arnold and is titled Vehicle and Engine Technology, by Heinz Heisler.

I hope the above information is useful in solving your engine problems.
 
If you want to read info on piston design, materials, manufacture, expansion-control measures (incl. Invar struts!) check out :-

'Light and Heavy Technology' by MJ Nunney (3rd Ed.1998, ISBN 0 7506 3827 3), published by Butterworth Heinemann

Also covers crankshaft design/balancing, camshafts/ bearing design, oils, gears, synchromesh types, carburettors and lots of other good stuff. If you want to see what a Mechanic is supposed to have studied in Tech. College, this book is good.

Might be available in some Libraries.

AL.
 
Last edited:
Greetings, I have managed to get the number 8 stud helicoiled successfully and have fitted the new studs, it was a bit of a faff to get a 25mm helicoil into the new hole, but with a little patience it went in nicely. I have saved getting any swarf contamination anywhere by using the wifes hoover at the same time to remove all the alloy drilled out oooer !!! :eek::eek: Will get on with the rebuild on Friday yippee!!! (y)(y)
Ian.
 
Greetings, Just when you think that all is going well - rebuild on course - Pistons and barrels in, sump on, filter pulley on, and head on, but wait a minute the new pushrods seem too long???:confused::confused: a quick measure and lo and behold my old pushrods are 225mm and the new set are 235mm what the !!!!!!!
:mad::mad::mad::mad::mad::mad::mad: How can this be????????
I know my engine is a hybrid of fiat 500/126 parts, but I didn't suspect this difference. They were ordered from VDL as (EP9490 N-D-F-L-R-G-126) so what have I got 126 BIS? or something else - HELP required please :eek::eek::eek:
 

Attachments

  • IMG_20180420_192057.jpg
    IMG_20180420_192057.jpg
    1.4 MB · Views: 19
Back
Top