General Bearing pre-load

Currently reading:
General Bearing pre-load

El cargador

Member
Joined
Jan 20, 2016
Messages
292
Points
93
Location
Jacarilla ,Valencia
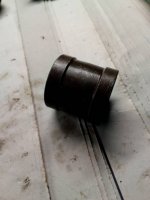
Hi All, reading posts here about the pre-load on the rear wheel bearings,some have been hanging off girders to get the resilient spacer to crush up.I have just replaced 1 of the rears and have followed the procedure but the nut only has to be done up finger tight to get correct setting. Is this normal or am I doing something wrong.
The new resilient spacer is 0.53mm longer then the original
P.s I have replaced the flexible coupling as well
 
Last edited:
Hi, did you compress the spacer? If you haven’t then the wheel may move, wobble, as the bearing surfaces will not be in contact. I would check to make sure there is no horizontal movement with the spindle.

Ralph
 
There is no movement in the spindle
As I said tightened up but not too much and the spindle becomes stiffer to the point it doesn't move the 1Llb weight
I presume you have to compress the spacer if the bearing is too loose
 
Last edited:
There is no movement in the spindle
As I said tightened up but not too much and the spindle becomes stiffer to the point it doesn't move the 1Llb weight
I presume you have to compress the spacer if the bearing is too loose

Assuming it's a new spacer and bearings, the most likely scenario is that one or both of the outer race shells isn't fully pressed home. This would cause the taper-rollers to bind giving a false, early indication that the correct pre-load had been achieved.

I suspect that if you signed-off with the job at that, you would find that things would loosen up over a very short time of driving the car. It might be worth taking it on a very short and careful run with limited turning and then check it all again.
 
Last edited:
Peter, the new races are definately sitting tight , I pressed them in the old fashion way before them darn hydraulic press things were invented i:e A hammer on concrete floor . I grind down the outside edge of an old outer casing so it goes in slack and use it ontop of the new casing hammering it down till it goes thud.
 
Peter, the new races are definately sitting tight , I pressed them in the old fashion way before them darn hydraulic press things were invented i:e A hammer on concrete floor . I grind down the outside edge of an old outer casing so it goes in slack and use it ontop of the new casing hammering it down till it goes thud.

In that case, if you want to be certain I would get another new spacer or, as was suggested a short time ago by F123C, somehow, somewhere??? get hold of a shim to pack the spacer a little.

Seeing as some people say that they have omitted the spacer there's maybe no need to worry. The massive amount of torque that many of us report isn't strictly desirable or necessary. If the hub-nut is sufficiently tight that it won't easily be coming loose and the rotational resistance is correct then maybe you've just got a spacer which is at the opposite end of the machined tolerance that most of us have had. :)
 
Peter. I don't understand the spacer, if the hub flange presses up against the bearing and the bearing race sits up against the shoulder machined into the hub, as long as the bearings are seated properly the distance between the races i.e where the spacer goes is set, so applying a lot of pressure to the nut won't alter the spacer's length. If the spacer is shorter in length than the space provided no amount of pressure will make a difference.
So saying mine aren't sitting right surely tightening the nut will only lock up the hub,it will have to be slackened off to achieve the desired setting.
 
If you hand tight it and you get the correct bearing friction then lets say that you are lucky and have found the correct spacer length. In that case if you apply another 50-100 in/lb nothing should happen. This torque is not enough to compress the spacer anyway. But if you apply that torque and then it becomes stiffer then your spacer is not touching anything. Remove the grease, clean up everything and put some kids play-doh (or clay or whatever they call this
), in the spacer touching surfaces. Assembly the whole thing back at the correct preload and then open it again. If you find the remains of the play doh fully compressed you are ok. Just a thought if you are not sure about it.;)
Thomas
 
Last edited:
as long as the bearings are seated properly the distance between the races i.e where the spacer goes is set, so applying a lot of pressure to the nut won't alter the spacer's length.

By the way, Thomas gordinir8 has a good suggestion.(y)

The outer bearing-races are fixed in position but the spacer should be in contact at its ends with each of the inner races. Initially this prevents the taper-rollers from bearing fully into the tapered outer-races. As the spacer is compressed by turning in the hub-nut, the two sets of caged rollers gradually move towards each other and deeper into the taper of their shells. Ultimately the two sets of rollers are at the exact and finely-balanced point where they spin freely but have no play; that is the point when the rotational torque measurement will be spot-on.

So it's true that if the spacer is too short, continuing to tighten it will actually damage the bearings.
 
Last edited:
I agree with Al (I was writing this as he wrote his answer)--I would have thought that the difference in length between a 'crushed' spacer and an 'un-crushed' spacer should be more than .53mm. I think I have a couple of new spacers in the work-shop---would you like me to measure one of them?
confused.gif
 
The "crush-spacers" that I have used are 32.55mm long---these were obtained from "Axel Gerstl"--part number:--20010 (spacer bushing, big for rear wheel bearing). The diameter of the rim on these spacers is 31.75mm. I have mentioned before that there does seem to be a discrepancy in sizes between the various suppliers. I have another set of 'crush-spacer' (NOT supplied by Axel Gerstl) which have a length of 32.7mm and a girth (at the rim) of 32.03mm. The diameter of the 2 spacers at the section where they "crush" is:- 29.43mm on the spacers that I use, and 29 85mm on what I have always regarded as the 'thicker' of the 2 spacers---it would seem now that I have measured them, that I was correct--1 make of spacer IS slightly bigger (thicker) than the other. I have late '126' hubs all the way round, hence my use of the 'big' spacers (as listed by Axel Gerstl).
confused.gif
smile.gif
 
Peter. I don't understand the spacer, if the hub flange presses up against the bearing and the bearing race sits up against the shoulder machined into the hub, as long as the bearings are seated properly the distance between the races i.e where the spacer goes is set, so applying a lot of pressure to the nut won't alter the spacer's length. If the spacer is shorter in length than the space provided no amount of pressure will make a difference.
So saying mine aren't sitting right surely tightening the nut will only lock up the hub,it will have to be slackened off to achieve the desired setting.

Tapered bearings don't need a collapsible spacer to set bearing preload, just an adjusting nut and a means of locking the nut in place e.g. look at front hub bearings on a 500.

But at the rear you have a driveshaft involved, so the driveshaft coupling is also held in place by the bearing adjusting nut. This coupling is on splines and needs to be clamped tightly to the shaft to prevent wear and ultimately failure of the splines due to fretting (slight movement back and forwards as power is applied and released during drive/over-run conditions). This is why I believe a collapsible spacer is utilized here.

When a rear hub is assembled with bearings and a new (un-collapsed) spacer, normally you'll find that there's way too much free play in the bearings i.e. no slight pre-load as required for correct bearing function.
Initially as you tighten the hub nut, nothing seems to happen. But the driveshaft coupling is being firmly clamped....

Continued tightening of the hub nut will eventually (whew! big sigh of relief!)cause the spacer to start to collapse (as designed). Care is needed now as the bearing free-play rapidly reduces towards zero. You're aiming for a slight pre-load (drag) on the bearings. This ideally should be measured as others have shown using various rig-ups at home. If you're not careful, it's easy to overdo the hub nut tightening resulting in too much pre-load on the bearings. Backing off the nut is not the correct way (although many do it!). What is needed is to start again with another new spacer or as I suggested in an earlier post to fit a thin shim (like a thin washer) between one of the bearing inner races and the now collapsed spacer (to allow this spacer to be re-used).

But when things are set correctly, bearing preload is correct. AND the driveshaft coupling is firmly clamped in place also. This is because the driveshaft coupling is clamped by the nut to the inside inner bearing race, which is clamped to the spacer, which is clamped to the outside inner bearing race, which is clamped to the hub driveshaft (which carries the brake drum and road wheel). The collapsible spacer keeps the inner bearing races the correct distance apart so that pre-load is correct, while allowing the driveshaft coupling to be securely clamped also.

So, you probably could omit this spacer or if you overcollapse it, simply back off the hub nut until bearing preload is again correct and get away with it. The only risk I can see is possibly accelerated wear of the splines on the driveshaft coupling.

AL.
 
Hi Peter,

You were asking where to get shims or shim washers.
Short answer - I don't know :)

Most of mine were saved from units before being scrapped, extra shim washers that were supplied with rebuild kits, plus some that were among the contents of my late father's and grandfather's workshops (going back to the 1920's!!!). Makes me feel old....

It's possible that shims might be still be available from engineering supply companies. I know they used to supply 'shim stock' often brass, not all shims are washer like. I've sometimes made shim washers from thin steel e.g. biscuit or oil tins - punch a hole using a traditional gasket punch (not the ones from Lidl, Aldi!) and trimmed the outside using tin snips. I usually have a rummage first to see if I have anything suitable first - small shims from electrical equipment/motors, medium from motorcycle/car gearboxes, large from e.g. old car balljoint kits (anyone ever done balljoints on an old Mini, 1100, Maxi etc?).

There's also hardened and ground shim washers/spacers for use when applied loads are high or there is relative rotation in use.

Use of shims seems to have been practically abolished probably due to more consistent sizings of machined components.

Some may have access to facilities at work to make shims or have a friend who could do so -very commonplace in the past, not so much nowadays :cry:
There is equipment that can punch out shims (in the metalworking industries). Nowadays I suppose for one-offs, a laser cutter or similar might be used.

Al.
 
I have been assured by MBG that you do not need to replace the spacer if you are just replacing the drive-shaft coupling, which ties in with Al description of why the spacer is required---the initial crushing established the distance required between the bearing inner races. However, there is still the (slight) chance that not replacing the spacer at this point could accelerate bearing wear. Just a thought, being that so many people (and the varied quality of the "crushable spacers", what would happen if one was to squeeze the spacer in press to get the VERY initial collapse (which seems to be the part that is difficult to get past). Then, after fitment of the slightly crushed spacer, tightening of the big nut, and eliminate bearing free-play might be easier---just a thought--might as well throw a pebble into the water and see how big the ripples are!!
thumb.gif
biggrin.gif
 
Looking more widely around specialist areas of the internet (ooh er missus!) I'm picking up some reasoning that says that the technique of a slight slackening of bearings after tightening(as on the front hub) is a compromise in mechanical terms. Bearings last longer when they are lightly pre-loaded. The way that friction generates heat even comes into it, which relates to the fact that there is a slight running expansion in any case and braking heat can also dissipate into the bearings. On the front hubs the inner race is static with the rollers moving around it. On the rear hub the inner race rotates with the axle-shaft. The spacer and clamping action will also help to prevent those races from spinning on the shaft
 
The "crush-spacers" that I have used are 32.55mm long---these were obtained from "Axel Gerstl"--part number:--20010 (spacer bushing, big for rear wheel bearing). The diameter of the rim on these spacers is 31.75mm. I have mentioned before that there does seem to be a discrepancy in sizes between the various suppliers. I have another set of 'crush-spacer' (NOT supplied by Axel Gerstl) which have a length of 32.7mm and a girth (at the rim) of 32.03mm. The diameter of the 2 spacers at the section where they "crush" is:- 29.43mm on the spacers that I use, and 29 85mm on what I have always regarded as the 'thicker' of the 2 spacers---it would seem now that I have measured them, that I was correct--1 make of spacer IS slightly bigger (thicker) than the other. I have late '126' hubs all the way round, hence my use of the 'big' spacers (as listed by Axel Gerstl).
confused.gif
smile.gif
I have just measured the old spacer I took out.
Length 31.75
Crushable area 17.68
Interior diameter 25.82
Girth at widest 31.96
As I said the new spacer Is 0.53 longer so it would be 32.28
 
Back
Top