Technical winter maintenance

Currently reading:
Technical winter maintenance

I am envious of your lathe and ability with it. I used to have access to a big hydraulic press and they are really useful.
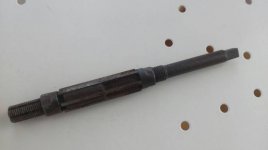
The nearest I can get to your bush removal tool is to weld some thin-walled, steel tube to an old kingpin.

That might work Peter, As for everyday greasing i have some high quality grease specially made for fire bomber airplane landing gear systems that are dealing with salt water.

The big lathe and the press is at work, funny thing is that we most using it to fabricate similar drifts and tools to use with the ‘’screw and washer’’ method to remove and to install flanged bushings, sleeves and bearings from aircraft control surfaces that are worn or corroded. These are pretty much same assemblies with what fiat has ofcourse.

Interesting note is that before installation we cooling with liquid nitrogen the new bushings due to close tolerances we need to achieve.

Anyway while the machinist was fabricating such a tool for one application that came up I told him, listen I need you to fabricate a tool to remove a couple of sleeves! He asked me '' for which aircraft?” I told him this is not for an aircraft it’s a serious job!! Then a 2CV owner, also machinist came and saw the king pins and told me, hey I know what this is, I have it on my 2CV and I have changed them years ago! To make a long story short they drop their work and build my drift first! :D
 
Last edited:
Look what I found. It needs a good clean. Frightening when I realise that I bought it for my first 500, which was 35 years ago.[emoji79]
 

Attachments

  • IMG_20171212_102208.jpg
    IMG_20171212_102208.jpg
    15.8 KB · Views: 42
Look what I found. It needs a good clean. Frightening when I realise that I bought it for my first 500, which was 35 years ago.[emoji79]

does not have a pilot extension.... to locate in the second bush :(
or you end up are hoping to ream them in line...
 
does not have a pilot extension.... to locate in the second bush :(
or you end up are hoping to ream them in line...
That's the bit I didn't know back in 1982 but somehow got it through two MOTs. I hated kingpins and the regular need to renovate them back "in the day" was one of the reasons I fell out of love with 500s. It didn't used to be so easy to get spares or refurbished parts. I will look out for pilot(s) now.
 
the end of the reamer needs to be able to accept a pilot shaft.. usually they are specifically designed to do so...
it may be an internal thread, I don't think it would be too hard to have a machine shop do something...
simply drill the end of the shaft (yeahh I know probably hard metal) and make a corresponding extension that is slightly smaller, then a cone that slides on this that will locate in the opposite bush to the one you are reaming so the reamer will go through the one while the pilot and cone keep it straight in line with the second.. then flip it around.. and reverse it...
And you know how much effort I have put in to finding out about King pin Reamers...

or you could just weld a nail on the end an put a bit of wood in the bush with a hole in...

I would like to know if the Factory one is a double reamer or a single with a Pilot cone and extension...

ohhh here's your cylinder head tool in place... well the cheaper plate rather than cast version
Probably because this was from the N Books so a first attempt or Prototype as some would say ha ha
(as you can see by the different cooling /thermostat housing (now find me one of those!!!!)
 
Last edited:
The factory reamer might even be two factory reamers as it was with my prewar Austin. One reamer had a plain bottom end and the other had a plain section near the top....same effect as a pilot. The pilot wouldn't be hard to make from appropriately sized pipes and sockets from my scrap box.
 
The pilot wouldn't be hard to make from appropriately sized pipes and sockets from my scrap box.

Bet you have some 15mm copper pipe!!! bash it on the end of the Reamer
put one bush in... Ream it with the 15mm copper tube extension and a it of masking tape to pack out the kingpin without the bush
then turn it around and remove the masking tape as the king pins are 15mm !!!
Jobs a goodun..
"ye cannae change the laws of physics, but I can mek it fit for sure Jim"
 
king pin set arrived yesterday. Set comes with two washers do you know which one goes up and which one goes down? The right one is thicker and smaller in diameter than the left. Also those two washers doesn't fit so i will have to take one down to make it fit.

Thomas

ps i have also post this to kingpin renewal sticky for those interested in the future.
 
One of the best moments of restoration is when new parts arrive, opening and inspecting all those little plastic bags.
Thomas
 

Attachments

  • 20180210_120356.jpg
    20180210_120356.jpg
    3.4 MB · Views: 33
Anyone knows how much i have to tight the two nuts that secure the wishbones at the suspension link? I guess not much since those use shelf lock nuts but do the have to move freely? There is no torque ref at haynes manual.
Thomas
 
Anyone knows how much i have to tight the two nuts that secure the wishbones at the suspension link? I guess not much since those use shelf lock nuts but do the have to move freely? There is no torque ref at haynes manual.
Thomas

Thomas, do you mean the two nuts at the inner end of the pair of top arms?

JAN_0111 by Peter Thompson, on Flickr

If so, the 126 book says 25Nm. The nuts don't move freely; all of the movement is the torsion of the rubber
 
Thanks Peter yes those are the nuts I am talking about, book also says to tight those with the car not in jacks if I remember correct.
 
Thanks Peter yes those are the nuts I am talking about, book also says to tight those with the car not in jacks if I remember correct.

I think that I eventually worked out that they actually have a bit of pre-load on the rubber. So you place the arms horizontal and then tighten the nuts under no load, either with the steering knuckle still not attached or with the weight taken off the suspension. Then loosely fit the knuckle and its top and bottom bolts and you do tighten them once the car is under load.
This means that the bushes in the top links are permanently exerting a small amount of rotational torque against the upward motion created by the vehicle mass and I guess that this adds something to the effectiveness of the suspension
On the other hand...I don't think it matters much how you do it.:D
 
I think that I eventually worked out that they actually have a bit of pre-load on the rubber.......................
On the other hand...I don't think it matters much how you do it.:D

I always wondered if there was preload.. but can't remember seeing or finding anything in my books...
on older Lotuses they have similar metalistic bushes, the procedure is to lower the car without the wishbone nuts tightened and place a measured block of wood under the chassis front/rear and weight the car down till the chassis touches the blocks and then tighten up the nuts...
if this procedure isn't followed then there are several effects; the car can sit higher or lower than it is supposed to, the bushes actually wear out quickly and split internally and finally handling is affected...

I have often wondered where you see pictures of 500s where the front is much higher than I would expect... perhaps these nuts are tightened with the suspension hanging down...

I'm sure someone must have more info on how to set up a 500 suspension...
Looking at it again, I may have got it wrong. (never happened before. ;) )
The static-loaded position of the top links is definitely horizontal, but Thomas is right in that the instructions say to tighten the nuts in that position. The key thing is that the angle between the kingpin and the arms should be 95 degrees at this optimal load setting.....how are you going to accurately measure that? :)
Mine works fine though and the ride height looks even and not excessive.
 
. The key thing is that the angle between the kingpin and the arms should be 95 degrees at this optimal load setting.....how are you going to accurately measure that? :)

I'm sure there must be a Fiat tool for that...
probably the size of a workshop that you must bolt the car to, with special arms and gauges...
 
Last edited:
The general rule with 'Metalastic'? type (rubber/metal) bushes is that they are tightened with the car at normal ride height i.e. let the car down onto it's wheels, bounce the car on it's suspension and roll it back and forth to settle everything it's normal position, then reach underneath and tighten the nuts/bolts. You can then raise the car to finish tighten with a torque wrench (if you wish....). This way the bushes are under no torsional stress at rest and on smooth road surfaces which should maximise their life. If the car is usually driven one-up (i.e. driver only on board), it might be best to have someone of similar weight to sit in the driver's seat before tightening the fasteners.

Next question is what to do if the split pin holes in the spindle/nut don't align when tightened to the correct torque figure.... :eek:

AL.
 
Last edited:
Back
Top