Technical Newbie with a timing question

Currently reading:
Technical Newbie with a timing question

Fayray

Member
Joined
Nov 6, 2017
Messages
286
Points
92
I have just joined the forum and have found it to be incredibly helpful. However, my Bambina still won't start

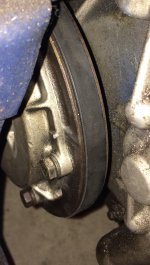
After constantly losing power after a short distance of driving I figured I might have a fuel starvation issue so ordered a carb service kit and removed the carb and gave it a good clean etc. At the same time I set the valve clearances and put it all back together. When I went to restart it all I got was a backfire and nothing else. I thought maybe I had the plug leads around the wrong way but reversing them didn't make a difference. So I rechecked the tappets and found I'd got them a bit wrong and reset them to the correct 0.15mm. However, I still just get a backfire and a few muffled pops and nothing else whilst cranking the starter. So next I thought I'd check the timing even though I hadn't touched anything that might've thrown it off. But when I look at the pulley there is no groove or mark on the edge that i can detect. So is the marker I need to use the one in this photo? There are two of these markers
 

Attachments

  • unnamed.jpg
    unnamed.jpg
    428 KB · Views: 40
So is the marker I need to use the one in this photo? There are two of these markers

Your pulley is just about at the point when the ignition points should be opening. The line on the pulley should be 13mm before the arrow on the timing case; then you have the correct static timing. In order to check that, extend a line outward from that pulley mark to the pulley edge and then measure 13mm e clockwise and mark it and the arrow with Tippex.
 
Last edited:
Thanks Peter, that was my assumption but thought I should check. I thought it was curious that there were no marks on the edge after 49 years on the road.

Another (probably embarrassingly obvious) question: When adjusting the float, if the factory measurements are not correct how do I correctly physically adjust it?

BambinoClassic - my first car was a 500 some 30 odd years ago and it was a well used old car even then. Despite almost certainly being even more of an idiot then than I am now I somehow kept that thing running as a daily driver. So I'm struggling with the idea that I can't seem to drive this one more than a few hundred yards without a problem and my attempts at maintenance seem to have made matters even worse. I'm having fun though:)
Oh, and I've just noticed your car. I remember inquiring about that car when it was for sale here. I didn't get much info from the seller so moved on. I really liked the original look of it and the "patina" with what looked like the original interior. Cool car. My car also came from Christchurch but is an F model.
 
Last edited:
Hi Fayray,

This thread explains the Weber IMB and one of the attached pdfs in the first thread post goes into float adjustment.

https://www.fiatforum.com/500-classic/355169-weber-26-28-imb.html

In short, the float has two tabs - one to limit its downward travel when the fuel bowl is empty and the other to limit its upward travel when it closes the fuel feed valve when the bowl is full.

Gently remove the float pin by tapping it out of the split post and withdrawing it through the non-spilt post. You can then remove the float itself and bend the tabs appropriately - a little at a time. Loosely replace it and check the measurements.
It seems a bit agricultural, but all carby floats are adjusted this way.
When replacing the pin, thread it through the non-split post until it engages the split post and gently tap it home.

Before you do anything to the float, give it a shake and listen for any sloshing - they can leak fuel into them through small splits over time and then they don't float and the carby will continually flood ...

New floats for these carbies are available and they are cheap.

Chris
 
thanks Chris. I read and re-read your post about the carb before I started and it was really helpful. But for the life of me I can't get the car to fire beyond a muffled pop. I've checked and adjusted the tappets, and re-checked them, twice. I've set the static timing. I have a spark, I appear to have fuel going to the carb.
So yesterday I removed the carb again and checked that I have assembled it correctly and checked the float and its adjustment which were fine. The only part that seemed possibly wrongly fitted was the auxiliary venturi which slides in perfectly both ways. It's slightly longer at one end so I fitted it the other way around. I put it back together and refitted it to the car and no luck, not a sausage.
I did notice that the base of the carb is warped. Could this be the issue? It is weeping from the gasket ever so slightly but would this mean the engine would not fire?
I'm thinking of splashing out and getting a remanufactured carb from ebay. Worth going there?
Thanks again for the help
 
The only part that seemed possibly wrongly fitted was the auxiliary venturi which slides in perfectly both ways.
I did notice that the base of the carb is warped.

Are you certain that you have fitted the venturi with the orifice aligned with the one in the carburettor throat?
There have been lots of discussions about warped carbs and how to flatten them. I would have thought that you would get some sort of peep out of the engine even with a bit of warping.
Better to err on the side of having the tappets a bit wide to ensure good compression if you have any doubt that you have them right.
 
Which system are you using to set the tappets?

Rule of 3?

D
What's the rule of 3? I used the system Toshi 975 suggests - Standing at the back of the car with the rocker cover removed if the rocker nearest to you is number 1 then the furthest is number 4. Manualy turn the engine using fan belt & pulleys , plugs out if necessary and when number 1 rocker goes right down then adjust the clearance on number 4 rocker. 2 goes down, adjust 3. 3 down adjust 2 and finaly number 4 rocker down adjust number 1. You do not have to do it in this order it is just easier to explain like this.
 
Are you certain that you have fitted the venturi with the orifice aligned with the one in the carburettor throat?

No I'm not. I will check again. What's that saying? Measure twice, cut once. I need to heed this advice clearly as this will be the third time I've removed the carb:mad:
 
Whilst I do not normally advocate the use of the substance, have you tried starting the car with "easy-start"?---if the engine bursts into life when firing on easy-start, you can reckon that the electrical side of the engine is all OK. have you checked if the plugs are wet when it will not fire? if they come out wet, try drying them (or fitting new) and then trying again---if they come out wet again, it would point towards a lack of spark at the correct time. from your initial comments, it would seem that the plug leads are the correct way round, but with the rocker-cover off (so that you can see which cylinder has both valves shut) confirm that the plug leads ARE correct.
Where do you live? it might be that there is a Forum member close to you who can help (or at least, share the pain!) :bang::)

Thanks Hobbler.
I haven't tried easy start but did pull the plugs and whilst they were a bit oily they weren't too bad (they are quite new). I will check again though.

So at the risk of sounding stupid (not much risk now though i guess) how do I tell if the correct lead is going to the correct cylinder when looking at the valves?

I have a friend who is better versed in this stuff than me who is coming over later in the week so we can stroke chins together and maybe have a eureka moment:idea:
 
So at the risk of sounding stupid (not much risk now though i guess) how do I tell if the correct lead is going to the correct cylinder when looking at the valves?

:D:D:D
Easy; turn the engine so the timing mark on the pulley and the arrow on the cover align.
At that point, if properly adjusted it will be possible to rattle one set of the valve rockers up and down by hand as they will have the .15mm clearance meaning that cylinder is at full compression. The other cylinder will have the rockers pushing down on the valves.
Take off the distributor-cap and note where the rotor-arm is pointing, Replace it and make sure that the plug lead to the rotor side is connected to the cylinder which is on compression. The other lead obviously goes to the other cylinder.
Lets hope it pops back into life. :)
 
this is great, I'm learning here. I'll check this out. Thanks
 
OK, so I thought I had made a breakthrough when I checked and found I had installed the aux venturi around the wrong way. However, still no joy (on reflection I think it was right in the first place before I changed it around and it didn't fire then either).

BUT...My buddy came around this evening and we rechecked everything I'd done, tried the engine start spray and initially had no luck. We had decided to then remove the carb and just as I'd removed the nuts holding on the rocker cover (I find it easier if the cover is removed to get the carb off) he told me to stop and just recheck the plugs and their gaps. They seemed fine and we put them back and gave the engine another crank and she fired up. Basking in the glory of our success it was a few moments before I realised the rocker cover was still loose so I shut down the engine and tightened it up. Then the car wouldn't start. So I removed the breather hose from the rocker cover and still no starting. So I loosened the rocker cover and away she went. As soon as I tighten the nuts up the engine dies. So this is the cause of the problem but I don't understand the underlying cause and I can't have a loose rocker cover as it spurts oils out. Removing the the oil filler cap had no affect either.

any ideas???

Of possible interest, the car is fitted with an oil catch tank (before my ownership). Could this be a clue? (fyi since these pics were taken I have fitted new plugs, leads, dist cap and rotor, condenser, coil, exhaust, air filter and air filter housing lid and fuel hoses)
 

Attachments

  • bambina oil catch tank.jpg
    bambina oil catch tank.jpg
    456.8 KB · Views: 60
  • bambina engine.jpg
    bambina engine.jpg
    574.8 KB · Views: 35
Last edited:
I would be checking that the studs that hold down the rocker assembly are tight in the threads of the head. They might appear secure when the cover is off but the action of tightening the cover may pull one or both of them upwards which can be enough to make the tappet gaps too wide to properly open the valves.
You might need to slacken the tappets, losing your perfect settings, and then unwind the rocker nuts so that you get a true idea if the studs are loose. If they are, it's possible that they will unwind as you turn the nut. If they are just loose then the threads can be cleaned and the studs replaced using Loctite. If the threads are dubious in any way they will need repairing.


There is also the chance that something inside the rocker cover or a distortion is restricting movement of the rocker(s).

It might be connected with the HT leads. I see a nick in one of them and it's possible that one or other might be shorting when the cover is fitted.

Nearly there.(y)
 
The earlier 500s had rocker-shaft studs with a 8mm thread into the cylinder-head---from experience, I know that these can slowly pull out (it was helping to cure this fault that introduced me to Joseph--Texas500). If the studs HAVE pulled out the only sensible way to permanently cure the problem is to put steel inserts into the stud holes OR, if the thread damage is not too bad, fitting later rocker-shaft studs that have 10mm thread into the head--(the threads in the head will require tapping out). To do both jobs properly will really require head removal to gain proper access.
It is also possible that the rocker-cover has been over-tightened, and as suggested by Peter, the underside of the rocker-cover is fouling against the rockers and preventing them from shutting fully. The nuts holding the rocker cover in place do NOT need to be 'graunch' tight--just tight enough to put light pressure on the rocker-cover gasket (preferably the 'ruberoid' variety)--don't forget to put a fibre washer on 1st, then a flat washer and finally, the NYLOC nut.(y):)
 
thanks guys. If the studs were unwinding would I not end up with a lot of excess thread sticking out the top? It doesn't seem excessive.
I wondered if the cover might be fouling the rockers but I thought I'd probably hear something as I tightened the nuts down while running. Or is the movement too small to hear the fouling? It almost feels as if the engine is suffocating when the nuts a nipped up like when you put your hand over the exhaust pipe.
I fitted a new rubberoid rocker gasket the other day and I'm not tightening too much (I read that somewhere here while researching my problem). I'm using the old nuts and washers which may need an upgrade.
Peter - the HT leads are new. The photo above of the engine is from when the car first showed up and I then renewed wires, condenser, dist cap and rotor, exhaust, air filter etc.

The good thing is I'm making some headway here and learning as I go
 
Back
Top