General My 5ino's transatlantic adventure

Currently reading:
General My 5ino's transatlantic adventure

Hi WaterDawg, so after almost a month of not using it, I decided I wanted to find a solution for the rear drums.
I unlatched the hand brake for both rears, then tried fitting the old pads with the new drums and it still wouldn't clear. So with a lot of hammering to try and move the adjustment rings to the outmost edges of the pads, I somehow managed to get the new drums over the new pads. The rear left doesn't turn well freely, the rear right is a bit better.

It also helped to open the brake nipples, so when I compressed the pads inwards, they weren't fighting the fluid.

Anyhow, I still have to properly calibrate the brake pads I only did forward braking stops. Also, I did a better bleed and now the brakes are much much better.

I agree, that I need to register the hand brake because now with the new pads/drums I can only pull it up 2 or 3 clicks (n)

Thanks for the help :)

any update with your rear brakes?
I've read through the whole thread and I think your E-Brake isn't releasing enough. One way to be sure, loosen it up fully so it's not engaging at all. While you do have to push the pads in a bit when you've installed a wheel cylinder, you shouldn't have to beat on it so much - I'd use a strap wrench if I needed to compress them a bit, but what you are describing sounds like the brake is expanded so easiest to begin with disconnecting the e-brake and eliminating that possibility.

I also think you still have some brake bleeding to do to fix the soft pedal issue.
It's not uncommon to have to bleed them 3-4 times when you've replaced lines.

As for the grinding noise - I'd go with a wheel bearing too.
 
Hello everyone,

After the recent brake bleed dilemma, I'm back with an even greater dilemma!

After over a month of my 500 sitting, due to work/christmas holidays/etc, I decided to start her up again. She started fine, made her run for a few minutes. Didnt have time to take her for a spin though.
A few days later, after a really cold spell (for where I'm located) I decided to start her up. She wouldn't turn over. I tried a few times but eventually figured it was the battery. So I charged the battery that was at 30%. After that she started fine. I took her for a ride.

First thing I noticed was she was down on power. Note that I had my headlights on. I also noticed that my generator light was on even in 3rd gear in higher revs. I pulled over after a few minutes, and tried to take off again. She died. She wouldn't turn over, so I push started her. But after a few minutes again she would die.
After push starting her again, when I turned on the lights, she died :mad: I limped home with no lights, and the gen light on.


When I turned her off, and checked battery life, it showed 16%.
Note 2: I had recently tried to change the generator belt, but the replacement was the wrong size, so I fitted the old one on again. Don't know if this is a coincidence.


Having spent the evening researching on the Italian forums, everyone tends to point at the Tension Regulator or Generator, or both. Also some mentioned it might be some wiring or grounding issue. Some mentioned to measure voltage when running at 2000rpms and make sure it's not overcharging the battery (again a fault of the tension generator).
So, since I am pretty clueless about the two items in question, how can I inspect to make sure it's not either of those? Is there anything else I can check for?

Thanks everyone (y)

EDIT: I added some photos of the tension regulator. It 'looks' pretty new. There are a few 'scales' on the left most cylinder. I also removed the belt, tightened the pulley, and installed the belt again. I have a feeling I might have put it on wrong, and there was too much slack.
Finally, I checked the battery, and it's refusing the charge at 10a, so I slow charged it at 2a, and it stopped at 71%. I tried charging it again, and it kept giving me an error in reading, also the desulfation mode kicked in before, but now the check light is on and it's having trouble reading the voltage.

Fq2kz.jpg


4F5uH.jpg


skAbt.jpg


HNrUy.jpg
 
Last edited:
This won’t be the cause of your problem but something that definately needs attention are cleaning of the bolts and posts on the voltage generator. That middle purple wire looks like the tape is hiding a dodgy crimp and the green wire looks like it is only attached with a couple of strands
 
Hi Paolo, I already have a new wiring kit to replace the current one.
I refitted the generator belt, I think there might have been too much slack, how can I test that it's not slipping? At the moment I have all 3 plates fitted inside the pulley (that's how I got the car).

On a separate note, while using the car recently, I noticed that when warm, there's some clutch slip (or at least that what it feels like) when taking off from a stop. Also when reversing, it feels very harsh when trying to get a bite.
I read somewhere that:
"I believe that is the freeplay distance at the pedal. I normally set mine to around 1" (25mm). There should be about 25mm of freeplay before the pedal starts to pull on the clutch cable.
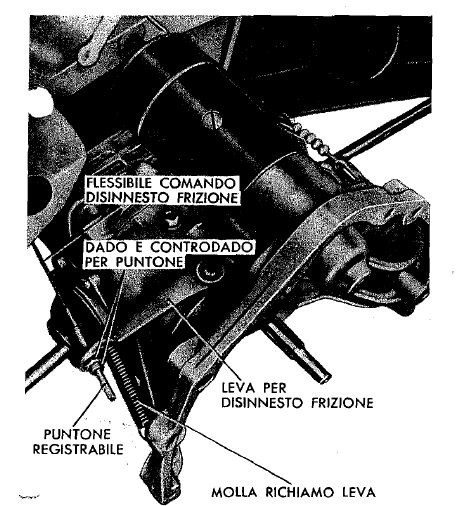
It is as simple as just adjusting the nut on the end of the clutch cable? Anyone have any tips on how to find the right point?
frizione-2.jpg

The nut where it says Puntone Registrabile I'm guessing is the nut that needs adjusting?
 
Hi Paolo, I already have a new wiring kit to replace the current one.
I refitted the generator belt, I think there might have been too much slack, how can I test that it's not slipping? At the moment I have all 3 plates fitted inside the pulley (that's how I got the car).

On a separate note, while using the car recently, I noticed that when warm, there's some clutch slip (or at least that what it feels like) when taking off from a stop. Also when reversing, it feels very harsh when trying to get a bite.
I read somewhere that:

It is as simple as just adjusting the nut on the end of the clutch cable? Anyone have any tips on how to find the right point?
frizione-2.jpg

The nut where it says Puntone Registrabile I'm guessing is the nut that needs adjusting?

Hi you are correct on the nut that needs adjusting. If you look closely at the picture you will see there are two lines pointing to Puntone Registrabile. There is a small nut that is the locking nut and a larger dome shaped nut that actually does the adjusting against the actuating arm.

It’s pretty much personal preference where you want the clutch pedal to start to bite. I tried it quite high up so that it bites quite early but I found like that it was quite hard work getting the bite point right with the pedal so I adjusted back out a bit to a more comfortable position. If you take it too far and adjust it in too tight the clutch will start to slip, so if yours is already slipping you might want to adjust it out first (anti clock) to see if it improves it?

It really is a case of adjusting it until you find what’s best for you, so long as you don’t adjust it in too tight and it starts slipping you won’t do any damage.

Tony

Grazie Tony, I will try that out next (y)
 
Going by what your battery charger is indicating, it sounds like your battery is..
what's the polite word? erm, begins with an 'f', oh yeah, faulty. :cry:
Regardless of whether or not anything is wrong with your generator or regulator or wiring etc, your battery should charge up fully on the charger if it's ok.

The usual recommendation is to ensure the car battery is fully charged before doing any checks on the generator output/charging rate or attempting to make any adjustments on the regulator (tensioner in your pics).

Re:- Generator belt tension. The usual check with a dynamo type generator is to adjust the belt so that there's appproximately 1/2 inch movement on the belt when pressed firmly (iirc the test load is approx. 20 lbs weight).

A belt driving a generator doesn't have to be set as tight as one driving an alternator and in fact setting it too tightly may damage the dynamo (generator) bearing. Another check is if you try turning the drive pulley on the generator it should almost turn over the engine i.e. might slip very slightly.

Al.
 
Last edited:
Ok, finally found some time to refit the pulley, I think it was slipping because it seems to be snug now. Also, the battery was pretty dead, I got it replaced for free and tried her out today.

She ran fine for more than an hour driving around. Battery was charging well, Gen light was out as it should be unless idling. Drove around with lights on and she performed well.

1. The only issue I noticed is that these damn rear brakes are sticking :bang: Came home and the rear rims were really really hot. Removed the wheels to help cool them down. I need to find a solution, this is driving me insane. :yuck:
There just doesn't seem to be any play between the pads and the drums. With the old drums + new pads, the drums move freely, but with new drums + new pads, they stick. I followed advice and hammered the registers as far outward as possible, opened the brake cylinder bleed valve while fitting them to ease some pressure off the pads, but they always stick.

Is there anyway the brake cylinders on the rears are to blame? I can't seem to come to a solution.


2. The clutch, I think generally it's ok, I did notice that the pedal sticks ~1cm from it's resting spot, so when used, it doesn't come back up all the way. However, I don't think it's affecting the clutch. I also tried a new approach when using the clutch, and I think I'm managing to avoid the slipping almost completely.
I will add a video soon to show what I mean about the pedal play.
 
Last edited:
Here is the video of the clutch pedal and clutch action. I definitely think there is a little too much play in the clutch pedal assembly? But it's working fine at the moment.


The new belt I had tried to fit, didn't seem to fit on the engine side pulley. Unless this is normal, and with time it shrinks to fit in the guide?

5IXnT.jpg


9FGSY.jpg


Rs8BM.jpg
 
And here is today's work #23501012 , on trying to get the rear brakes to work.

I think...I think, that I might have solved the issue in part. The issue seems that the hand brake cable is registered to the older worn pads/drums, so with the new drums/pads, the hand brake is pulling on the pads, and thus rubbing.

The problem I encountered today when trying to adjust the hand brake, is I managed to loosen the nut closest to the brakes., but I can't seem to get to the counter-nut. The wrenches and tools are too big to get a grip on it.

Is there a way to remove the whole thread/nut system from the metal bracket? That would ease this whole process. (I tried googling to see how to replace the whole cable assembly but couldn't find anything.

This is where I'm stuck at, the rear 19mm counternut is inaccessible with my tools. Do I need a stubby/half moon/crowsfoot wrench maybe...?
l9jKD.jpg
 
-------------------
---------------------------------
--------------------

The new belt I had tried to fit, didn't seem to fit on the engine side pulley. Unless this is normal, and with time it shrinks to fit in the guide?

5IXnT.jpg


9FGSY.jpg


Rs8BM.jpg

Iirc, the original belt was 9.5mm x ???. Your new belt seems to be 10.00mm x 800. It shouldn't make much difference. The top face of a new belt (where the marking are stamped) often sits slightly proud of the pulley sides. The important thing to note is that 'V'-belts drive/are driven by the tapered sides not the bottom (narrow) face. The bottom of the belt should not make contact with the bottom of the pulley (i.e. not bottom-out), if this happens, it indicates either the sectional width of the belt is too small or the pulley is badly worn (rarely happens!).

AL.
 
Here is the video of the clutch pedal and clutch action. I definitely think there is a little too much play in the clutch pedal assembly? But it's working fine at the moment.

https://www.youtube.com/watch?v=FlwFmV7q8OQ

------------------
---------------
---------------

A few suggestions:-

Fit a return spring to the clutch release lever at the bellhousing (gearbox). This not only helps the clutch pedal move fully back (up) when released but more importantly pulls the clutch release bearing away from the clutch pressure plate (assuming free play is present), avoiding unnecessary wear).

Put a smear of grease under the clutch cable adjusting nut at the release lever,in the video, I can see the cable adjuster nut not swivelling in the release lever when the clutch pedal is operated.

Fit a lock nut against the clutch adjuster nut, when you've finalized the adjustment. Don't forget this and go for a long drive - I've heard of several lost adjusting nuts because of no lock nut being fitted.

In your video, on the right hand side, it shows the inner cable moving through the guide tube as the clutch pedal is operated. It looks to me that the guide tube needs a little 'adjustment' to allow the cable to move in and out freely, it seems to be rubbing against the guide tube at an angle.

Iirc free play at the pedal is supposed to be circa 15-20mm? I don't pay too much attention to this. I check the free play at the gearbox end of the clutch cable - press the clutch arm lightly so it makes light contact with the release bearing inside the belhousing and pull the clutch cable in the opposite direction - I look for approx 2-3mm (c. 1/8 inch). as explained above to avoid premature wear on the clutch release bearing.

AL.
 
--------------
---------------------
-------------

The problem I encountered today when trying to adjust the hand brake, is I managed to loosen the nut closest to the brakes., but I can't seem to get to the counter-nut. The wrenches and tools are too big to get a grip on it.

Is there a way to remove the whole thread/nut system from the metal bracket? That would ease this whole process. (I tried googling to see how to replace the whole cable assembly but couldn't find anything.

This is where I'm stuck at, the rear 19mm counternut is inaccessible with my tools. Do I need a stubby/half moon/crowsfoot wrench maybe...?
l9jKD.jpg

As Peter (Fiat500) suggests, cut down spanners (wrenches) can help with access. If you need more leverage you might have to use a crows-foot wrench. As not everyone have these and they can be relatively pricey if bought as a set, I'd suggest getting an old ring spanner (double box end wrench) and use an angle grinder to cut a small segment from the ring to allow it to pass over the cable adjuster thread. If the nut size is 19mm? ,then 3/4 inch AF is the same size.

To remove the cable complete with the thread/nut system, iirc you only need to back off the rear nut (the one you've managed to loosen already) completely, then pull the cable forward until either the reduced section on the adjuster (visible to the right of the threaded section) can pass through the slot in the adjuster bracket, or else pull the rear nut and cable spring rearwards until the inner cable can pass through the slot on the adjuster bracket. (It's easy once you've seen how it's done)
You can then work on freeing the front nut on the cable adjuster, this will need to backed-off completely to back-off the handbrake fully.

You might be able to free off the front adjuster nut is situ with patience. With the rear nut already slackened, the front nut is not under pressure, so any reluctance to turn is due to rust or dirt build-up. It can be difficult to get a wire brush into place to clean up the threads, I use a length of string, sometimes soaked in rust penetration spray to clean the threads.


AL.
 
First of all, thank you Al, greatly appreciate your knowledge and feedback to my many issues (y)

Iirc, the original belt was 9.5mm x ???. Your new belt seems to be 10.00mm x 800. It shouldn't make much difference. The top face of a new belt (where the marking are stamped) often sits slightly proud of the pulley sides. The important thing to note is that 'V'-belts drive/are driven by the tapered sides not the bottom (narrow) face. The bottom of the belt should not make contact with the bottom of the pulley (i.e. not bottom-out), if this happens, it indicates either the sectional width of the belt is too small or the pulley is badly worn (rarely happens!).

AL.

I see what you're saying, and it seems that the belt is supposed to be 9.5x813, but many end up using 10x800 as it's easier to find?
I purchased a new belt and will be trying it out as soon as it arrives...can't wait, since my current one is making a mess of my engine bay as it's shredding itself to bits.

A few suggestions:-

Fit a return spring to the clutch release lever at the bellhousing (gearbox). This not only helps the clutch pedal move fully back (up) when released but more importantly pulls the clutch release bearing away from the clutch pressure plate (assuming free play is present), avoiding unnecessary wear).

Put a smear of grease under the clutch cable adjusting nut at the release lever,in the video, I can see the cable adjuster nut not swivelling in the release lever when the clutch pedal is operated.

Will try this out

Fit a lock nut against the clutch adjuster nut, when you've finalized the adjustment. Don't forget this and go for a long drive - I've heard of several lost adjusting nuts because of no lock nut being fitted.

In your video, on the right hand side, it shows the inner cable moving through the guide tube as the clutch pedal is operated. It looks to me that the guide tube needs a little 'adjustment' to allow the cable to move in and out freely, it seems to be rubbing against the guide tube at an angle.

Noticed this as well, will try to adjust it back to avoid wear on the cable

Iirc free play at the pedal is supposed to be circa 15-20mm? I don't pay too much attention to this. I check the free play at the gearbox end of the clutch cable - press the clutch arm lightly so it makes light contact with the release bearing inside the belhousing and pull the clutch cable in the opposite direction - I look for approx 2-3mm (c. 1/8 inch). as explained above to avoid premature wear on the clutch release bearing.

The issue is that the pedal doesn't bounce back to the 'pedal released' position, so there isn't really any free play. It kind of sits at the 15-20mm distance by default (unless I bring it back up with my foot). Maybe the spring will help solve this issue..

AL.

As Peter (Fiat500) suggests, cut down spanners (wrenches) can help with access. If you need more leverage you might have to use a crows-foot wrench. As not everyone have these and they can be relatively pricey if bought as a set, I'd suggest getting an old ring spanner (double box end wrench) and use an angle grinder to cut a small segment from the ring to allow it to pass over the cable adjuster thread. If the nut size is 19mm? ,then 3/4 inch AF is the same size.

To remove the cable complete with the thread/nut system, iirc you only need to back off the rear nut (the one you've managed to loosen already) completely, then pull the cable forward until either the reduced section on the adjuster (visible to the right of the threaded section) can pass through the slot in the adjuster bracket, or else pull the rear nut and cable spring rearwards until the inner cable can pass through the slot on the adjuster bracket. (It's easy once you've seen how it's done)
You can then work on freeing the front nut on the cable adjuster, this will need to backed-off completely to back-off the handbrake fully.

You might be able to free off the front adjuster nut is situ with patience. With the rear nut already slackened, the front nut is not under pressure, so any reluctance to turn is due to rust or dirt build-up. It can be difficult to get a wire brush into place to clean up the threads, I use a length of string, sometimes soaked in rust penetration spray to clean the threads.


AL.

Yes, no one sells stubby wrenches in the area, so I ended up going the long way round, meaning unscrewing the closest nut, undoing the cable from the metal plate, and adjusting that way. It's definitely slower but it seems that I managed to adjust it all. Will be looking to get the correct wrench in the near future.
 
Also, in my infinite list of things to do, are wipers.

I can't tell why they won't turn on. Is there a correct way of checking that they are getting power or if there is an issue with the motor without removing them? With a multimeter?
 
Went for a drive today, after 30 minutes parked her and noticed that there was a bit of smoke/burning oil?, coming from the oil cap on the valve cover.

The vapor tube insert is pretty mucky as well.

Is there anything I can do to check why it's smoking? Read somewhere that it might be the piston seals going/compression issue maybe...
 
1st. Check the engine oil level is not too high. Check that the breather pipe and wire mesh type flame trap are clear.

2nd. Is the engine burning oil - dropping oil level plus blue smoke from the exhaust? This usually indicates engine wear in the cylinders/ valve guides. To rule out worn valve guides - check if the engine only emits blue smoke from the exhaust when the throttle is opened after being on the 'over-run' for a while or when engine is first started.

3rd.Do, or else, have done a cylinder 'Compression Test'. This will indicate if there is leakage of compression past the pistons/rings or valves.

If the figures are low, a second test is done after putting a little oil into the cylinders.

If figures now improve significantly, this indicates cyl. bore/piston/ring wear, possibly sticking rings.

If no real improvement, this indicates valve leakage.

In practice, on an older engine, you may have both piston and valve leakage.

There are other tests that a garage can do e.g. 'cylinder leak down test' etc.

Unfortunately, if there is excessive wear in the engine then it has to stripped down for examination to decide how to proceed.

My advice is :- if the engine is running reasonably ok, I'd live with it and just enjoy driving the car :)

AL.
 
Also, in my infinite list of things to do, are wipers.

I can't tell why they won't turn on. Is there a correct way of checking that they are getting power or if there is an issue with the motor without removing them? With a multimeter?

Sorry for the delay in responding - I assumed others here more familiar with the 500 wiper motor would have responded before now...

I don't have a wiring diagram for the 500. Can you tell me or post a pic of the wiring colors at the wiper motor connector block and at the back of the wiper switch.

I assume you've already checked that there's no blown fuses and all fuse contacts are clean and corrosion free? Also that the wiper motor and particularly the linkage/spindles are not seized (frozen)? ( try pulling/pushing on the wiper arms to see if the linkage moves a little, try swivelling the links/rods on their pivots - careful, only do this with wipers switched off!)

Iirc, some Fiat wiper motors have a constant live feed to the motor and are switched on and off on the earth (ground) side. Also self-parking, if fitted, is through a switch in the motor, again iirc on the earth (ground)side. So essentially, you can have a live feed to the motor and it still might not work.

AL.
 
Last edited:
When I first got my 500 there was smoke coming out the back. Turns out that little dip sticky thingy has to be very sorry pushed in our oil will come out and smoke. That may not be your problem...
 
Back
Top