Technical Project Little Blue - an introduction (and cry for help)

Currently reading:
Technical Project Little Blue - an introduction (and cry for help)

Don't forget to point your 500 owning neighbour towards this Forum. ....sounds a potentially very useful and positive contributor. How can there be many of these cars down there? :)

I should point him this way! He brought his R in from Italy when he moved here, and it's a beauty. He's probably reasonably famous in a small circle, as he's the insane chap who for a fundraiser drove more than 3000km from Sydney to Uluru in his little 500.

Number 1 lesson from him was be prepared - he pulled out from his car a box with multiple spare condensers and contact sets! So even if I don't make any changes, I will be prepared to when I need to:cool:
 
The other query was something very simple that he spotted - the oil dipstick. It was leaning on the condenser and he thought this might have been grounding the system.

There was a guy on the forum last year, can't remember his name but his car was called Sofia, who drove his car back from Italy to the UK and made a video of the trip. One evening he parked up and noticed there was oil coming out by the dipstick so he turned the dipstick, jamming the end under the condenser, to make the stick fit tighter. Next day his car wouldn't start! Eventually, after trying lots of things, he moved the dipstick and the car started so this must earth the ignition system. Something to keep an eye on (y):D
 
There was a guy on the forum last year, can't remember his name but his car was called Sofia, who drove his car back from Italy to the UK and made a video of the trip. One evening he parked up and noticed there was oil coming out by the dipstick so he turned the dipstick, jamming the end under the condenser, to make the stick fit tighter. Next day his car wouldn't start! Eventually, after trying lots of things, he moved the dipstick and the car started so this must earth the ignition system. Something to keep an eye on (y):D

That must have been it then! Just amazing that something so small can cause so much angst - I must have nudged it out of the way when trying to align the exhaust brackets and therein lies the woes. Hopefully it's a lesson in a very first easy check for a non-starting 500!
 
AT LAST.
On the road properly.

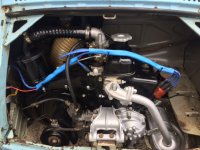
Parts arrived from Passione, and it was straight to work. The manifold and some gaskets had to be fitted to the exhaust that Chris Bambino sent my way. I can't express how grateful I am for this, the exhaust fits beautifully and she actually purrs!

Fitting the exhaust brackets is a total nightmare though. The new brackets, when aligned with the old ones, are ever so slightly smaller, enough to make fitting them a real pain in the... I had to bend them slightly as they're round and the exhaust is slightly oval shaped. Then I had to grab some large locking pliers to bring the ends together and put the bolts in. Sounds easy but the whole process took several hours.

Anyway, success! I'd tidied up the engine bay a bit while awaiting the parts and it looks a lot better now. Got some heatshrink wrap as sleeves to insulate the leads, as they were at risk of falling against some hot spots and melting. If I can find some proper grommets for the metal lead holders, then the wrap probably won't be necessary.

Took her out for a properish drive to get the brakes sorted. The shoes were rubbing on the drum ever since I'd been troubleshooting an odd rattle sound, which turned out to be the spring on the wrong side of a metal tab, as pointed out by eagle eyed fiat500. Lots of runs slamming on brakes, especially in reverse down a steep driveway and finally they have adjusted! An odd whirring sound remains but I'll deal with that later.

She's slowly getting to the point of being ready to run.

Latest issue is on hard acceleration, feeling like she stutters intermittently.
Speeds up then stutters, then speeds up, stutters.
From reading around, could this be the valve clearances?

I have some feeler gauges and plan to adjust as per Toshi's advice here:
https://www.fiatforum.com/500-classic/341467-valve-clearances.html?p=3396329

Only problem is I don't actually know which bit needs adjusting!

Other thoughts were if it might be the carb?
I played around adjusting the mixture and idle screws but feel like I'm just guessing really. I did see a good guide here somewhere about how to best adjust the mixture+idle screws in harmony.

Thank you everyone for all the help so far, I couldn't face this little project without your help!
 

Attachments

  • IMG_2828.jpg
    IMG_2828.jpg
    122.1 KB · Views: 28
AT LAST.
On the road properly.

<SNIP>

Latest issue is on hard acceleration, feeling like she stutters intermittently.
Speeds up then stutters, then speeds up, stutters.
From reading around, could this be the valve clearances?

I have some feeler gauges and plan to adjust as per Toshi's advice here:
https://www.fiatforum.com/500-classic/341467-valve-clearances.html?p=3396329

Only problem is I don't actually know which bit needs adjusting!

Other thoughts were if it might be the carb?
I played around adjusting the mixture and idle screws but feel like I'm just guessing really. I did see a good guide here somewhere about how to best adjust the mixture+idle screws in harmony.

Thank you everyone for all the help so far, I couldn't face this little project without your help!


Hi,
Stuttering problem sounds like the acceleration pump. This gives a squirt of fuel when you depress the throttle. I don't know the card on your 500 but a general check is to look down the intake (ignition off) and get someone to quickly depress the throttle (or move the lever yourself). You should be able to see the squirt of fuel. Normally it is generated by a cam on the throttle pushing on a small plunger. There is a rubber diaphragm behind the plunger that pumps the fuel. Could be stuck or worn plunger, holed diaphragm, blocked jet or even incorrect adjustment or assembly.


HTH,
Robert G8RPI.
 
Fitting the exhaust brackets is a total nightmare though. The new brackets, when aligned with the old ones, are ever so slightly smaller, enough to make fitting them a real pain in the... I had to bend them slightly as they're round and the exhaust is slightly oval shaped. Then I had to grab some large locking pliers to bring the ends together and put the bolts in. Sounds easy but the whole process took several hours.

I decided that the easier way is to loosely fit the bottom supports, with the top nut just on the stud-thread, then fit the top supports with the bolts just slightly screwed into the bottom bracket, then tackle the nuts on the bottom studs in the engine case. All this should be done (ideally) with the exhaust elbow to cylinder head fixings slighty loose; they should only be tightened once the exhaust brackets are tightened.
It's great to hear you've done it though and are motoring now.(y)
 
I have some feeler gauges and plan to adjust as per Toshi's advice here:
https://www.fiatforum.com/500-classic/341467-valve-clearances.html?p=3396329

Only problem is I don't actually know which bit needs adjusting!

Once you take the rocker cover off you will see four arms like little hammers, which pivot on a shaft.
Following Toshi's excellent instructions on how to find the position to check each valve's clearance, you try the appropriate feeler gauge for fit between the hammer end of the arm and the small shiny bit in the centre of the spring, (which is the end of the valve stem). The gauge should be a snug fit and it shouldn't be possible to rock the arm up and down when the gauge is in place. If the gauge won't slide in or is too loose you need to adjust the clearance.
Each arm has an 11mm nut (may be 10mm on earlier cars I think?) with a slotted bit in the centre like the end of a very broad screwdriver. The nut is slackened slightly and the slotted bit is turned one way or the other to increase or decrease the clearance; you may need a tiny spanner or adustable to turn the adjuster, but a proper tool is available.
The process is very easy and intuitive once you've done it a few times; but it can be a bit of a faff to get it just right and it's worth re-checking at least once after you have done them all

PS. From my experience, a standard Fiat carb (Weber 24/26/28IMB) won't have an acceleration pump.


Thank you for that. I've popped the rocker off and put a new gasket on last week, and seen the arms inside that need the adjusting. Your description of the process sounds great, and should be enough for even me to work on.

The manual suggests 0.15mm clearance, is this correct?

I'll have to have a look at my carb too, and see if it does have that acceleration pump - I've newly discovered it to be a dellorto FRG 28 so it will need some exploring...
 
The manual suggests 0.15mm clearance, is this correct?

On a 499 engine that's correct.

I forgot to say that when you adjust them, the main fiddly bit is holding the slotted head in place whilst you tighten the nut. It's easy to get it wrong...patience needed; check and double-check and re-adjust if in doubt.
The principle is that when the engine gets hot, the expansion of all the parts will close the gap and make things smooth. If there was no gap or too much gap, the engine will be hard to start, inefficient and prone to gradual erosion of the valves.
 
There is a tappet adjusting tool specifically for the 500/126 engine---costs about 19 euro (on e-bay) plus carriage. Type in 'tappet adjusting tool for classic fiat 500' Alternatively, go to you local fiat dealership and see if any of the technicians have one of the 'screwdriver' type adjusters. These are red handled and instead of a 'male' tip, they have a shaped 'female' slot in the end which fits over the top of the adjuster. You use this tool in conjunction with the appropriate ring spanner.
thumb.gif
smile.gif
 
Well I guess this could explain the poor running the other day.
Opened it up and the cap must have been on a fraction squiff, and one of the contacts in the cap was slightly shaved off! Learn something new everyday.

This has me pondering the 123 ignition or similar. I love originality but also want to just be driving it loads.

Pros and cons of each, almost seems worth just giving it a go almost out of curiosity.
 

Attachments

  • IMG_2853.JPG
    IMG_2853.JPG
    548.8 KB · Views: 21
I gave it a go for the same reason...an expensive experiment. The thing is that the weakness of the distributor cap and arm are still present, so the same mistake can be made. In theory the spindle and bearings of the 123, although very well made, can eventually wear in the same way as the original. It only eliminates the points and the advance mechanism, so is not true EI in the modern sense.
When you feel up to it, yours could do with a thorough cleaning for now, maybe with a partial stripdown and some new points.
 
Last edited:
Ah interesting, so not a foolproof option. Did your experiment end in a return to the old fashioned setup?

I've given it a good clean and it runs nicely now. Adjusted the points gap to 0.4mm based on neighbour's recommendation (or is 0.5 better?) using a feeler gauge.
I'll investigate a stripdown guide, but maybe while it's working should leave well enough alone!
It was pointed out that I need to make sure there's enough oil in the little distributor too. Looks ok but great to learn another little tip!
 
Can't recall years etc but on some early cars (N/D) they had a distributor that had a small oil tube on the side, perhaps this was dropped in view of the extra cost, but seems a good option.. check if one is present...
Are the bearing not just simple bushes?
In the years when I could not afford to replace things... I had access to much better workshop facilities and often took dizzys apart and replaced the worn bushes with a better material that would be left soaking in oil for a long time before fitting...

Perhaps look for a spare and rebuild it to replace the existing one...
as we know a spare that is sitting on the shelf ready to swap if needed can remove days or weeks of frustration if something fails...
I always think it's worth buying spares for cars (more so for much older cars) if the price is right...

Don't know what distributor is fitted, but most have a felt pad in the centre of the shaft, under the rotor arm. This should have a drop or two of light oil every service to keep the bearings lubricated. If it hasone and it's dry, pull it out, clean with solvent (carb cleaner etc) soak in light oil such as 3 in 1 and replace it. Bearings are invariably plain bushes.

Robert G8RPI.
 
Yes it has that great little oil dash pot, brilliant little addition, I just wasn't sure how one monitors the level of oil in it currently. I'll enjoy a little tinker and tune and maybe a new cap. Learning as we go :)
 
Yes it has that great little oil dash pot, brilliant little addition, I just wasn't sure how one monitors the level of oil in it currently. I'll enjoy a little tinker and tune and maybe a new cap. Learning as we go :)

just 2-3 drops every service or once/twice a year.. it may also have the felt pad.. totally forgot about that..

Now you can see how the early cars had so many features that were probably dropped because of cost cutting and profitability...
I think it happens with all cars...
The very very first 500s were so crude and badly made that the Italians actually rejected them and caused Fiat to do a recall to upgrade them and offer a refund and drop the price on future sales, I think they decided to improve the quality to gain better sales at a lower price..... this is what make the very first cars so rare...
 
Ah interesting, so not a foolproof option. Did your experiment end in a return to the old fashioned setup?

I've given it a good clean and it runs nicely now. Adjusted the points gap to 0.4mm based on neighbour's recommendation (or is 0.5 better?) !

When I replaced the engine I didn't re-use the 123. Many people argue that it makes for good performance and reliability but I have had several thousands of miles of the same using an original distributor and the old contact-breakers it was delivered with.

The median measurement given for the points is 0.5mm and the lower parameter is 0.47, so 0.4 is a bit narrow. You're actually meant to check the spark timing when the points are adjusted but I would read up on the principles of that before adjusting anything.

The later 500's also have an oiler which is not so obvious. There is a spring-loaded ball-bearing slightly anti-clockwise from the LT connection, which is depressed by the tip of the oil can so you can let oil in I can't see one on the 126 engine.
 
Done! 0.5mm spacing and she really runs nicely.
This is despite the new discovery that there is no thermostat flap!
Not sure if I should bother putting one on, it's pretty warm here. It seems I will never get around to ordering my haul of parts to be shipped over, as I keep finding new things to add. Perhaps I will be waiting for an eternity, she is a 500 after all...
 
The later 500's also have an oiler which is not so obvious. There is a spring-loaded ball-bearing slightly anti-clockwise from the LT connection, which is depressed by the tip of the oil can so you can let oil in I can't see one on the 126 engine.

Well you learn something every day.. I think that oiler would have been missed by most people...
 
Back
Top