General Spotty Fiat 500

Currently reading:
General Spotty Fiat 500

Joined
Mar 7, 2005
Messages
6,239
Points
1,615
Location
Nairn
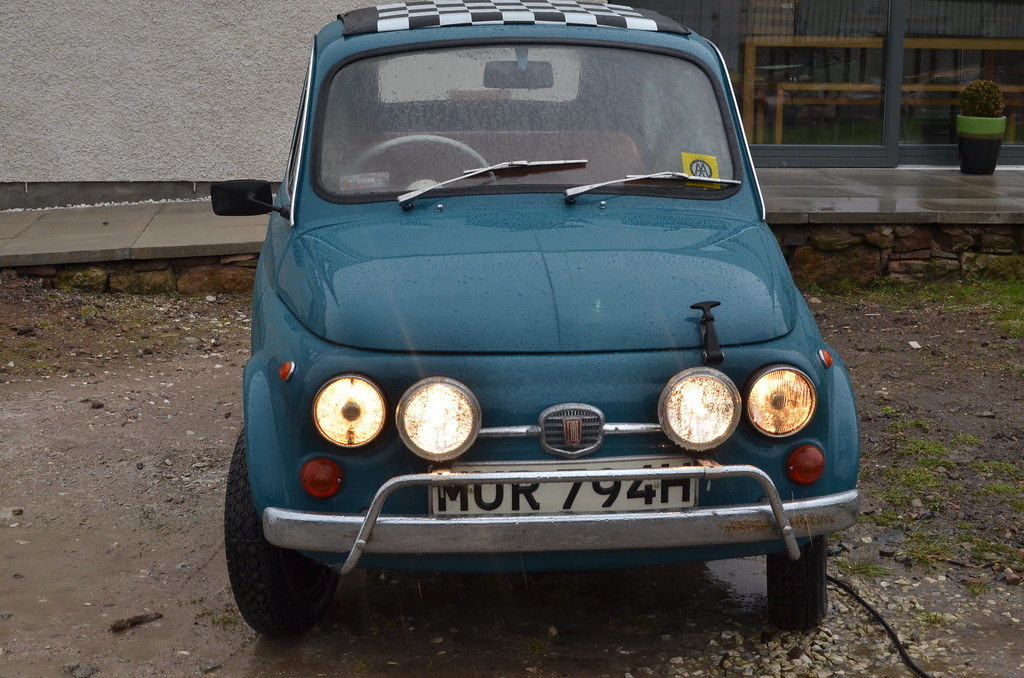
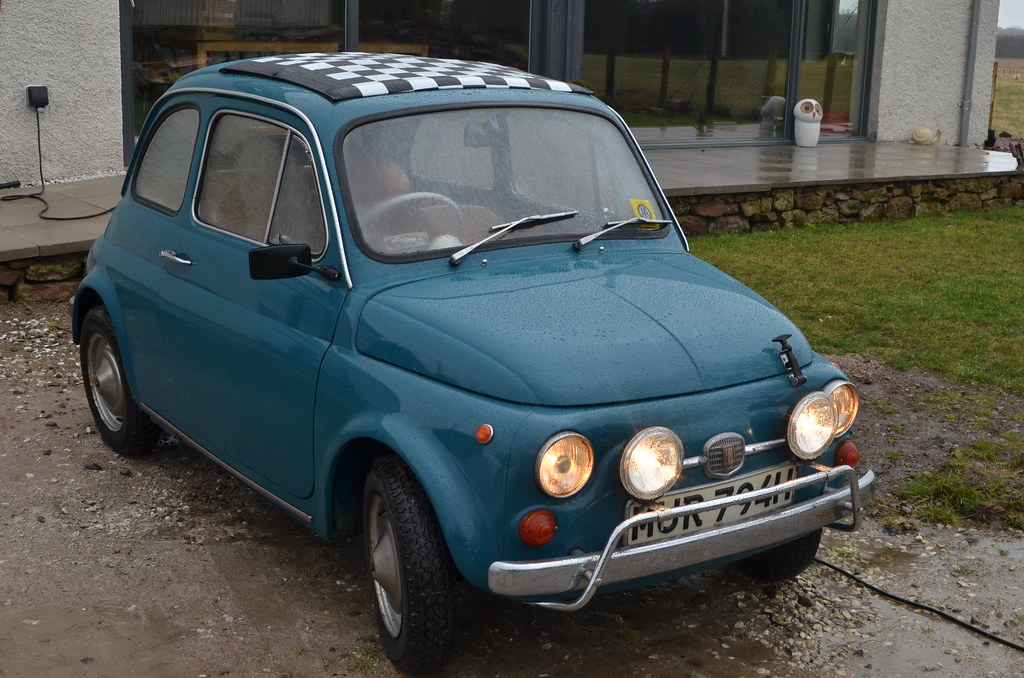
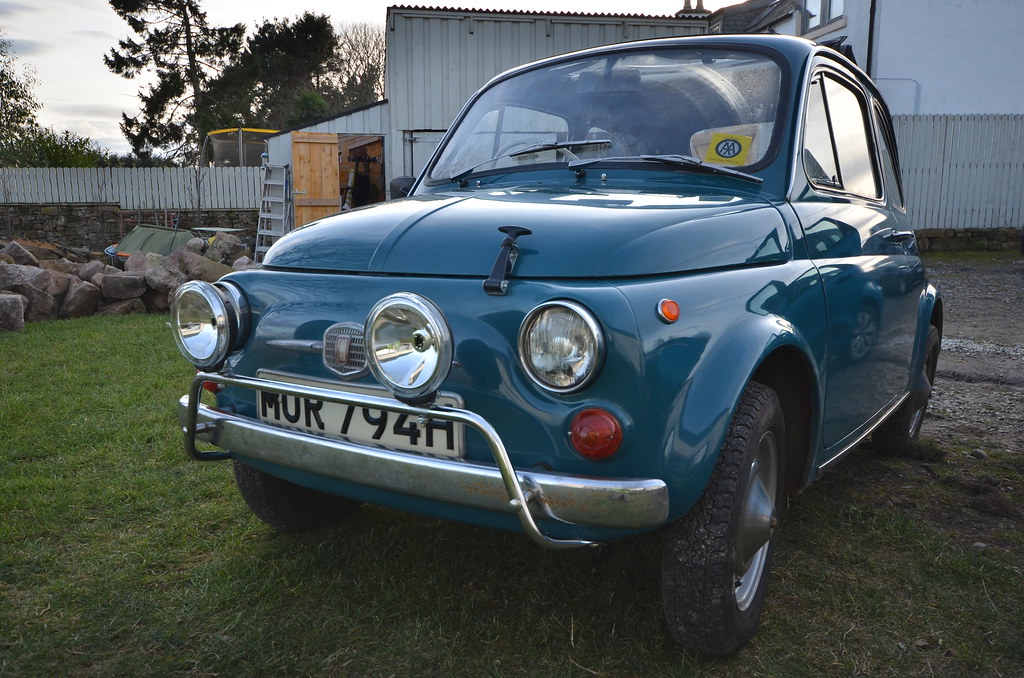
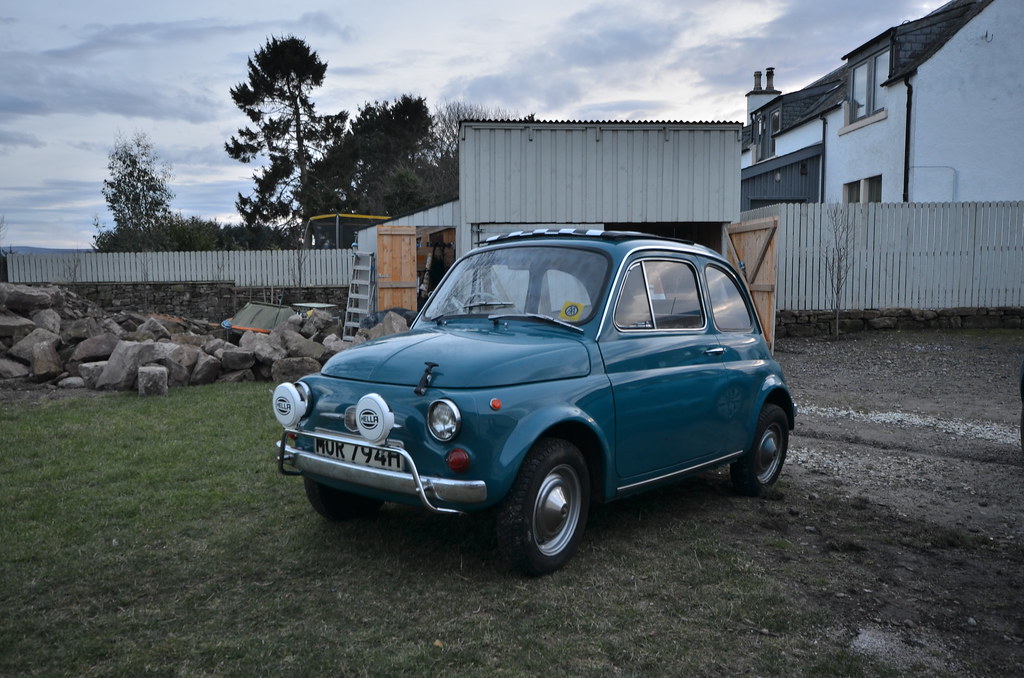
Murf has had a facelift and like all such surgery this has had a dodgy result.:D
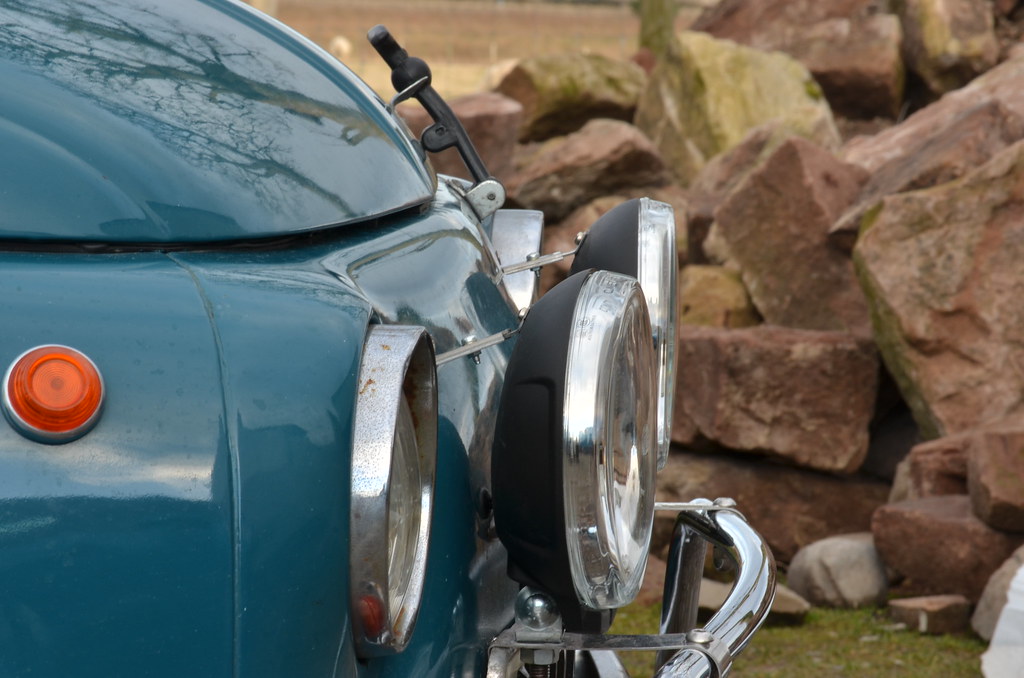
Having made the decision to fit spotlights, what better mounting than to install the ready-made item from the "L" model? I had to drill two holes at the base of the front panel and I used dome-headed stainless-steel bolts to secure the bar.
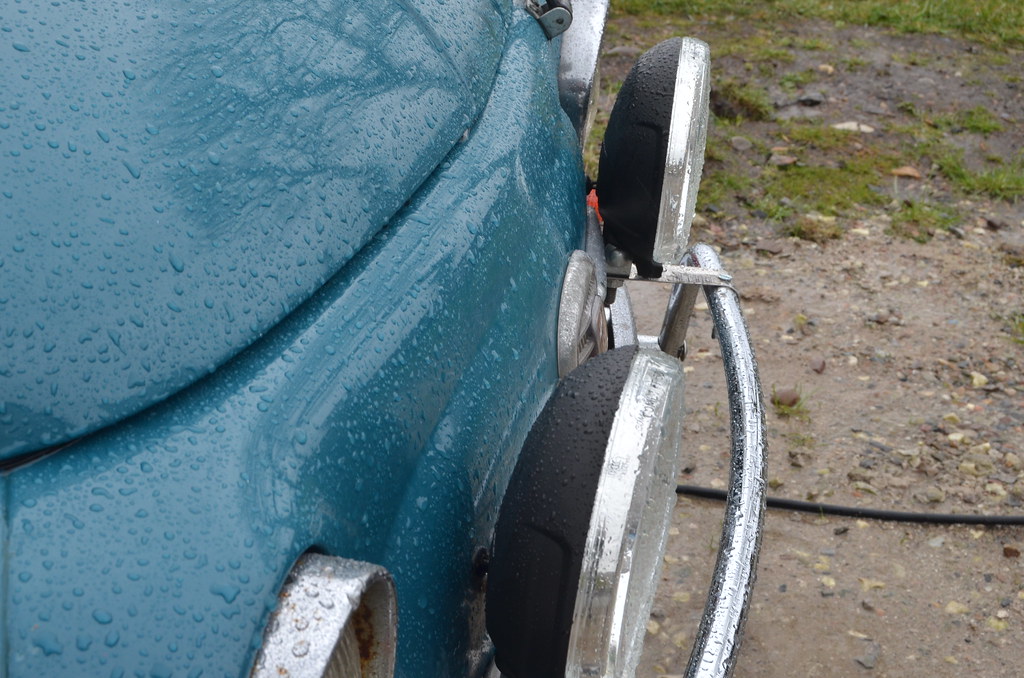
I decided that the simplest and most secure fixing for the lights was to drill a hole through the bar at the appropriate points. I haven't got as far as the electrics yet and more modification is likely. The lights look even more odd when viewed from the side so I may buy or make some brackets to allow them to move back closer to the bodywork.
I'm not sure I can get used to the look although it is largely emulating the appearance of some of the rallying 500's I have been admiring recently.:eek:
MAL_9700 by Peter Thompson, on Flickr
MAL_9707 by Peter Thompson, on Flickr
 
Crikey they are enormous!!!!

I don't know if it's the size of Murf but they look much bigger than the ones I have. You haven't got any excuses now it's going to be like having a juggernaut coming down the road behind you and then little old Murf appears.:D
 
Yes they are Big(y)you know what they say about size(y) for narrow roads the bigger the better - if you blind the oncoming traffic they have to give way(y) Ooooer Peter is this the start of a 'Modding' program??????

Ian.
 
:D:D:D
Kind comments...I deserve a slap on the knuckles for defacing a Fiat 500.:)
I think the wide-angle lense has given a mis-representation of size. it's because the lights are so far forward and they seem to go on forever at the perimeter because it's clear glass wrapped around. I think they are 165mm and the car's own lights are probably 150. The spotlights would look great if they could be squeezed into the holes in the bodywork.:eek:
I kid myself that it's not modified yet because I still have at least 90% of the car as original, including unmodified engine and gearbox, the entire interior, all badges and chromework apart from that new over-rider, all wheels, all outer bodypanels except the front wings, sills and repair panels to the edges of the rear arches, all glass and seals and even the door seals, all the rear lights, wiring etc, etc.
It will be more fun on country lanes and when we went to the cinema tonight (Trainspotting T2.....superb), I was reminded how dodgy the current lighting is. I hope to start testing it tomorrow if I get an hour to wire it up.
The problem is that one mod addition leads to another so my next plan is to fit the alternator to power this lot as a forerunner to changing the engine. I've said before, it's running so well at the moment I don't really want to swap things over.
 
The downward slide to modding madness continues....☺

You're dead right there Andrew, especially when I have started using your images as references to show me what to do.:D
The lights are about 100mm too far forward and seem slightly too high; even though I know that is a bit of an advantage it desn't look right and might induce wobbliness.:eek:
After a bit of thought and seeing that Andrew has some brackets holding the badge-bar to the front of the car, I have decided to use two sections of stainless-steel restraint strap left over from my house build. These will connect the tubular over-rider to the front panel. The fixing point will be conveniently hidden under the number-plate and the headlamps will be re-mounted directly through the straps. This will place them almost touching the front panel, which will look better and accentuate how (cough :D ) compact they are. This extra restraint should also make things very rigid as there are so many fixing points for that bar.
Apart from Andrew, has anyone else reading this fitted auxilliary front lights?
 
Last edited:
The lights are wired-up now and the job's done apart from awaiting some top stays to prevent them wobbling and some stainless fixings for the brackets. (I know I need to do something about the rusty patinated bumper.)
MAL_9778 by Peter Thompson, on Flickr
You can see that even with halogens in the original headlights, the Hellas can clearly seen to be brighter. It might help when I get the relays fitted.
The wiring of the lights was very easy and is quite tidy. I was able to bunch and tape it to the part of the original loom which is behind the front panel.
The lights aren't sticking out in such a bug-eyed way now.
MAL_9780 by Peter Thompson, on Flickr
I have the lamps so close to the bodywork that the external wires are extremely minimal as they pass through a tiny grommet.
MAL_9777 by Peter Thompson, on Flickr
The problem now is that I will be using more amps than the dynamo can safely make and so I'll be discharging the battery all the time they're on; so the next project is the alternator.
 
If you have an outbreak of surface rust on your bumper you can try this. Grab a small handful of aluminium, scrunch it up and dowse it in coke. Use it like a Brillo pad over the rusted area to remove any loose bits. The mild phosphoric acid in the coke will retard the rust and the aluminium particles that break off go a little way to restore the chrome effect. You can then wax over it for a little more protection.
 
Is the engine running in those pictures? What happens if you switch the spots off, do the headlights get brighter or are they wired into the main beam?

Are the back of the brackets attached to the front panel, I can't really see in the pictures but it looks like a nut and bolt behind where the spot is mounted?
 
I left the engine running but on idle, but nothing is gained because it's below cut-in speed for charging; I'm thinking that will be different with an alternator.
I hope Andrew's not reading this, because at present I have used a Scotchlok, as supplied, to plumb into the existing feed cable for the high-beam, (so both lights are on at the same time.) This activates the relay which takes the feed for the Hellas straight from the battery. When I get the "too good to be true" mini-loom for the headlights, it looks like I will only need to use one of the existing headlamp connectors to activate both headlights via the loom's built-in relay. So the other one will be used to provide a proper connection to activate the Hellas.
In hindsight I needn't have fitted the "L"-type bumper bar, because the design of the car would have allowed me to attach a simple bracket directly to the front of the car. As it has evolved that is the way it's fixed but the bracket is further supported on the tubular bumper. The fixing to the body of the car is hidden behind the number-plate. The Hella has a swivel bolt and nut at the base which is secured through a hole in the bracket I made.
After a test-drive I am now very happy with the setup. The standard main-beams seem to light up the foreground and the Hellas light up well into the sides of the road and way into the distance.
I read people claiming they can illuminate a quarter of a mile ahead :nutter:
They're good but the actual clear distance is probably about a hundred yards although they provide some light further than that. But that is an amazing improvement over the previous results and more than adeuate for me to keep my foot down just the way I used to do in the daylight before I became a night-time only driver.:D
 
Last edited:
If you have an outbreak of surface rust on your bumper you can try this. Grab a small handful of aluminium, scrunch it up and dowse it in coke. Use it like a Brillo pad over the rusted area to remove any loose bits. The mild phosphoric acid in the coke will retard the rust and the aluminium particles that break off go a little way to restore the chrome effect. You can then wax over it for a little more protection.

Thanks Dave; I think I've heard part of that before but not about the acid. It makes sense and I will try it. I can keep,the rust at bay in summer and it's not doing bad for nearly 48 years and being out in all weather.
 
Last edited:
Thanks Dave; I think I've heard part of that before but not about the acid. It makes sense and I will try it. I can keep,the rust at bay in summer and it's not doing bad for nearly 48 years and being out in all weather.

He had me thinking for a moment? I thought he must have strong hands to scrunch up so aluminium but then realised he meant foil. I tried it on an old bumper a few years ago and it did actually work quite well
 
I left the engine running but on idle, but nothing is gained because it's below cut-in speed for charging; I'm thinking that will be different with an alternator.
I hope Andrew's not reading this, because at present I have used a Scotchlok, as supplied, to plumb into the existing feed cable for the high-beam, (so both lights are on at the same time.) This activates the relay which takes the feed for the Hellas straight from the battery. When I get the "too good to be true" mini-loom for the headlights, it looks like I will only need to use one of the existing headlamp connectors to activate both headlights via the loom's built-in relay. So the other one will be used to provide a proper connection to activate the Hellas.
In hindsight I needn't have fitted the "L"-type bumper bar, because the design of the car would have allowed me to attach a simple bracket directly to the front of the car. As it has evolved that is the way it's fixed but the bracket is further supported on the tubular bumper. The fixing to the body of the car is hidden behind the number-plate. The Hella has a swivel bolt and nut at the base which is secured through a hole in the bracket I made.
After a test-drive I am now very happy with the setup. The standard main-beams seem to light up the foreground and the Hellas light up well into the sides of the road and way into the distance.
I read people claiming they can illuminate a quarter of a mile ahead :nutter:
They're good but the actual clear distance is probably about a hundred yards although they provide some light further than that. But that is an amazing improvement over the previous results and more than adeuate for me to keep my foot down just the way I used to do in the daylight before I became a night-time only driver.:D

It should work better once you get the headlight halogens on the relays, as at the moment you are taking a little bit of the current away from the headlamps to switch the relays, it's probably minimal but with these little cars, every little bit counts. But i should imagine it makes a huge difference, you'll have to go on a midnight foray and takes some pictures.:D:D
 
He had me thinking for a moment? I thought he must have strong hands to scrunch up so aluminium but then realised he meant foil. I tried it on an old bumper a few years ago and it did actually work quite well


I've used this recently but with white vinegar. You can see it working before your eyes and it brings the chrome up lovely. You go through a lot of tin foil but its cheaper than metal polish
 
More messing about as I have now fitted ugly little stays at the top of each headlight. I think it was Ian Emery who warned me that accessory lights would wobble; they did, but not excessively. Fitting these stainless steel bars has eliminated it altogether. They are adjustable and I will have to go through the alignment process all over again.
Job done.:)
MAL_0100 by Peter Thompson, on Flickr
 
More messing about as I have now fitted ugly little stays at the top of each headlight. I think it was Ian Emery who warned me that accessory lights would wobble; they did, but not excessively. Fitting these stainless steel bars has eliminated it altogether. They are adjustable and I will have to go through the alignment process all over again.
Job done.:)

Peter you are correct with your recall of Ian, but you got the wrong one, it was Ian, Bleeding Knuckles, who wrote:

Peter, having been involved (in the Group 4 era) with rallying I can confirm that the top stay not only supports the spotlamp it maintains the adjustment of it and believe me even if the lower mounts look substantial the lamp WILL vibrate and flap fore and aft without the top support. At night on a stage the last thing you need is a wandering spotlight!!!!!

(y)(y)
 
Thanks Ian E. and Ian B.K. was correct. (y)
Mixed messages there with effective thumbs-up and down.:D
I can't imagine fitting another set of lights and the dynamo's going to struggle with just these.:eek:
The one bit I didn't need was actually the bumper bar:rolleyes: but it's staying there now.
From my point of view, this is the sort of modification which, as opposed to engine and chassis upgrades, actually does make the Fiat 500 more driveable and even more fun. :)
I know it's very visible...how could it not be:confused:, but when I pass the car on, when I pass on, it's only an hour's work to make it original again. Most 500's seem at best to be only "as original".:D
 
Last edited:
I fitted LED in my three (embarrassed grimace) sets and dropped the current from 10 amps to 2......
I'm aware that LED have a different light spread but i believe that they will work well ........and i also have LED dipped and main beam and hope all is well....
In fact i have LED in every fitting except the wing repeaters - which are clear with orange lamps and no LED is available.
The interior light is particularly effective
 
Back
Top