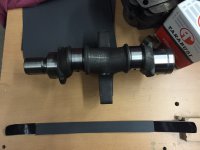
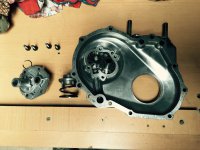
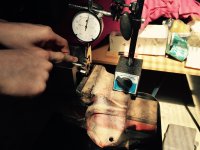
General Fiat 500F rejuvenation

Currently reading:
General Fiat 500F rejuvenation

Food for thought. Mmmmm food

That reminds me there is a cafe in Canberra called il Dolce where on a fine day you can walk up to an opening in the wall to buy gelati. Recently the council made the road a 20km/h shared zone and for some reason extended the shared zone beyond the original roadway to just past the cafe where it used to just be footpath.

I feel I Have no choice but to take the kids down there one day and do a drive through purchase, with my daughters ordering and paying through the sunroof. Seems reasonable to me. Pic outside cafe with 500L import from UK. Now member of local Fiat club
 
Pic
 

Attachments

  • image.jpg
    image.jpg
    1.6 MB · Views: 52
Sounds like a perfect place to see how many 500s you can get together--500s, warm weather AND Gelato--what more could a man want?
yummy.gif
thumb.gif
 
Cleaned up a few more engine parts today.
A few steps to getting the engine done.
Also dismantled two sets of rockers to find(as expected) worn shafts

I think a buying new set would be the most sensible thing to do.
 

Attachments

  • image.jpg
    image.jpg
    2.1 MB · Views: 40
A bit of work on the new crankshaft in preparation for the rebuild. A local engine wizard has opened up the oil galleries to improve oil flow over the journals. This is something he always does to help the oil transfer heat away from the journals. They are opened directionally based on the rotation of the bearing over the journal. He also suggested that I smooth out the freshly machined journals with some 1200 wet and dry sand paper attached to cloth tape. See pic
 

Attachments

  • image.jpg
    image.jpg
    1.2 MB · Views: 47
I have started on smoothing out the oil ways around the main bearing carrier. They have quite a rough casting that can impede oil flow. Only takes a few minutes to do each one with a d shaped hobby file. See comparison pics.
 

Attachments

  • image.jpg
    image.jpg
    672.1 KB · Views: 47
This weekend I was able to clean a few parts.
Nuts and bolts and then the crankshaft. Blasted spay can degreaser though all of the oil ways then washed out with hot water.

I also washed the main bearings/carriers that I filed out last week.

Moved on to the oil pump to install the new pump gears only to find that with two new gears they will not turn at all, and with drive gear and old second one it is very tight to turn by hand. I rigged up a drive from my drill by grinding an old 10mm stud and ran it while squirting oil in. It loosened up a bit but still hard to turn by hand.

I need to use the new drive gear as it matches the new camshaft I bought. They are also the right gears out of all the available combinations. I noticed on another thread the teeth were ground down a bit to give better clearance so I might have to give that a go.

Anyway here's The cleaned up timing over
 

Attachments

  • image.jpg
    image.jpg
    1.6 MB · Views: 49
This tightness of new oil-pump gears would seem to be a recurring problem--look at 'bleeding knuckles' comments. Don't forget to pack the pump with Vaseline (petroleum jelly) prior to putting it all back together--this gives the pump something to 'suck' on during initial cranking, and will bring up an oil pressure much quicker.
thumb.gif
smile.gif
 
Hi

Marcus550 had a similar problem in 2014 with the drive gear being out of round. I have tried filing the teeth and it is getting better so will keep trying.

Thanks also for the reminder re Vaseline. I had read that tip earlier so will do that.

Cheers. Geoff
 
I borrowed a dial indicator and got all of the teeth the same and finally stopped the drive gear from catching. Then put the secondary gear in and it was just scraping the housing but all the way round. I measured the teethe and filed a little bit of each one. Got it to the stage where I could turn it by hand but it was still touching. Then moved in to driving the gears with my drill while my nephwew fed oil in.

Now have a nicely spinning oil pump with two new gears. Took a bit longer than expected but happy with the result.

Next job is to seat the valves and clean the head. (Can't upload pics due to upload error)
 
Back
Top