OP
OP
He's in there somewhere.


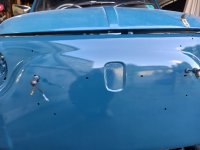
Keep going Peter, eventually Murph will have a re spray!!!!Seeing shiny paint on the rear wing where it used to be embarrassingly rusty got me thinking about other rusty areas. The front panel on Murf has been scarred by innumerable stonechips and corrosion that was started when I drilled holes for a bonnet safety-catch and spotlights.
It's the original front panel and I want to keep it that way. So I sanded down to bare steel where needed and then etched away all the rust pitting and coated with epoxy primer followed by cellulose.
It looks much better now although the darker shade of 419 Blu Turchese jars a little against my previous colour mix. Maybe it's faded?
I took the image to show a detail that I have frequently mentioned before. Ignoring the many extra holes I have made, you may see four tiny pilot holes that were intended for the small, Italian plates. Despite being an "F" for which all the suppliers suggest a front panel with a round hole under the winged badge, my car has the indent for the "L" motif, which is small enough to be hidden by the badge. The four, bigger mounting holes for that badge are obviously also present.
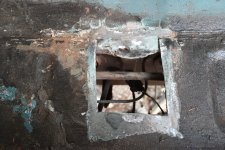
I have kept going but at this rate he will get a bit more than a patch by patch respray.....it's going to be a rebuild by installment. In the latter stages of painting the front panel I had noticed, and then chose to ignore a small area of the bottom of the spare wheel-well that had the texture and strength of a sausage-roll. I couldn't bear the worry of what it might entail and decided that for the "small" input of effort it would be worth welding it up whilst I'm at it. As always, the small area proved to be bigger...much bigger than anticipated (I should have known better).Keep going Peter, eventually Murph will have a re spray!!!!
Ian.
") Despite that, idiots like me will continue to road test until destruction, until my own personal bodywork starts to let me down.
Despite that, idiots like me will continue to road test until destruction, until my own personal bodywork starts to let me down. 
Murph is putting you through your paces at the moment! Door repair looks tidy, hopefully the door shut repair is the last of the rust in this round of repairs and it doesn’t go any deeper!
I think it ois partly due to being more patient....
We have all rushed things to get something done, but know in the back of our minds we have cut corners..
I all teh work I have done as p[art of my living I adopted teh mantra "Do it once do it right" it may take longer but hjopefully it will be a long time before you have to return to things again....
Currently helping a mate make his Transit more presentable and last a fair few more years.... (God the modern ones RUST!!)
He does not like that I have made him get underneath and attack all the rust scabs with a cup wheel and flap disk, then zinc primer put on some cheap top coat then shultz it.. the underneath will look p[erfect (well as perfect as it could) now his next task is to remove all the interior lining vac out all the spaces and he will be waxoiling all the ecavities...
He actually said... I wish i had done a bit of this every year it would not be so bad....
and I said yes and you should have done all of this in the Summer when I told you as now we are burning power keeping teh cold and damp at bay!!
and have taken to using "Hobbyweld" gas rather than "BOC", and perhaps because I've been using Italian steel from old van doors; It's a good thickness...maybe a true 20 gauge., I'll try that.you should look up Zinger paint which is what I use now...
I have a 8x4 trailer and the exposed metal; was flap wheel'd and painted with just Zinger.... still looks good...