Tuning Canterbury 695

Currently reading:
Tuning Canterbury 695

AndrewHarvey

Established member
Joined
Jan 17, 2015
Messages
1,471
Points
290
Here is the build thread of my 500 - 695 1971 500L last driven 2007 in Pescara Italy
After the exploits of its awkward arrival it was great to get to grips with the real car.
It is very sound body wise - but mechanically exhausted
The front brake cylinder had let go - so armed with a full brake re-furb kit the tools came out.
Needless to say all did not go as planned.....
Upon braking down the front hubs it became apparent that some "refreshing" of rubber components would be needed to get the sort after MOT leading to its UK registration.
A full strip down has now taken place and an order to our friends at Axel Gerstl is winging it way to me.....all bushes, rubber pads, king pin re-build kit, wheel bearings, steering rods and steering box gasket set were needed.
All came apart alarmingly easily.....most weren't even tight......only a bent bolt holding the nearside transverse link gave a problem.
This initial work are not enhancements.....lower spring and new shocks and disc brakes are for another time......now its just chasing the elusive MOT....
Pictures tomorrow....
 
Great motivation there Andrew, with Spring round the corner. I hope that an early MOT is a real possibility.

I am sure everyone will be watching this space as keenly as I will.

I can see that you enjoy the process a great deal so that's half the battle won already.:)
 
Great progress for your first week :)

All came apart alarmingly easily.....
In a way that's a good sign, as it shows that the 500 hasn't been exposed much to damp conditions, so bodywork that you can't see so well like inner arches and inner sills are likely to be sound too. When all the major work is over, it's probably a good opportunity to get something like dinitrol 3125 into the bottom of the doors, sills etc. as its certainly going to get exposed to some damp conditions from now on ;) ;)

cheers, Steve
 
As I am under taking most of the work..........!! I took the cylinder head to a great guy called Steve at Vulcan Engines near Brands Hatch.
He viewed the heaad and made some very good observations of where to progress extracting best possible gains......
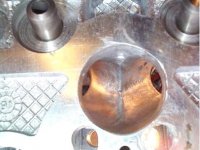
He noted that the valve guides pertruded hugely into the flow of inlet port....they are to be replaced with brass lined types and cut back as much as is possible. 36mm inlet valves were supplied along with the exhaust valves by me.
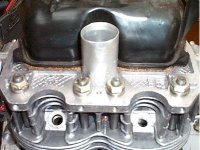
I had initially requested that the inlet tract be opened up hugely (it is as standard 29mm) to a 38mm and tube be fused into the head (picture attached) BUT
I am running a Delortto FZD and supplied a manifold - Steves opinion was that we could work by opening the inlet tract AND use the existing FZD manifold, removing any issues with the carb position clashing with other fixtures......and keeping things more manageable.
I am dropping off two cranks and the big bore kit to him, for a partner to balance and machine on Monday.
Crank case and gearbox internals to a friends machinists also on Monday for the more specialised mods needed.
 

Attachments

  • port-2.jpg
    port-2.jpg
    22.6 KB · Views: 123
  • port-3.jpg
    port-3.jpg
    26.6 KB · Views: 121
Removed the knackered wiper mech today and my car has badly repaired accident damage to drivers (nearside) inner wing.
I will get car up and running and get professional advice on getting it properly repaired later. Otherwise body is good for 44 years......
Thoroughly enjoyed stripping wiper motor down and getting it back to working condition, along with new spindles etc....battery sat on kitchen table for a power supply - listening to the rugby.
 
Hi - can you guys help please.
The bolt for one of the front transverse links is bent - managed to get the nut off.....just......

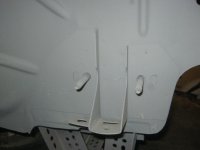
Is it possible to extract the bolt.....its head is kinda buried in the fluff in the footwell...

Its a sign of previously mentioned damage, and needs ideally to be changed rather than straigtened - your knowledge is welcomed please

:confused:
 
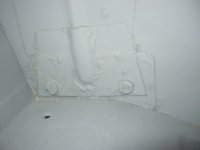
I dont think you can Andrew without it becoming a kerfuffle! I think the heads of the bolts are held in place by a welded on bracket. You would have to remove this and then weld another one back in. Will try and get a photo of mine when I get home later
Damian
 
the bar the top arms bolt to are held by two bolts pertruding out of the body.....the heads are in the very bottom of the footwell.....and mine are covered in fluff..................and i couldn't see if they were removable

:p
 
Andrew,
I haven't had to replace these bolts, but looking at them closely they are probably welded in place. You should be able to grind the heads off from inside the vehicle and then run a drill through from inside the vehicle. The bolts may even just pull out once the head has been ground off.
Not a nice job to do especially with all the interior & glass in place. Plenty of sparks to fly around.
 

Attachments

  • IMG_9464.JPG
    IMG_9464.JPG
    1.2 MB · Views: 95
  • IMG_9466.JPG
    IMG_9466.JPG
    1 MB · Views: 100
I agree with Sean Andrew. They appear to be welded to that plate. Good luck
 
Done that Andrew and I think I ground the domed head then drilled when I could see the outline of the stud. Refit with an appropriate M10 hexagon setscrew in high tensile steel and although I welded mine, I'm not sure you would have to.
 
oooooooooooh!
Its bent but I got it undone.......may be best left alone rather than pick a fight with something I won't win.
What do you guys paint kingpins/ suspension arm and components with?
 
I've been using engines enamals and then baking them in the oven..........stinks the house out but seems to give a tough finish......is it tough enough for suspension bits?

:eek:
 
I also had to replace 1 of the top-wishbone bolts many years ago with one of my early 500s. I seem to remember that it was spot-welded to a reinforcement plate on the inside of the foot-well. The bolt had sheared fairly 'short' so I drilled it out as much as I could from under the wheel arch, leaving only the head of the bolt to be attended to from inside the foot-well, which is a 'pain-in-the-bum' job. The answer might be to cut the damaged bolt off as much as possible from under the wheel arch, drill it out as much as poss from under the wheel arch and the attack the bolt head from inside the foot-well with a 'diamond' wheel on a Dremel (or similar) to cut the welds onto the backing plate. The head of the new bolt can be welded to a backing plate (with a couple of welding holes drilled into it) prior to it being fitted and this plate welded to the original backing plate.
thumb.gif
 
getting machining organised tomorrow.
Crankcase opened out and fifth gear mods will be handed to my contractor.
Then get oil plugs welded in crank at work, before it goes away with engine internals for balancing.....really getting going now....

:cool:
 
Handed over gearbox machining parts + crankcase today.......next up balancing...
I had the crank oil way plugs spot welded in preparation for work.
So crank, new rods, new pistons, clutch, oil pulley and 500 flywheel are off for balancing......have I missed anything?

Next up are some replacement exhaust studs for the head and a gasket set.....any particular recommendations?

The one custom item I need to organise is the throttle outer cable stop.

From what I can make out I need a stainless bracket fabricated, to terminate the outer throttle cable - offering tension adjustment and a cable balljoint to fix to the FZD...this will be fixed to the alloy air box right??

Its the only part I cannot buy from what I can make out.
 
Many parts of the build preparation are coming together ......many hiccups along the way...
Can anyone recommend a UK machining company to bore out my 650cc crankcase. - my origanal pan proved flawed as i need +- 0.1mm and my machinists bottled it?
I am in the south East of England but I guess I can post it regardless.

Your experiences please
:p
 
Back
Top