Tuning 5 speed

Currently reading:
Tuning 5 speed

Does any one have experience of this issue - of what pressing the lever down does to the change action?
 
Hi Andrew, yes you need to grind a section out of the reverse lockout so that you can engage 5th without having to push down when moving across the gate.
The best way to work it out is to fit the transmission and linkage and adjust so the lever is vertical then mark where you need to cut the lockout. I just used a little dremel tool with a cutoff disc to trim out the excess metal.
I havent used the open guide plate as it will let most of the heat out of the tunnel, your left hand would be cozy but your feet and windscreen demist might not be very effective...
 
Hi - apologies for asking but where is the reverse lockout? In the box or part of the linkage..... My book does not have a description of such item
 
Hi - apologies for asking but where is the reverse lockout? In the box or part of the linkage..... My book does not have a description of such item

I obviously didn't explain it well before, it's at the base of the shaft. You basically have a stop along with a spring on the shaft. Pushing down moves the stop out of the way.

As per Damon's post cutting/grinding the stop solves the issue.

cheers, Steve
 
I found this pic if it helps...
f4fd87386091839262ec61f2cf6fb553_zpstv0diei8.jpg


cheers, Steve
 
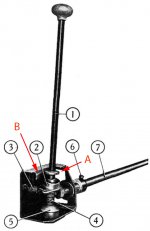
The stop Steve and Damon are talking about shows up as "A" in the photo below. When shifting into 3rd and 4th, this stop bumps into and rides along the downturned metal lip of the lever support mount "B."

When shifting into reverse, you push down on the lever and the stop slides under the metal lip, allowing the lever to move further to the right (and the gear shift control rod to rotate further).

From what Damon and Steve are saying, the front-most portion of this lip needs to be cut away to allow an easy shift from 4th to 5th gear.
 

Attachments

  • Gearshift control.jpg
    Gearshift control.jpg
    87.9 KB · Views: 34
Many thanks to all....

I had bought a spare linkage and so set to it with the Dremmel.....

Results:
 

Attachments

  • linkage1.JPG
    linkage1.JPG
    3.2 MB · Views: 53
  • linkage2.JPG
    linkage2.JPG
    3 MB · Views: 55
Could someone please scan and email me the instructions. I've got my hands on a partially assembled kit with no instructions.
 
Back
Top