General Weber 26/28 IMB

Currently reading:
General Weber 26/28 IMB

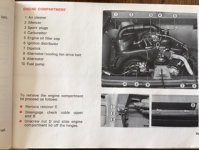
Yes, it can’t be a filter because it’s straight through and it does look like a silencer!!! Very odd. I have one on my 650 engine maybe I should take it off see if it makes a massive difference!:D

I have one in my spares , in fact I may have three! But they just look unwieldy. You might have to buy the steel pipe and maybe the rubbers as fitted to the "R".

It might not make much difference to the noise but the performance would rocket.:D
 
Knew I had seen it somewhere, 126 Owner Handbook , check out item 2 :)
 

Attachments

  • 76FC1671-EAAB-4CDC-94E2-7BB18C0AC223.jpeg
    76FC1671-EAAB-4CDC-94E2-7BB18C0AC223.jpeg
    31.4 KB · Views: 151
Raising a question here as it is carb related (but part of my ongoing saga on a different thread!).

I have rebuilt a 26IMB/10 using my original, one I had from ebay a while back and one from a "donor" engine in an attempt to rule out the carb as the source of the problem.

My starting point was getting the base as flat as possible.

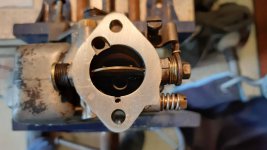
All now rebuilt but I have a problem with the butterfly valve.

Essentially it doesn't reclose when the throttle arm is opened.

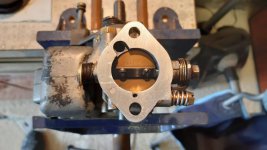
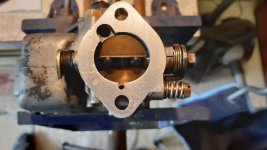
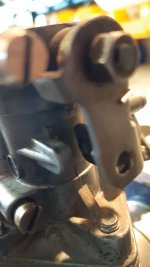
A few photos may explain.

(1) with the bolt at the end of the spindle loose, the valve closes on the springs and the idle screw rests on its stop

(2) and (3) with the bolt finger tight, the valve doesn't close fully and the idle screw is short of the stop (5mm?)

(4) if I tighten the bolt with a spanner, the valve doesn't close at all

I assume the bolt should be tightened otherwise it will shake off.

My conclusion is that something is rubbing or not fitted properly but am totally baffled what.

I should say that, having "smoothed the bottom" I did give everything a good clean and have also tried a couple of different butterfly disks.

Now I will try and load the photos in the right order!

Thanks all.

20200719_162908_compress52.jpeg20200719_162936_compress85.jpeg20200719_162956_compress3.jpeg20200719_163022_compress53.jpeg
 
Have you tried tightening the nut on the spindle with the butterfly screws loose then look down the carb barrel to see any light around the butterfly. Make minor adjustments on the butterfly until you get best fit and minimum light. Make sure the tick over screw is loose.
 
Thanks Toshi

Sounds so obvious (doh!).

Yes I think it seems to have worked. I also tried the couple of spare disks I had so hopefully now have the best fit and it seems to close.

Now to put it back on the engine and see if it makes any difference to the running. If not I think I can at least assume the carb is not the issue and move on to the next thing.

Thanks again...much appreciated.
 
Sorry, me again!

So I thought I had it all sorted with a flat bottom, new jets and carb back on car. Turned over and fired up OKish but when I switched off after a few seconds and checked, there was fuel dripping (putting it mildly) out from around the main jet. I think that was where it was coming from. So I mopped it all up and removed the carb again, checked the float, float adjustment and needle, checked the main jet again and put it all back together but no improvement [emoji33][emoji2959][emoji35]....fuel coming from somewhere. It continues to drip for a while after the engine is off.

At the end of my tether now and looking at spending a fortune on a new carb just so that I can rule that out as a cause of my running problems.

Any ideas why fuel would be leaking or where from? I must have missed something obvious [emoji852]

Thanks all (off to find that hard wall for my head...)
 
You need to establish exactly where the leak is coming from. You can wrap a little tissue paper around suspect areas on a dry carb, a coloured serviette even better as a leak will show up better. Run just for a few seconds then inspect the tissue for signs of leakage. I have known the carb body to be cracked where someone has fitted the wrong main jet holder. Some seal on a taper and some on a tiny copper washer. The top cover can warp causing the gasket not to seal. Best test is to fit the top without a gasket and see if you can see daylight through it. I assume you have checked the float for hairline cracks. Be careful if you are looking at new repro carbs.
 
Refitting the butterfly can be a tricky job as they tend to stick against the carb bore and make sure no force is asserted whilst refitting as the disc will dent the aluminium body.


Also make sure the disc is fitted the right way as some carb have a chamfer on the edges to maintain a better fit.


When you slide the disc in keep it loose and allow the spring to close the flap and gently manipulate it to a good fit, then gently nip up the screw.


And just an observation from memory, don't the screws go in from the top? this would mean the spindle is 180 degrees out? I could be wrong though...….


Rob
 
Last edited:
I just posted several pictures of my carb 26 IMB 10 in another thread :

https://www.fiatforum.com/500-classic/482421-carburettor-problems-2.html?p=4554320


I have been using this thread has a reference. If you guys think it would be good to have them copied here I can re upload them on this thread.


Main differences from previous pictures:

- No fuel filter
- Mixture screw
- Cap of the spring of the choke
- Venturi tube seems to be plastic?
 
My 500L has a 126 fuel pump and a 28IMB carb. I took the carb apart and thoroughly cleaned, soda blasted and cleaned again. I replaced the mixture screw and rubber gasket as well. My mixture needs to be dialed pretty far out for the car to even run. Does anyone know the direction for lean/rich? I.E. do you turn it clockwise to make it leaner or counter clockwise?
 
On most Weber carbs, a good starting point with the mixture screw is "2 turns OUT" (I.E. gently turn it fully in, then out 2 turns) If the mixture screw need to be more than 3 turns out , you need a larger idle jet--if the engine runs best with less than 2 turns, you need a smaller idle jet. By my simple brain, this would indicate that turning the mixture screw OUT you are WEAKENING the mixture---anybody, feel free to correct me on this train of thought!
 
On most Weber carbs, a good starting point with the mixture screw is "2 turns OUT" (I.E. gently turn it fully in, then out 2 turns) If the mixture screw need to be more than 3 turns out , you need a larger idle jet--if the engine runs best with less than 2 turns, you need a smaller idle jet. By my simple brain, this would indicate that turning the mixture screw OUT you are WEAKENING the mixture---anybody, feel free to correct me on this train of thought!

It’s exactly 3 turns out so i guess i can live with that. I was used to initial settings on most carbs of around 1 1/2 turns out so it seemed excessive
 
So...I have new starter, new ignition from coil to plugs. Completely disassembled and cleaned carb, new fuel tank and lines. Car runs well but if I accelerate rapidly it goes well and then just stops as revs pick up, then goes again. Slow acceleration is fairly smooth. Floats?

I did adjust the float settings to spec but it’s a weird issue.
 
1st, I'd try advancing the ignition timing a little and then test-drive.
If no difference, reset the ignition timing to stock and

2nd, I'd do a quick check on fuel pump output.

If following the following procedure, best do it outdoors and have a fire extinguisher to hand.

1. Warm up the engine so that it will idle normally without choke.
2. Switch off.
3. Disconnect the fuel pipe at the carb, place the open end into a container outside of the engine compartment
4. Start engine and allow to idle.
5. If fuel pump is ok, you should collect approx. 1 pint (1/2 Qt, 500cc/ml) in 1 minute of engine idling. If float level is ok, engine should be able to idle for 1 min when warmed up, i.e. not running on choke.

If you have a fuel pressure gauge, iirc, you need a minimum of 2.5 psi but not more than 4 psi. - higher pressure can cause carb flooding.

Fuel pumps occasionally give trouble on the 500. The pump internal spring can go weak, the diaphragm can leak or the little disc valves can leak. The only possible adjustment in to the stroke of the pump pushrod (it's usually ok). Also fuel flow can be restricted due to blocked filters - there's usually 3 filter screens, 1 on the fuel pick-up pipe in the tank, 1 inside the fuel pump and 1 adjacent to the carb fuel connection under a large brass nut (iirc 19mm/3/4" size). These 3 filters rarely give trouble unless the car has been laid-up for a long time. If the fuel pump output is low, best to check these filter screens are clean before replacing the fuel pump.

Al.

This is good stuff thanks. Here’s whet I did previously

Ignition as I said was all replaced with the exception of the distributor body itself. Strobe timed to just a hair past 28deg advance. I did notice the mark start to dance a bit at really high revs but it didn’t seem excessive.

Fuel system
1. Brand new fuel tank with new sender and screen.
2. New fuel lines
3. Checked screen in fuel filter...clean
4. Disassembled the carb, soaked all the metal parts in carb cleaner. Float looked and sounded fine. New filter screen. Soda blasted the carb, rinse dry and reassemble.
5. It’s a 126 fuel pump going to a 28 imb carb. And I did make a return with a T to the fuel line before the pump. There’s also a 1 way valve in the return line to avoid creating a vacuum.
6. Air filter is new and so is intake trunking.

Car is new to me and needed some mechanical sorting obviously but the fuel pump looked pretty clean and newish compared to the rest of the engine. I will check output though.

I may do a rebuild on the carb with new jets this time. My other thought is a sticky float needle. The float was adjusted to 28 imb spec

I’m trying to visualize what’s happening in the carb as I accelerate rapidly. I’m leaning toward the float area because like I said it accelerates really well then it feels like the engine stops and then a second later it just picks right up again like nothing happened.
 
Try removing the one-way valve. The Fiat pump will PUSH fuel through a one-way valve, but NOT pull it through. Although it should in theory be OK, it may be that by fitting the one-way valve into the return pipe you are creating a restriction in the return pipe. I concede that it may not be the answer, but you have tried most things.
The reason I know about the one-way valve is that I decided to remove the one-way valve that I had fitted between the pump and the carb (and the engine ran fine) and move it to the fuel outlet at the tank---when I drove on a light throttle, all was well, but as soon as I tried to accelerate hard, it just died on me-----and i had a big show next day! Removing the one-way valve cured the problem.

Just because it was simple to test, I did a normal straight run of the fuel line to the pump and capped off the return. No real difference. It seemed to idle just a tiny bit better but thats likely my imagination/wishful thinking/cooler weather. I'm going to pull the carb again and check everything out there.

Here’s my setup before
 

Attachments

  • BE33DB93-5B0C-4162-8339-8DC5723C10C5.jpeg
    BE33DB93-5B0C-4162-8339-8DC5723C10C5.jpeg
    702.5 KB · Views: 64
  • 960BA523-DB9E-420A-A69A-5A924613EED1.jpeg
    960BA523-DB9E-420A-A69A-5A924613EED1.jpeg
    1 MB · Views: 81
Last edited:
I swear this car is going to kill me...

Decided to do a full rebuild on the 28 imb. Ordered the kit from mrfiat. Second time stripping it so I was moving nicely. Time to take the butterfly off and the screws were tight but turned and lo and behold one of them just came apart. No problem because I have a brand new shaft and butterfly with screws. Break out the drill and carefully drill the screw out and remove the butterfly. On re-assembly the new shaft refuses to go in. I measured it with calipers and it’s actually a larger diameter shaft than the old one?? It appears to have a shoulder on each side the proper diameter but the middle section is larger. WTH?
 
The emulsion tube DOES come out BUT BEWARE; behind the little brass cap that covers it is a spring, which if you are not aware of, will pop out when you remove the cap and dissapear into the darkest and most remote part of your workshop--and they are NOT a purchasable part! How do I know? despite clearing out my old garage when we moved to Wales, I never found the spring out of one of my IMB carbs! (luckily, it was one I only used for spares). If you would like me to, I will look in my workshop tomorrow and see if i still have that carb---if i have, you are welcome to the butterfly shaft---what size IBM carb do you have---my spare is a '28'.
 
Back
Top