Technical New Exhaust Muffler

Currently reading:
Technical New Exhaust Muffler

Giardiniera1969

New member
Joined
Mar 9, 2014
Messages
125
Points
40
Hello All!

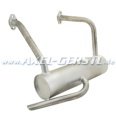
This weekend I plan to replace my Fiat Giardiniera exhaust Muffler (silencer) which seems to be from a classic 500D (1st Picture) to the stock Giardiniera one. Does anyone have any hints or tips for this project? I looked in the manual and there seemed to be no procedure listed for it.

Thanks!
 

Attachments

  • 621b21a961d14442abfa112f98ac3736.jpg
    621b21a961d14442abfa112f98ac3736.jpg
    4.2 KB · Views: 108
  • 60c3f9a8811c96d4b9a5de80a3daebe6_small.jpg
    60c3f9a8811c96d4b9a5de80a3daebe6_small.jpg
    1.5 KB · Views: 108
Be careful--the pictures you have shown are from totally different engines. The 1st picture is for a 500D/F/L which has a VERTICAL 2 cylinder engine--the 2nd picture is for a Giardiniera which has FLAT twin engine. The exhaust for the D/F/L engines has long down pipes which bolt onto to the exhaust elbows which bolt on to side if the cylinder head. The exhaust on the Giardiniera bolts straight onto the top of the cylinder head (although, as the engine is a flat twin, I suppose technically it comes out of the side!) with very short 'down' pipes---they are NOT interchangeable!! Try:- www.il motore.de for a good sports exhaust (as well as a standard type.
thumb.gif
 
Yes, somehow the previous owner put the first type on, granted, the attachment/downpipes are short like the stock model. It seems like I will just have to unbolt them, put on the new gaskets, and bolt the new one one. Hopefully it is that easy. I will take photos.
 
Hi,
Yes I have seen modified sedan exhausts fitted to Giardinieras over the years and they look terrible. Remember that there are also 2 metal mounting straps that hopefully are still present - if you leave them off it might not stay secured too long...
Otherwise the procedure is to mount the exhaust with new gaskets and fit all the bolts loosely, tighten the manifold to head bolts first and then the securing bolts afterwards in turn. Good luck with the project!
 
Back
Top