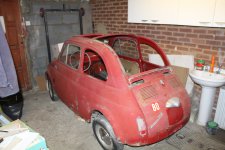
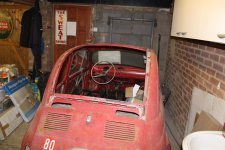
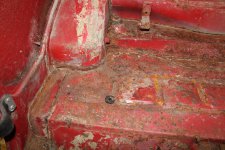
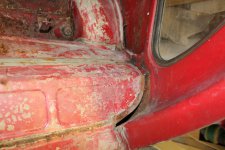
General My next project

Currently reading:
General My next project

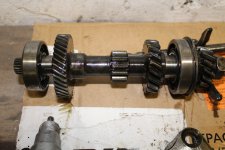
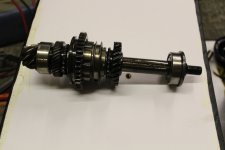
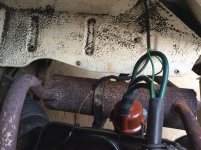
Busy this weekend rebuilding the dynamo and starter this weekend.
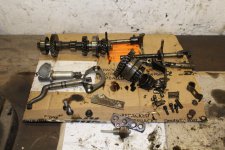
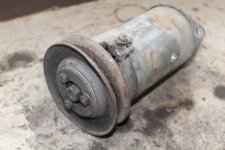
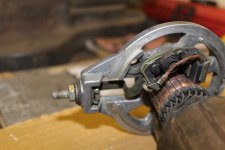
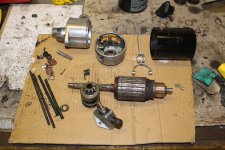
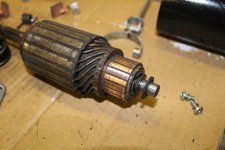
Stripped the 500L dynamo apart. Gave it a good clean up and a lick of paint. The brushes and commutator were all in very good condition. Mind you the car hadn't done that many miles and the majority of mechanical parts were all very solid and serviceable. The bearings were nice and smooth and so I felt it best to keep the original ones.
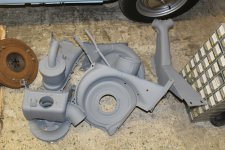
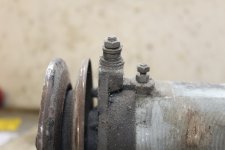
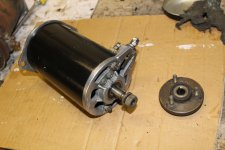
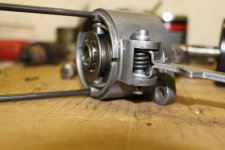
Came out rather nice. just need to paint the pulley mount and purchase a new pulley. After my previous disaster using the old one, I realise some things just aren't worth keeping - not when there is a new one available.
 

Attachments

  • IMG_1704.JPG
    IMG_1704.JPG
    1.6 MB · Views: 71
  • IMG_1705.JPG
    IMG_1705.JPG
    1.8 MB · Views: 216
  • IMG_1706.JPG
    IMG_1706.JPG
    1.6 MB · Views: 63
  • IMG_1708.JPG
    IMG_1708.JPG
    1.6 MB · Views: 98
  • IMG_1711.JPG
    IMG_1711.JPG
    1.8 MB · Views: 113
  • IMG_1717.JPG
    IMG_1717.JPG
    2 MB · Views: 76
  • IMG_1716.JPG
    IMG_1716.JPG
    1.7 MB · Views: 102
  • IMG_1714.JPG
    IMG_1714.JPG
    2 MB · Views: 68
  • IMG_1713.JPG
    IMG_1713.JPG
    1.6 MB · Views: 46
Now the starter motor.
I have 2 F/L starters, I had already rebuilt my L one before deciding to go with a 650 engine. However as I am using the D engine which has a slightly different block due to originally built using a 2 bolt starter, The L one doesn't quite fit and wouldn't look correct.
So I managed to find an original D one with 2 bolt holes. Bargain, I think it was about £12 for 3 starters and and L gearbox.
I stripped it apart and cleaned it up. Now the D as mentioned in the engine thread has a flywheel with less teeth and a different size clutch plate which means a slightly harsher clutch. So the theory was to use the L flywheel which meant changing over the Bendix from the later starter.
After checking that they all spun before dismantling, I cleaned all the parts and painted the body and started to assemble. Hmm, this isn't working.
On closer inspection the body and brush assembly are all the same. But the Bendix and armature are slightly different. The 2 splines are slightly deeper on the D one so the later Bendix wont fit. No problem I thought. Use the L armature. Still wont go together
confused.gif

It turns out that the Bendix outside diameter of the bearing part of the gear is larger diameter 40mm compared to the early 35mm. Also the 2 bolt housing is smaller diameter so the later Bendix wont spin out as far as required before hitting the housing
banghead.gif

So I have 2 options. Use the original D flywheel, clutch and starter. Or see if I can use the later starter housing in the D bell housing and then remove the additional flange/ 3rd bolt hole to make it look like an early one.
Enough for tonight, think I will sleep on this one.
smile.gif
 

Attachments

  • IMG_1718.JPG
    IMG_1718.JPG
    2.4 MB · Views: 53
  • IMG_1719.JPG
    IMG_1719.JPG
    1.9 MB · Views: 54
  • IMG_1720.JPG
    IMG_1720.JPG
    1.6 MB · Views: 53
  • IMG_1722.JPG
    IMG_1722.JPG
    1.7 MB · Views: 113
  • IMG_1723.JPG
    IMG_1723.JPG
    2 MB · Views: 93
Sorry I have nothing to contribute here; just a big thumbs-up(y) to you for determination and high-quality work. It reminds me of my approach when I was restoring my pre-war car. Thank-goodness I came to my senses eventually and threw all thoughts of originality aside.;)
 
Sorry I have nothing to contribute here; just a big thumbs-up(y) to you for determination and high-quality work. It reminds me of my approach when I was restoring my pre-war car. Thank-goodness I came to my senses eventually and threw all thoughts of originality aside.;)

Its strange - I used to be into modifying everything. Now I have reverted back to keeping it all standard. Quite the opposite for you
biggrin.gif
 
Busy afternoon
Stripped a 126 gearbox in preparation to build the gearbox for the D.
This was one which I got from the 3 wrecked 126's a couple of years ago. The gears are perfect, none of the usual wear on 1st or reverse.
I cleaned all the casing the best I can using petrol and a metal brush. Just needs a final clean up. I might check out vapour blasting as I saw some results at the London Classic car show that were really impressive. Otherwise its a could clean up with a wire brush and maybe a lick of aluminium paint.
I now need to whip out the D gearbox, strip it and check that it all lines up. Also need to see if the driveshafts are salvageable or if I need new ones.


All my engine cowlings and centre heater duct have all been blasted and primed - not bad for £45 all in
smile.gif
 

Attachments

  • IMG_1728.JPG
    IMG_1728.JPG
    1.9 MB · Views: 45
  • IMG_1729.JPG
    IMG_1729.JPG
    1.3 MB · Views: 66
  • IMG_1727.JPG
    IMG_1727.JPG
    2.3 MB · Views: 46
  • IMG_1726.JPG
    IMG_1726.JPG
    2 MB · Views: 43
  • IMG_1724.JPG
    IMG_1724.JPG
    2.1 MB · Views: 62
  • IMG_1730.JPG
    IMG_1730.JPG
    1.7 MB · Views: 63
Sean it's filthy that gearbox casing isn't it! I would be ashamed to put a picture of it on the forum. What do you reckon Peter?? :D:D:D

I was just about to ask how much for the blasting and priming, then saw it at the end. Do you get mates rates or something?
 
Last edited:
Today the fun began!
biggrin.gif

I decided to start stripping some of the underseal in preparation for the shell to go to the blasters.
So I attacked the engine bay first. Removed all the items from the bay and used a heat gun and a scraper to remove the underseal. Then a good wash down with petrol & white spirit as they used a petroleum based product. Once you get past the paint the underseal will wash off.
This makes the engine bay much cleaner to work with and now shows all the areas that require a little sorting out.
There is slight damage to the centre above the gearbox, this will straighten.
The lower inner wing re-enforcers look ok, or at least a lot better then the L were, but that is mainly down to a slightly different set up in the construction. The lower 1/4 panels are still rusty though.
But the worst part is where the osr has had some impact damage and can now be clearly seen looking at the panel that sits near the exhaust. This will need to come off and be straightened and welded back on. But not until I give the rear end a light pull and sort out the rear seat floor. I will cover that later. The rear inner arch is also slightly distorted but that should come out when I give it a pull.
I also tackled the nsr wheel arch. Cleaned the sealer and underseal off, but forgot to take a clear picture before I put the wheel back on.
banghead.gif
 

Attachments

  • IMG_1771.JPG
    IMG_1771.JPG
    2.3 MB · Views: 44
  • IMG_1765.JPG
    IMG_1765.JPG
    2.2 MB · Views: 79
  • IMG_1763.JPG
    IMG_1763.JPG
    2.1 MB · Views: 43
  • IMG_1761.JPG
    IMG_1761.JPG
    3 MB · Views: 48
  • IMG_1759.JPG
    IMG_1759.JPG
    3 MB · Views: 76
  • IMG_1775.JPG
    IMG_1775.JPG
    2.2 MB · Views: 57
  • IMG_1776.JPG
    IMG_1776.JPG
    2 MB · Views: 41
  • IMG_1774.JPG
    IMG_1774.JPG
    1.9 MB · Views: 39
  • IMG_1773.JPG
    IMG_1773.JPG
    2 MB · Views: 64
  • IMG_1778.JPG
    IMG_1778.JPG
    2 MB · Views: 118
  • IMG_1792.JPG
    IMG_1792.JPG
    1.7 MB · Views: 67
I'm also amazed by the condition of those panels and your tenacity in removing the gloop. But it does point to that antique soundproofing product being very effective (when used in hot and dry conditions! :D )
Have you revealed the original colour or is that the Fiat pink-primer?
 
Last edited:
A very productive day today.
Removed the rear screen & 1/4 windows - cut the rubbers out so as not to chance breaking any glass.
Stripped the front bonnet area of tank & all components and removed the complete wiring loom, switches and speedometer.
Also decided to remove the roof. quite easy really.
Remove the sunroof, 2 bolts holding the frame and the small nuts holding the rear rail - most of which snapped off.
Then there are 2 10mm nuts inside the roof rail, the washers all fall into the roof channel so don't know if I will see them again. Then undo the screws along the bottom of the rear air grille and then it comes off with a little leverage. The roof is rather rusty around the rear screen aperture and also on the 2 front corners. All of which can be repaired but the inner channel around the rear screen is going to be the difficult one.
Amazingly there is little rust if any on the roof rails now the roof is removed.
I tidied up the inside a little and found my D had been a home to a little rodent in its past. I also removed some of the sealer and sound deadening. This has now exposed the full extent of the impact damage to the right rear. Someone has had a go at repairing the 1/4 panel but they have left the damage to the rear floor, inner wing & wheel arch. Also now the roof is off you can see there is a larger gap between the inner 1/4 panel and the rear seat panel.
I'm going to attempt to give the rear end a pull but I think I am going to end up removing the 1/4 panel, unpicking the inner panels to remove the strength then I should be able to straighten everything up.
The front end has also been repaired with a new front panel but they didn't repair the inner front panel which is still badly damaged and corroded. I'm also going to give the front a quick pull as the front wing has closed up to the front of the door. There's not much strength in the sills so I need to be careful I don't pull the car apart.
I'm surprised how some of the panels are so much better condition than my L was but sadly the accident damage is going to mean a lot of bodywork repairs to be carried out. So watch this space for some serious panel work and welding going on.
Just not sure when yet!
eek.gif
 

Attachments

  • IMG_1825.JPG
    IMG_1825.JPG
    1.7 MB · Views: 47
  • IMG_1821.JPG
    IMG_1821.JPG
    1.8 MB · Views: 32
  • IMG_1804.JPG
    IMG_1804.JPG
    2.2 MB · Views: 54
  • IMG_1800.JPG
    IMG_1800.JPG
    1.8 MB · Views: 73
  • IMG_1802.JPG
    IMG_1802.JPG
    1.9 MB · Views: 29
  • IMG_1867.JPG
    IMG_1867.JPG
    1.9 MB · Views: 32
  • IMG_1850.JPG
    IMG_1850.JPG
    2.2 MB · Views: 76
  • IMG_1844.JPG
    IMG_1844.JPG
    2.3 MB · Views: 29
  • IMG_1843.JPG
    IMG_1843.JPG
    2.1 MB · Views: 28
  • IMG_1834.JPG
    IMG_1834.JPG
    1.8 MB · Views: 67
  • IMG_1868.JPG
    IMG_1868.JPG
    1.8 MB · Views: 87
  • IMG_1869.JPG
    IMG_1869.JPG
    2.1 MB · Views: 57
  • IMG_1814.JPG
    IMG_1814.JPG
    3 MB · Views: 77
  • IMG_1830.JPG
    IMG_1830.JPG
    2.3 MB · Views: 27
  • IMG_1829.JPG
    IMG_1829.JPG
    2.3 MB · Views: 76
  • IMG_1859.JPG
    IMG_1859.JPG
    2.6 MB · Views: 94
  • IMG_1865.JPG
    IMG_1865.JPG
    2.1 MB · Views: 30
  • IMG_1863.JPG
    IMG_1863.JPG
    2.3 MB · Views: 26
  • IMG_1835.JPG
    IMG_1835.JPG
    1.9 MB · Views: 71
So removing that roof is that something specific to the D Sean? Never seen one removed before. Could you go transformable with the full sunroof?
 
Oh yes!
This was the design for the N & D.
I'm not going to quote models etc, I will leave that to the experts! but there was the option for the full transformable model or the with roof. I think on the D's they were all fitted with the roof.
I just need to remove the centre brace and then buy the full roof and frame.
The original sunroof frame mounts aren't used but there are similar points halfway along the inner roof rail where 2 captive nuts need to be fitted. Then hey presto! we have a full convertible.
The wife was most impressed when I removed it. she said could I have it finished for next spring so she can use it?
eek.gif
 
It looks very solid although I know that photos are deceptive. How are you going to stretch the squashed areas outwards? It sounds like you have your better half well on side so maybe you'll get out to the garage pretty soon; I'm looking forward to seeing you tackle the metalwork.(y)
 
Well, ideally I would put it on a jig and used a controlled method for pulling it. But due to its condition and the cost I will try and attach a chain to a beam that is concreted in the ground and wrap the other end around the front bumper and then push the car backwards. The front on these are rather flimsy compared with modern day car structures so I don't think it will take much to sort out the front.
The rear I will do the similar thing around the rear cross member. Failing that I will use a porta power ram to push the panels apart. Otherwise I will have to remove the rear 1/4 panel, unpick the joints between the inner wing and wheel house. I am even considering removing the rear bulkhead. this will then remove all the strength and allow me to repair each panel then weld them back together.
As you have experienced with Mitchio, when you take the sill off and the L panel you made that attaches to the rear floor, there is not much strength there so that part will repair easily.
It will be a fair bit of work - but that's the fun part
devil.gif
 
After pulling the front end to pull the outer panels back into line, I then removed the outer panels and gave the front inner panel a pull. Also put a great big bolt through the top shock absorber mount and pull on that as well.
this opened the gap up by about 3mm between the front wing and front edge of the door, but it wouldn't pull it any more.
Today I cut the front wings off leaving only the back edge so I can use this to keep an eye on the door gaps. Just in case things start to move. Usual rust as expected. I was going to try and save the outer arches but they were just too corroded and would end up replacing the complete lip that the outer wing welds to.
The front inner panel has been completely removed ready for a new one. I have some heavy corrosion on the upper bulkhead panel on the right side - very similar to yours Peter but not quite so bad - just a small section to cut out.
Now the front is off I might try and give it another pull on the front as the NSF A pillar will be a bit weaker now.
I also removed the panel that sits by the exhaust. It was rather bent and need to come out to straighten the rear arch. Cleaned the underseal off and 20 minutes of panel beating it is looking quite straight now.
Trouble is it is different to my L one and I'm not sure what shape the edge should be - the edge nearest the exhaust of which the additional panel is screwed to.
Is there any D owners out there who would have some good images of this panel that I could use please?
 

Attachments

  • IMG_1773.JPG
    IMG_1773.JPG
    2 MB · Views: 31
  • IMG_7328.JPG
    IMG_7328.JPG
    2.1 MB · Views: 32
  • IMG_7330.JPG
    IMG_7330.JPG
    2.8 MB · Views: 54
  • IMG_7331.JPG
    IMG_7331.JPG
    2.3 MB · Views: 76
  • IMG_7334.JPG
    IMG_7334.JPG
    2.3 MB · Views: 51
  • IMG_7348.JPG
    IMG_7348.JPG
    2.1 MB · Views: 48
  • IMG_7345.JPG
    IMG_7345.JPG
    2 MB · Views: 31
  • IMG_7343.JPG
    IMG_7343.JPG
    3.2 MB · Views: 26
  • IMG_7340.JPG
    IMG_7340.JPG
    2.4 MB · Views: 51
  • IMG_7338.JPG
    IMG_7338.JPG
    1.8 MB · Views: 49
Thats a project and a half Sean. Those tyres look like off roaders
 
Here you go Sean. I hope these help you. Let me know if you need any other photos.

I must get around to replacing the wiring on the oil pressure switch!
 

Attachments

  • IMG_6148.JPG
    IMG_6148.JPG
    1.3 MB · Views: 25
  • IMG_6151.JPG
    IMG_6151.JPG
    1.9 MB · Views: 34
Back
Top