Good to see photos Damian. That really doesn't look too bad. Do you really need a load of full repair panels?


You are using an out of date browser. It may not display this or other websites correctly.
You should upgrade or use an alternative browser.
You should upgrade or use an alternative browser.
Technical Project Paolo
- Thread starter Paolo66
- Start date
Currently reading:
Technical Project Paolo
Ah, the innocence of youth! These days I don't bother worrying beyond 25. ")
Just you wait until you start cutting panels off, that's when the fun starts!
Just take your time and make sure you repair it properly & it will be well worth all the hard work.
Just take your time and make sure you repair it properly & it will be well worth all the hard work.
OP
OP
Paolo66
Established member
- Joined
- Feb 6, 2013
- Messages
- 1,004
- Points
- 235
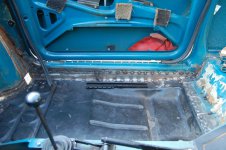
So not much progress since the last post but it's getting there (slowly). Got the last of the cables out that run through the tunnel. Dead easy getting them out as you just pull but I imagine a tad more difficult getting them back in again as you try to clip them all in place? How do you get to the clips inside the tunnel?


Pictures aren't that exciting but I know how you lot like photos.
Starting to understand replacing panels a bit more now, just wish I could weld as I'd love to replace them myself. Should be starting on getting all the underneath stripped next. Want to clean and paint all the swing arms etc so it doesn't look crap against the new paint job
Damian
So not much progress since the last post but it's getting there (slowly). Got the last of the cables out that run through the tunnel. Dead easy getting them out as you just pull but I imagine a tad more difficult getting them back in again as you try to clip them all in place? How do you get to the clips inside the tunnel?
Damian
The only way to get to those clips is exactly how you have done it so far. Once you have removed the handbrake, levers, gear lever gaitor & rear inspection cover, then these holes are your access to undo the clips. Basically they are small tabs of sheet steel that are spot welded to the tunnel. Just bend them open to release the cables. Make a note of where they sit and what holes they go through for later.
When you come to put them back in just bend the tabs around them again.
OP
OP
Paolo66
Established member
- Joined
- Feb 6, 2013
- Messages
- 1,004
- Points
- 235
So been a while since I last posted any progress but managed to get a bit more done today. All the panels I need turned up this week from Van der Laan. Excellent service as usual from Leo and only 12 euros postage. Got another box of parts coming from passione500 but won't be needing any of those until it comes to rebuilding (a long way off yet). Today I've been scraping off all the coating in the engine bay. A tedious task but well worth doing in my opinion. I prefer a nice smooth look to the engine bay but others will disagree I'm sure.

Before

After (still needs some more work but was getting high on thinners)
Was originally going to remove the front panel and the panel with the battery support attached due to a hole behind the battery bracket. However Van der Laan do a repair for this area which I have bought instead thus saving me the time and money replacing the other two panels. Next job is to get the sound deadening material off the floor panels ready to remove them and the inner and outer sills.
Damian
Before
After (still needs some more work but was getting high on thinners)
Was originally going to remove the front panel and the panel with the battery support attached due to a hole behind the battery bracket. However Van der Laan do a repair for this area which I have bought instead thus saving me the time and money replacing the other two panels. Next job is to get the sound deadening material off the floor panels ready to remove them and the inner and outer sills.
Damian
Looks good Damian I know what you mean about the thinners having done the same job myself!!!!
The only thing I would be wary about is Fiat must have put that coating on for a reason? It may well be to stop the rear seat panel and other panels from vibrating due to engine noise, it may well act as a form of sound deadening? It's a bit like the little panel on the roof behind the sunroof it is purely there to soak up vibrations and prevent the roof panel vibrating, not for it's limited cosmetic value.
Tony
OP
OP
Paolo66
Established member
- Joined
- Feb 6, 2013
- Messages
- 1,004
- Points
- 235
I reckon it will be fine Tony. Got plenty of sound deadening material to go between rear bulkhead and seat. Also plenty of other people have gone down the same route as me. No matter what sound deadening you use on these little monsters you cant make them quiet;-)
OP
OP
Paolo66
Established member
- Joined
- Feb 6, 2013
- Messages
- 1,004
- Points
- 235
So I'm at the point now where I can start removing the old panels and fit the new ones. I need to replace both floor panels, both inner sills and both outer sills. In which order would you advise doing it? If I remove a floor panel, inner and outer sill on one side won't this leave that side weak and open to distortion? I was thinking of removing the floor panel, fit the new one, remove the inner sill, fit the new one and then the outer sill. Don't want to dive straight in and start cutting out metal and cause myself grief further down the line
Damian
Damian
Hi Damian, I'm still wondering that so much needs replacing since your original pics seem so (relatively) good?
Others have gone deeper into this and more recently than me but you are on the right track.
Main thing, keep the car level and try not to move it when these big bits are missing.
Mine had ropey inner sills but this was only at the bottom (where else) so I left them in place since they do a lot to brace the car. I just patched in the bottom once the floor was in. No on sees it and it's really strong.
Attachments
Hi Damian,
As Peter said, think carefully about what you are going to do, its not for the faint hearted and you could cause a lot of damage.
If you are going to replace the lot then you could follow the way i did it.
1.make sure your door fits properly.
2. If the floor is solid from front to back (with just coroded edge) then you should be able to remove the outer & inner sill without too many problems. Just keep it on its wheels on a flat surface to prevent any twisting of the shell etc.
If you are concerned about the door gap closing up you can weld a bar from the A post to the B post to prevent anything moving. I didn't and all my gaps remained ok.
3. try to keep the floor intact including its outer edge where the sills join. Just clean any remaining metal from the sills or spotwelds, this gives you a good starting point to fit your sills up against.
4. when you have removed all the old metal, make sure your door still shuts & the gaps are correct. If they have closed up, you will find if someone holds the front of the car & another pulls the rear of the car you can make a slight adjustment to the gaps.
5. once you have tried your sills in place and happy everything lines up weld them in place. Not to the floor though. But don't forget to check, check & check that everything lines up, do this between welding as sometimes things have a habit of moving due to heat or accidently knocking something.
6.once the sills are all in place you can remove the floor panel and fit that.
Then weld the floor to the sills.
Reason i keep the floor in place as it keeps the strength in the car and gives a good original panel to work up to
OP
OP
Paolo66
Established member
- Joined
- Feb 6, 2013
- Messages
- 1,004
- Points
- 235
So I've decided to shot blast the body first now before doing the panel work. Got a good deal on the shot blasting and he's going to do all the swing arms etc as well. It should also show up any other areas that might require attention. Hopefully it won't take me too long to get the underneath stripped as I'm quite keen to get it done
OP
OP
Paolo66
Established member
- Joined
- Feb 6, 2013
- Messages
- 1,004
- Points
- 235
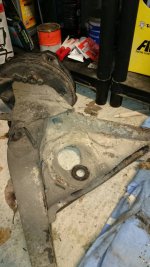
Anybody got access to their rear shocks that can help me please? Just taken rear axle off and compressed the shocks but they dont return on their own. This tells me they are knackered? Dont want to buy new ones to find they are the same
Damian
Damian
- Joined
- May 27, 2010
- Messages
- 416
- Points
- 137
Lot of technical stuff in shocks and springs but I think this is normal behaviour. It is the spring that forces the shock to extend back to its proper position. In fact I think it is the spring that holds it in its proper position at rest anyway.
From memory I could extend and collapse my shocks by hand but it took a little effort. Shocks get tired eventually but I am not sure how you can test them at home.
Regards
Joe R
From memory I could extend and collapse my shocks by hand but it took a little effort. Shocks get tired eventually but I am not sure how you can test them at home.
Regards
Joe R
Joe has that spot on. On a standard 500 shockers or dampers (which describes their purpose better) have a relatively easy life on a 500.
The trouble is that you're starting to enter "might as well do it whilst I'm at it land".
I am not an advocate of replace for the sake of it, in fact the opposite is true. But unless they look pretty new I would consider putting on new ones anway. They are easy to do at this stage.
PS. Photos Damian. Pleeeeease!
OP
OP
Paolo66
Established member
- Joined
- Feb 6, 2013
- Messages
- 1,004
- Points
- 235
Hi Damian,
From the net...
In their simplest form, shock absorbers are hydraulic (oil) pump like devices that help to control the impact and rebound movement of your vehicle's springs and suspension. Along with smoothening out bumps and vibrations, the key role of the shock absorber is to ensure that the vehicle’s tyres remain in contact with the road surface at all times, which ensures the safest control and braking response from your car.
My own opinion for what it counts...
The shock absorber on a 500 doesn't have a spring inside, therefore you can push it in or pull it out and it will stay in what ever position you move it to.
The only tests you can do is check there is no oil leaking(some shocks are gas filled), and also that there is no corrosion on the chrome shaft that goes up the middle.
Also do a push/pull test. When you push or pull the shock you should feel a resistance which slows down the movement. That is basically what a shock does. The coil spring is always under tension & controls the ride height of the car. When you go over a hole or dip in the road, the coil spring expands pushing the suspension down keeping the tyre on the ground. If you go over a bumper the coil spring collapses some more, but this is where the shock kicks in by controlling how quick the spring collapses by providing resistance, thus smoothing out the ride of your vehicle whilst driving in a straight line & cornering.
A good test is with the shocks fitted on the car, bounce one corner up & down, if it bounces easy the shock could be faulty, if it goes down but meets resistance and then just comes back up the shock is usually ok.
Hope this helps, but as Peter suggested if you are going for a full rebuild & you don't know the age or condition of the shock absorbers, then for the small cost involved it really is worth replacing the shock absorbers, rubber bushes and joints on the steering & suspension. It will make a world of difference to how your car drives. and the last thing you want to do is take it all apart again after you have lovingly painted parts and assembled them.
Believe me I have done that in the past (mainly when I had less money) and regretted it.
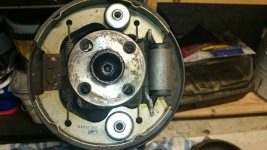
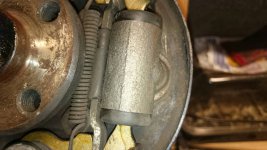
Looking at those brakes though, it looks like your car has had a good renovation not many miles ago.
Last edited: