Technical Fuel Leak, loose fuel hose help!?

Currently reading:
Technical Fuel Leak, loose fuel hose help!?

atta

New member
Joined
Apr 12, 2014
Messages
4
Points
1
Hi All, first post here!

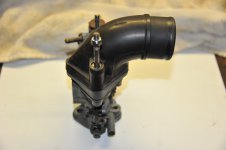
My fuel hose (from the fuel pump to the carburettor) keeps working itself loose at the carburettor end, mid-drive leaking fuel everywhere and in turn cutting fuel suply to the engine.

The first time I noticed te problem I couldn't actually get the car started after a few weeks that it had been covered. A quick look around and I spotted the hose was disconnected and consumed.
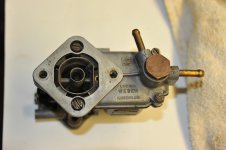
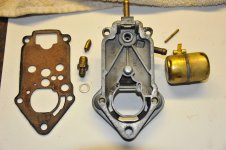
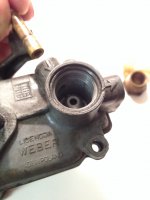
I replaced the hose, reconnected it to the carburettor tightened all the snap clasps really well, but it's worked loose again after a few drives... There is a small piece of metal tube that sits between the hose and the carburettor, would this need changing too? I didn't think it would...
Has anyone else experienced this problem?

Thanks
Ric
 
Ric,

There should be a single run of hose from the fuel pump to the inlet pipe of the carby. I have included a photo of my carby, a standard IMB 26 unit. Note the inlet in the photo is brass and has a flared end. The outlet of the fuel pump should also have a flared end. The flare along with a clamp should stop the hose sliding off.

You note that there is a small piece of metal tube between the carb and the hose. Not sure what this refers to, perhaps you can post a photo? On the face of it this does not sound correct.

Are the snap clasps and the hose the right size?

Be careful, the hose sliding off will lead to a disaster in a hot engine bay.

SANY1256.JPG

Regards

Joe R
 
Hi Joe,

thanks for getting back to me. The 'metal tube' I was referring to is the brass inlet you mention. Should this be stuck solid in the carburetor? This is where it's coming loose for me, the brass inlet tube is solid in the hose, but working itself loose from the carburetor...

thanks
Ric
 
Hi Ric;
Yes, the brass pipe should be VERY firmly fitted into the carb's top section! One way to do it is to use a bit of 'JP Weld' or similar. Roughen up the surface of the inlet pipe where it fits into the carb to give the 'goo' a better grip. I suffered a similar fault and by using this method it hasn't re-occurred.
 
Ric,

my choice would be to look for a replacement top cover. If you use JB weld make sure that you don't foul up the inner end of the pipe.

Please let us know how yoou get on.

Joe R.
 
Hi All,

thanks for the suggestions, I am a bit worried about getting JP Weld or similar into the carburetor and really screwing things up, although with a bit of care I should be ok... Joe is a replacement top cover a lot of work to put in place?

thanks
Ric
 
Ric , having read this thread I would normally say that I do not want to scare you but in this case I do as you are literaly playing with fire. Be scared, in fact be very scared as when that connector works loose in the carb top you can end up spraying petrol onto the hottest part of the exhaust. If you are not entirely sure about what you are doing and by the sounds of it you are not then do not run that car until you get some help as you may be putting more than just your car at risk.
 
Ric,

nothing is hard, but it becomes fiddly and by the very nature of what you are doing you may upset the applecart. You have to be gentle because after 45 years, threads are a little worn and a heavy hand messes up aluminium soooooo easily.

Do you have a workshop manual? They are a good investment if you are going to hang onto the car, provides lots of good reading and is generally helpful for this kind of task. Here is a link that will give you some text from the manual. Is very slow and you may not get any images. http://www.kesteleyn.net/500/Haynes_UK.htm Use Google Chrome and you should be OK.

Very briefly, to get the carb off you need to disconnect the throttle and choke linkages and cables, remove the connection to the air filter, remove the fuel line and remove the rocker cover. Then you can undo the two nuts that hold the carb to the head, slide the unit off and move to your workbench. Then the air inlet can come off and finally the cover can come off. The float and needle valve are part of the cover so these will have to come off the old one and go on the 'new' one.

The above takes about 10 minutes if you have the right assortment of tools on hand and you are not referring to the manual all the time. (nothing special, mainly a small screwdriver and small sockets and ring spanners). You may need a back massage afterwards and perhaps removing the engine lid will help as well.

The 'applecart' part is setting the float level afterwards, making sure nothing leaks, not dropping anything down the rocker tubes or the inlets, and then getting the thing to run again.

Don't be put off, but if you are new to working on cars and the car is your only method of transportation then think carefully. Nearly 30 years ago I had no idea about my 500. I had the luxury of a backup car so if I tinkered on the weekend and still had an issue on Monday morning I still had wheels.

There are some things that you can get away with for a little while, raw fuel from the pressurised side of the fuel pump is not one. You have fix this one way or another.

Hopefully Hobbs will chip in and give an indication if he removed the carb and pulled the cover off the use JB weld in his fix.

Look at the link and please come back and let us know how you go.

Joe R
 
Last edited:
Evening children;
I am very lucky in that I have been working on 'n off on 500s since I was doing my apprenticeship---my 1st 'proper on the road' car was a 500D--all 479 cc of it!----I am retired (well, sort of)
I did NOT remove the complete carb---my procedure was thus:-
(1)--disconnect the battery--always wise when working on the fuel system in the engine bay.
(2)--Remove the engine cover--put it carefully aside
(3)--Remove the elbow on top of the carb (10mm ) complete with air-filter pipe.
(4)--Disconnect fuel pipe at carb--tie it up so that fuel won't run out of it.
(5)--Remove carb top section--(4 slotted screws)--the float will come with it.
(6)--The brass pipe into the carb top is smooth sided, hence my suggestion to rough up the surface of the section that goes into the carb, to aid adhesion.
(7)--Mix up a small amount of adhesive (I used JP weld) and spread thin coat on section of brass tube to be secured--insert back into carb top--surplus 'goo' will be wiped off tube as it goes into carb top orifice (an orifice, in case you didn't know, is measured hole!)--wipe off surplus 'goo' leaving a thin bead around join between fuel tube and carb.
(8)--Allow adhesive to go off as per instructions--check pipe for security.
(9)--Whilst carb top is off, check float height--if you haven't got a workshop manual I will send you a copy of the relevant page.
(10)--Re-fit carb top--ensure that gasket is fitting properly
(11)--Re-fit elbow and air-filter pipe
(12)--Re-connect battery
(13)--Re-fit engine cover
Individual carb tops are not easy to find--it might be easier to find a good 2nd hand carb and transfer any parts you need. hope the above is of help to Ric.
smile.gif
biggrin.gif
 
Ric,

I've attached some photos I took a while ago of a 28IMB that was on a 126 650cc engine that I had bought. The 24IMB on the 500s is virtually the same.

Whatever you do - repair or replace - you must stop fuel spraying around in the engine bay. Apart from the fire risk, it's too expensive to waste :D

The whole carby is quite easy to remove and that is the way I'd tackle it - that way if you drop anything it's not likely to go somewhere where you can't retrieve it.
It is secured to the manifold by two studs and sits on a bakelite spacer.
The air intake elbow (metal in your case) is held by 2 long threaded studs and the top is held by four screws.
The gasket will come off with the top.
Remove the pin holding the float, then the gasket, then the fuel inlet valve. Push the pin from the post which is split toward the opposite one which is not split. It comes out easily.
The valve base takes a 10mm hex and there is an aluminium spacer between it and the top.
You should buy a kit which will contain all of the gaskets, spacers and even a new inlet valve. These are cheap and easily available.

I used to have a few IMB parts lying around, but I think I gave them all away when I rebuilt my engine and fitted a better carby. I'll have a look in the shed for you.

Give this maintenance job a go - it's easy and will give you a sense of achievement when completed.

My 2c to go with Tom & Joe's $2,
Chris
 

Attachments

  • 28IMB 1.jpg
    28IMB 1.jpg
    307.9 KB · Views: 42
  • 28IMB 2.jpg
    28IMB 2.jpg
    372.6 KB · Views: 45
  • 28IMB 3.jpg
    28IMB 3.jpg
    408.2 KB · Views: 42
  • 28IMB 4.jpg
    28IMB 4.jpg
    426.5 KB · Views: 47
  • 28IMB 5.jpg
    28IMB 5.jpg
    423.6 KB · Views: 56
Whatever the solution to this problem it must be worth looking for the original cause of it and making sure that the circumstances that led to it happening are avoided in future.

The biggest issue will probably be the force sometimes used to remove the flexible pipe . In the life of the car that pipe has probably been on and off many times with a greater or lesser force each time, we should try to use the lesser. The original Cavis pipe goes quite hard and can mould itself around the flare in the brass spigot of the carburettor. If the pipe is old it's probably best to slit the end with a sharp blade if it is any way hard to remove, then replace it with flexi-pipe which is resistant to breakdown by modern fuel additives.

Some cars have the stand-off bracket between the pump and carb fitted in the wrong place; it might be missing on some cars. This is obviously meant to steady and support the pipe and should be re-shaped if it is adding any strain to the carb fitting.

If there is an after-market filter fitted in the fuel line between the pump and the carb, not only is this technically in the wrong place, it adds a weight load to put strain on the pipe; don't forget the weight of fuel it contains.

Even at best we all know what a wobbler this engine can be and that vibration will magnify any loads imposed on the carb input pipe. I am sure there are more considerations which could be added to this list and any detail attended to will increase the reliability and safety of the car.
 
Where should the aftermarket filter be Peter? Before the petrol pump? I have just bought a glass one off of Ebay as I have heard of horror stories with the plastic ones.

Another good investment is a fire extinguisher, as the you never know with these little cars and all that heat.

Tony
 
You must remember when you went to get insurance the options were Third Party , Third Party, "FIRE" & Theft or fully comp.
Another thing to remember is that many of our cars went through a phase when they passed through hands for not much more than the cost of a postage stamp. So owners bodged and bungled their way to keep the motors running just like any now classic car.
Those original fuel pipes fossilise about a million times faster than your average dinosaur. I would guess that bits have been chopped off & shortening the pipe on many cars thus putting more stress on the carb inlet or bashed about as people tried to disconnect the pipe.
I find that it is best to just put the kettle on :)
You can have a cup of tea but if you pour boiling water over the pipe end you will find that it will slip off easily and repeat for refitting.
 
Tony I just wrote a massive reply but it failed to post.
Basically the filters are supposed to be after the pump unless electrically operated.
I think "rubbish" and want to avoid extra fuel connections under the bonnet.
I will try to fit a big, steel-cased on one, possibly in the internal tunnel if I can find space.
I think those plastic ones are for lawn mowers, not sophisticated Italian thoroughbreds. ;)

I had a plastic one on when I bench tested the engine between the carb and pump. I took it off yesterday and it was literally bent at each end where the pipe was connected to it. It wasn't bent double but considering how long it had been on there it didn't exactly fill me with much confidence.

If you go on Ebay and search for Classic Fiat 500 there is a filter that comes up in the results. £6.37 I think and free P&P. that's what I have now, it's a solid little thing made out of glass and metal. You have to stipulate you want the small one when ordering.
 
Thanks for all the replies and suggestions.
Last weekend I finally got around to removing and dismantling my carburettor (my first job on my 500) which wasn't as daunting as I first thought. Photos attached.
Second phase is to replace repair the brass fuel inlet tube which was causing the original leak.
Feel free to make any suggestions for parts or other things I should look out for whilst I have my carby on the workbench.
Thanks
Ricc

ImageUploadedByFIAT Forum1399507336.670259.jpgImageUploadedByFIAT Forum1399507361.495087.jpgImageUploadedByFIAT Forum1399507375.108063.jpgImageUploadedByFIAT Forum1399507386.181673.jpgImageUploadedByFIAT Forum1399507399.074850.jpgImageUploadedByFIAT Forum1399507411.843286.jpgImageUploadedByFIAT Forum1399507430.243195.jpgImageUploadedByFIAT Forum1399507443.407159.jpgImageUploadedByFIAT Forum1399507458.077301.jpg
 

Attachments

  • ImageUploadedByFIAT Forum1399507470.873490.jpg
    ImageUploadedByFIAT Forum1399507470.873490.jpg
    443.1 KB · Views: 40
Me personably I wouldn't look to use something like J B Weld it is really good stuff but I would prefer peace of mind.

A new carburettor is the way I would go. I would prefer to spend approx £200.00 rather than risk my car being written off in a ball of flame.

It is such a hot engine bay being air cooled that it is just not worth the risk. IMHO.

Tony
 
I see that you have a 28IMB carb there so does that mean that you have a 594 or 652 ccs engine there ? If you have a 499 ccs engine then the carb should be a 26IMB. I would guess that I have rebuilt getting on for 20 of these carbs over the last few years so I have quite a few spare parts or a complete carb if you need anything.
Things to check ? Well I would say check base flange for flatness with a straight edge, spindle wear, spindle seals, float pivot wear & float height, inlet valve wear, flatness of the top casting if you are going to re-use it, slow running jet seal, top & base gaskets and give it all a good clean including blowing through all the passages & jets.
 
I had exactly the same problem this morning in my 500L with a 126 engine. Boy was I scared when I opened the engine cover and saw a puddle of gas boiling away under the carb.

It's weird. The copper tube fits very snugly when the engine is cool. I think what must be happening is that the carb inlet is expanding more than the tube when hot, and the tube is working its way out from all the vibration.

I'm wondering if anyone would recommend any specific adhesive given the exposure to heat and gasoloine.

Thanks.
 
Back
Top