There are a couple of kits available, but the only ones i have seen come with the domed cap. I reused my screw in covers. Not sure if you can use the domed caps if your ones are no good.


You are using an out of date browser. It may not display this or other websites correctly.
You should upgrade or use an alternative browser.
You should upgrade or use an alternative browser.
Technical Kingpin renewal
- Thread starter Crxsprocket
- Start date
Currently reading:
Technical Kingpin renewal
Paolo66
Established member
- Joined
- Feb 6, 2013
- Messages
- 1,004
- Points
- 235
With all this talk of reamers thought I would mention that the measurement you need is 15.2-15.4mm with the kingpin being nominally 15.1mm. You don't want to exceed a 0.2mm clearance. A 19/32" reamer will do the job or an adjustable one. The clearance you should be aiming for is 0.016-0.02mm
Damian,
we didnt actually use a reamer.
The bushes were a really good clearance fit on the shaft (with a little wet and dry paper). However we found the OD of the bushes were too much of a compression fit so machined them down to a fine compression fit. This probably stopped the ID from becoming too tight when inserted and therefore reduced the need for a reamer. You could actually machine them to be a clearance fit and then loc-tite them in.
The biggest problem was fitting the washers. If the washers have caused a slight recess in the hub then this needs to be machined/ground flat as it can cause problems inserting the lower washer which needs to be ground down to a good but not loose fit. Just enough clearance to be able to move.
Similar to my experience as the pins on mine were very grooved and corroded and simply fitting new ones in the old bushes got me through the MOT. I doubt that will last as the pattern parts designer had given no thought to greasing properly.
What we need is to get Nev back on the forum, the original poster who has all the factory kit for the job.
What we need is to get Nev back on the forum, the original poster who has all the factory kit for the job.
Paolo66
Established member
- Joined
- Feb 6, 2013
- Messages
- 1,004
- Points
- 235
I was thinking of instead of using the copper bushes that come in the kit I could use some oil lite bushes. These are copper/bronze that are slightly porous. You leave them to soak in oil overnight and the oil embeds itself within the bush. They should provide better friction and lubrication properties. I'll post some photos when I get round to it
mine were a bronze like material. I noticed the polish ones look like a tin/steel type
In case it helps anyone, LP garage will refurb king pins. £50 per side, 2-3 day turnaround and postage if not local.
cheers, Steve
http://lpgarage.co.uk/
cheers, Steve
http://lpgarage.co.uk/
the hobbler
Distinguished member
- Joined
- Jul 25, 2012
- Messages
- 4,070
- Points
- 1,011
I have dealt with Lucasc at 'LP Garage' a couple of times--always had first-class service from him. He also breaks '126s' and often has a number of parts for sale on his web-site.


Paolo66
Established member
- Joined
- Feb 6, 2013
- Messages
- 1,004
- Points
- 235
An article I wrote recently for the Fiat 500 enthusiasts magazine on kingpin refurbishment. May be of use to someone?
View attachment RESTORATION CORNER part 1.pdf
View attachment RESTORATION CORNER part 1.pdf
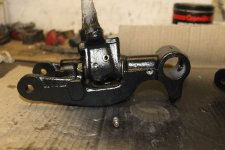
Just a photo for reference of a brand new Fiat 500 stub axle assembly which unusually, has two grease nipples...obviously the better arrangement.
 FOR_4140 by Peter Thompson, on Flickr
FOR_4140 by Peter Thompson, on FlickrI have a new kingpin kit which was most definitely better quality than the last one I had for my 500L. It was in the same green box from Passione 500 so they have either changed supplier or made some improvements.
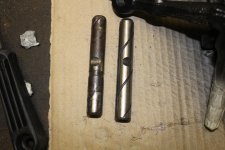
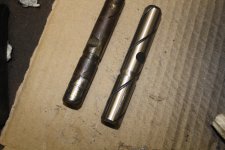
The main shaft was better quality and machined to a finer finish and tolerance.
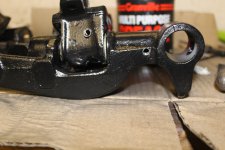
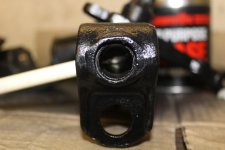
The hubs and housings were all sandblasted painted, bushes fitted.
All ok so far.
Then as I was building them I noticed the new ones don't have the channel ground around the shaft to allow the grease from the usual grease nipple to move around the shaft. In fact when the shaft is inserted you couldn't pump any grease in as the hole is blocked.
I think the kit is for the later 126 hubs as in Peters photo where they have a nipple at the top and bottom. Which is clearly the way to go if you want to buy new assemblies.
However my hubs and housings are perfect despite being 55years old.
So I marked the area where the grease nipple hole is and ground my own recess to allow the grease to go through the hole and then find its way around the grease groove.
I have also drilled a new hole at the top. This is just above the top bronze bush. So when the top arm bush is in place, the space above will fill with fresh grease and be pumped down the hole in the centre of the shaft (this was missing on my last kit) through to the bottom joint.
I didn't want to drill through the bottom of the housing as this would drill through the bronze bearing and I don't want to damage it.
The only issue I have at the moment is that the nipples wont screw in. I drilled and tapped them with a 5mm tap which is what the old ones seemed to be. A 5mm bolt goes in both the original and my new hole but the nipple wont! I will have to see if my Dad has a different tap.
I ended up using the original lower washers as they were a perfect fit where as the new ones were too thick and needed grinding down. That took me ages last time. It would be far better if they gave the option of different size washers like were available from Fiat when these cars were still in production.
All in all they turned out well.
The main shaft was better quality and machined to a finer finish and tolerance.
The hubs and housings were all sandblasted painted, bushes fitted.
All ok so far.
Then as I was building them I noticed the new ones don't have the channel ground around the shaft to allow the grease from the usual grease nipple to move around the shaft. In fact when the shaft is inserted you couldn't pump any grease in as the hole is blocked.
I think the kit is for the later 126 hubs as in Peters photo where they have a nipple at the top and bottom. Which is clearly the way to go if you want to buy new assemblies.
However my hubs and housings are perfect despite being 55years old.
So I marked the area where the grease nipple hole is and ground my own recess to allow the grease to go through the hole and then find its way around the grease groove.
I have also drilled a new hole at the top. This is just above the top bronze bush. So when the top arm bush is in place, the space above will fill with fresh grease and be pumped down the hole in the centre of the shaft (this was missing on my last kit) through to the bottom joint.
I didn't want to drill through the bottom of the housing as this would drill through the bronze bearing and I don't want to damage it.
The only issue I have at the moment is that the nipples wont screw in. I drilled and tapped them with a 5mm tap which is what the old ones seemed to be. A 5mm bolt goes in both the original and my new hole but the nipple wont! I will have to see if my Dad has a different tap.
I ended up using the original lower washers as they were a perfect fit where as the new ones were too thick and needed grinding down. That took me ages last time. It would be far better if they gave the option of different size washers like were available from Fiat when these cars were still in production.
All in all they turned out well.
Attachments
Ok i have just bought a new king pin set and i observed the same as Paollo66 above so i will have to make a groove for the grease. Anyway set comes with two washers do you know which one goes up and which one goes down? The right one is thicker and smaller in diameter than the left. Also those two washers doesn't fit so i will have to take one down to make it fit.
Thomas
Thomas
Attachments
Paolo66
Established member
- Joined
- Feb 6, 2013
- Messages
- 1,004
- Points
- 235
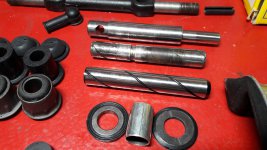
These king pin kits are always different depending on where you buy them from. You havent got the bronze bushes but DU bushes. These wont need reaming but rely on the bore in the king pin to be correct so it crushes the outside of the bush slightly. You should also have two, picture only shows one. Both washers should have a groove in them to disperse the grease and aid friction. I had to grind one of my washers thinner but was able to do this at work on a machine grinder. You only need to keep taking a little bit off at a time and checking to get the right fit. Another option is to replace these washers with a couple of thrust washer packs if you can source ones to fit
And here is a useful information i didn't knew") . I thought that those bushings also require reaming although i have already push the first one half in (I will build a special tool on my lathe to press fit them more gently) and looks like the king pin can go in with gently tapping and reform as you said.
. I thought that those bushings also require reaming although i have already push the first one half in (I will build a special tool on my lathe to press fit them more gently) and looks like the king pin can go in with gently tapping and reform as you said.
As for the groove on the second washer i believe it is better to have just one way out for the grease. I will consider about this later.
Thank you
. I thought that those bushings also require reaming although i have already push the first one half in (I will build a special tool on my lathe to press fit them more gently) and looks like the king pin can go in with gently tapping and reform as you said.As for the groove on the second washer i believe it is better to have just one way out for the grease. I will consider about this later.
Thank you
As for the groove on the second washer i believe it is better to have just one way out for the grease.
Thomas, the groove is needed actually to lubricate the washer; there is a heavy loading on it.
Thomas, the groove is needed actually to lubricate the washer; there is a heavy loading on it.
Peter ok i can make a couple of grooves no problem but do you think the one without the grooves that comes with the kit is the lower one? Maybe that's it comes without grooves because the load actually goes to the upper one. Just don't know which one goes where.
Paolo66
Established member
- Joined
- Feb 6, 2013
- Messages
- 1,004
- Points
- 235
And here is a useful information i didn't knew
As for the groove on the second washer i believe it is better to have just one way out for the grease. I will consider about this later.
Thank you
If its a DU bush, and I think it is, it should have a teflon/PTFE lining. If you ream it you will just be left with a steel/bronze liner that will not do its job.
Peter ok i can make a couple of grooves no problem but do you think the one without the grooves that comes with the kit is the lower one? Maybe that's it comes without grooves because the load actually goes to the upper one. Just don't know which one goes where.
Consult with Sean Franko500, the expert.
https://www.fiatforum.com/500-classic/345169-franko-1971-500l-25.html?p=4043698
There should be 3 washers per king pin.
There is usually 2 washers with a groove either side. These are for the top and work together. the large O ring fits over these 2 to keep the grease in and the dirt out. As you said when the vehicle is on its wheels the load is on the top of the swivel part of the hub and that's where these 2 washers work as it allows the joint to swivel on the washers that are greased due to the grooves.
The plain washer is for the bottom. It does nothing apart from take up the slack.
This can be difficult to get right. Originally these washers were available in different thickness. However these new kits come with an over sized one which needs to be gradually ground down until when its all fitted together it takes away any up/down movement. You don't want it too tight as it will cause friction. Too loose and a MOT tester may fail it thinking that the joint is worn. Although they should only check for side movement.
There should be 3 washers per king pin.
There is usually 2 washers with a groove either side. These are for the top and work together. the large O ring fits over these 2 to keep the grease in and the dirt out.
The set i bought has only two washers for each side, a 5mm plane washer with o ring and another one with grooves which is also thick. I guess it is better to use two washers at the top but i will only use what my kit offers. In my case i used the old grooved washers for the top since their reduced/worn size fits perfect. I also put the DU bushings and press the new hardened shaft through them 3-4 times, then a very very slide ''cleaning'' with a scotch bright and now i can push the new shafts through the bushings using my fingers and lot of press so i guess it is ok. Actually DU bushings are made to operate dry without lubrication and here i am not sure if it is better or not to lubricate them but i will eventually. I also made a grease channel on the shafts so grease can reach the bushings.
![20180213_223609[1].jpg](https://cdn.fiatforum.com/data/attachments/182/182206-b5c180816aa74dce5336b91728503e85.jpg)