General New owner, new adventure!

Currently reading:
General New owner, new adventure!

Gaffer 124

New member
Joined
Jun 4, 2020
Messages
4
Points
2
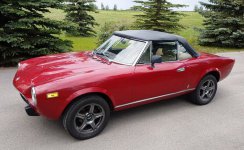
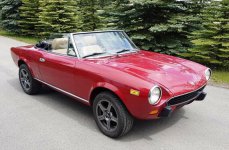
Picked up my first Fiat 124 earlier this week, looking forward to joining this community and doing what I can to spruce this baby up.

Exterior is in pretty good shape after a major overhaul 10 years ago, interior is not bad, a few panels and trim need replacing but seats in good order (rear is original, fronts appear to have been replaced).

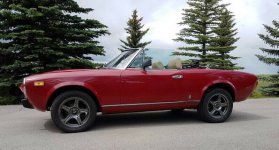
Runs and drives pretty well, no issues so far, couple of oil spots underneath so will probably track those down eventually.

Needs a lower boot on the shifter (when I was test driving it I thought 'wow the heater works real good' - now realize it was the heat coming up from the engine :D) needs new bushing on the shifter too, may just go with a short shifter right off the bat.

Anyway, here are a couiple of picks and I am sure I will be on here regularly once I find more issues...
 

Attachments

  • $_59 (1).jpg
    $_59 (1).jpg
    115.1 KB · Views: 62
  • $_59.jpg
    $_59.jpg
    130.8 KB · Views: 58
  • $_59 (4).jpg
    $_59 (4).jpg
    86.7 KB · Views: 55
--------------------
--------------------------------
-------------------------------
----------------------
----------------
----needs new bushing on the shifter too, may just go with a short shifter right off the bat.-------------------
----------------------
-----------

There are some rubber bushes inside the shift lever (which is in 2 parts, items 20 and 25) that deteriorate over time resulting in a sloppy gearshift action, see items 21 and (2x) 22 in picture. Also check out the condition of items 23 and 24, these sometimes 'get broken'. To separate the 2 parts of the gearshift lever, push down the gaiter/leather cover to reveal the joint, use 2 small screwdrivers or similar to prise down item 24, the upper gearshift lever can then be pulled up off the lower gearshift lever and the bushes changed.

Al.
 

Attachments

  • Scan_20200606 (2).jpg
    Scan_20200606 (2).jpg
    496.5 KB · Views: 45
Thanks Al I am currently trying to fit the new shifter but there does not seem to be enough room in the shaft for the cap, 2 bushings and the plastic pieces, seems like I am about half an inch short? I have tried checking to see if there was something lodged in there that is stopping it seating properly but it just seems too long
 
I've seen the old rubber cap literally stuck in place inside the tubular gearshifter - if you shine a light up inside you should be able to see if this is what has happened. Did the old cap come out when you removed the gearshifter?

Another possibility is that the upper gearshifter or the gearshifter stub that exits the transmission was changed in some dimensional way over the course of production, I'm not aware of any such changes but I'm only familiar with these cars up to around the 1976 model - you didn't say what year your car is.

I can only suggest that you 1st double-check that nothing has been left behind inside the gearshifter, then assemble all the rubber and plastic components onto the gearshifter stub on the transmission and measure the length that needs to enter the upper gearshifter, then check if you have the same space available inside the gearshifter. Are you sure that all the new parts are assembled correctly - iirc, item no. 23 in the above part diagram, some models may have a reduced diameter section on one end (different to what is shown) that one of the rubber bushings has to fit over? See diagram below for correct order of assembly.

It's helpful to have someone to push down on the gearshifter to compress the rubber bushings a little to allow the bottom plastic locking ring to be popped into place. A little liquid soap/possibly some silicone lube might help.


One little mod I sometimes did was to reduce the length/height of the gearshifter - this reduces the throw but at the expense of making the gearshift action a bit heavier (and the old Fiat transmissions could be a bit obstructive at times). I don't know if you're interested in this mod or if you're equipped to do it but here goes :-

Remove the gearshifter, unscrew the gearshifter ball/knob, cut off *3 or possibly? *4 inches. Take a 10mm x 1.25mm bolt x approx. 50 - 75mm long (this size is used everywhere on the Fiat, it's sometimes called Metric Fine thread), cut off the hex head + top of bolt leaving the thread and some plain section, total length approx 40mm. Place the plain section of the former bolt into the shortened gearshifter (you might have to run a 10mm drill to open out the hole) leaving about 20 mm of thread protruding, weld or braze in place. Clean up, paint, refit gear knob/ball and refit to the transmission.

* I can't recall the maximum amount by which the gearshifter can be shortened - you need to allow sufficient space for the rubber and plastic bits that fit onto the gearshifter stub protruding from the transmission to still fit into the gearshifter after this mod.

Al.
 

Attachments

  • Scan_20200607.jpg
    Scan_20200607.jpg
    519.5 KB · Views: 35
Last edited:
After staring at it for over an hour I finally figured it out, when I zoomed in on the diagram you attached I noticed the PO had the bottom white plastic locking clip on upside down which threw me, got all the bushings changed and good to go!

Last piece of the puzzle for now, how do I attach the shifter boot ring?
 
Depends on which type of transmission you have - 4 speed/v.early 5 speed or later 5 speed.

The later 5 speed is shown in my post#2 and doesn't have a shifter boot ring, the boot is square where it fits onto the shifter remote housing.

The 4 speed/v.early 5 speed in shown in my post #4 - this has a circular boot ring which is larger than the boot corrugation above it. Probably the easiest way to fit this ring is to 1st fit it to the boot, then fit the boot together with the ring most of the way onto the gearshifter, expand the ring by squeezing it's ends using a pair of pliers (slip-joint type is suitable), push the boot and ring fully home, then release the pliers allowing the ring to hold the boot in place.

Alternatively, if by shifter boot ring, you're referring to the (imitation) leather gaiter visible inside the car, then probably the easiest way to fit the ring holding this gaiter in place is to remove the panel (it'll be either imitation wood grain or imitation leather covered) from the center console. This panel is held in place (iirc) by a metal stud that engages with a plastic plug at each rear corner. It can (iirc) be removed by carefully prising up each rear corner then pulling the panel rearwards which allows it to disengage at the front end. With this panel removed, the gearshift gaiter can be changed and it's retaining ring refitted.

As regards heat entering the cockpit/cabin, be aware that some of the 5 speed cars also had an additional, large, approximately rectangular rubber shield that fitted over the gearshifter rubber boot on the transmission and effectively sealed the transmission to the underside of the transmission tunnel, alternatively, some cars used a rectangle of foam/sponge rubber to provide this additional seal to prevent excess heat/dust/noise entering the cabin. On the later 5 speed cars, this extra shield (either rubber or sponge) is accessed by removing the black metal panel (4 Philips-head screws) that is under the panel in the center console, mentioned above - this metal panel is screwed to the transmission tunnel. (I'm assuming your car is a 5 speed model).

Al.
 
Last edited:
Back
Top