General Poor mans Stratos...

Currently reading:
General Poor mans Stratos...

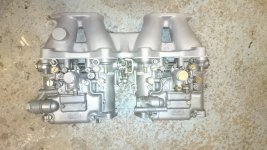
nice work - and nice 'carbies' as the Aussies call them. Your certainly going to town with the re-paint. Have you hear of the chemical dipping - pro dip? I think its a bit pricey but with the value of these cars going up it might be a good investment for the future? There is some talk about it on the owners club forum.

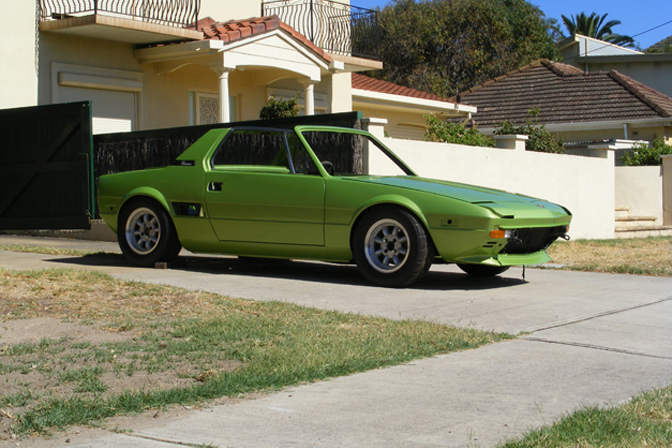
I found this guys restoration thread on Xweb last night. will provide some good inspiration and hes fitted twin 40's like yours!

http://www.xwebforums.org/showthread.php?t=919&highlight=andrew's

http://www.xwebforums.org/showthread.php?t=12623&highlight=andrew's

http://xwebforums.org/showthread.php?p=161297#poststop

Keep it up man!
 
Thanks for the links Purf!

I have heard of them, but it's hard to convey just how tight a budget I'm doing this on, so I'm seriously trying to DIY absolutely everything possible. I have some dichloromethane paint stripper and that is working a treat, so I suppose I'll just burn through several sanding discs to get to painting point.

That was an interesting read actually, though hopefully I'll take a little under the 5 odd years Andrew did, the car looked spectacular though. I think I'm going for a met green paint too so that's always good inspiration!

The other car I was restoring has now gone, so the X finally has a full garage to itself. Let the sanding commence once more!
 
Cool. Love the original green metallic and non metallic colours. I always imagined I'd have a Kawasaki green x1/9 for some reason...

I definitely think the single body color suits the body shape more. Kind of wish i had a single colour car rather than a two tone but oh well

I think you can go overboard when restoring cars and remove the original character... I do like modifying but its nice to keep things original at the same time?... I'm ranting..

im on a tight budget too. no twin webber 40's for my car :)

8df2a27d342e61ca467b7a2517c37428.jpg

This one is in Japan but I can't find any more pics. here its on the Japan owners club 'runabout'

0001639.jpg


search
9470355Main.jpg


65_kFrJ_4.jpg
 
Last edited:
I'm thinking a sort of darker green? There's a stock VW and Ford Met Green that I think looks pretty good but I'll see what happens.

Stripped and nearly finished sanding the entire other side of the X (amazing what you can do with room eh?) And found that the rear nearside wheel arch inside bit is absolutely riddled with rust. So that's fantastic...

So it looks like I'm welding in two new wheel arches, the front rain channels, the roll bar thing, the rear boot, maybe some of the front boot and whatever lies in the front arches. Then I've got to do this rad conversion, think about bumpers (euro conversion anyone?) And then paint!

Watch this space...
 
Only 10 minutes? I'll probably not be as slick at it as you though...

May have bought a pair of Dellorto DHLAs as they were cheap and matched. So I guess I'll sell the weber I have and chuck these on?

Is it easy to use American bumpers but without the awful side plastic pieces?
 
I don't know? I think some people shorten the bumper 'irons' to tuck the bumpers a bit?

Personally I have just unbolted the alloy bumpers so I can put them back later. I was quite impressed by their design. Quite lightweight really.

One thing to consider is the protection the originals provide. Sometimes drove into my car in a petrol station and I wish the bumpers were fitted!!!
 
Hi all

Well the extra space has been pretty invaluable, got so much sanding done!

Also found a pair of carbs that didn't cost the Earth - Dellorto DHLAs all in good nick with a throttle link. So I just need to decide on trumpets. Am I right in saying that the longer the trumpet, the lower the peak torque occurs in the Rev range? I'm not worried about high end power as it should have more of that now, just making it more drivable. I've seen 100, 125 and 150mm trumpets knocking about and, although they're ridiculous, I'm not really restricted in how long they can be, and if they improve drivability then I have no problem.

Anyway, lots of sanding and lots of worrying rust spots. The nearside rear sill no longer exists due to 3 minutes with a small screwdriver. But I'm hoping to get the sanding done soon and start the metal work. Then it's just new rad, bumpers, body, sills, engine bay, wheel arches, front nose and rear boot that need doing!
 

Attachments

  • DSC_1611.JPG
    DSC_1611.JPG
    3.3 MB · Views: 26
  • DSC_1612.JPG
    DSC_1612.JPG
    2.9 MB · Views: 24
  • DSC_1613.JPG
    DSC_1613.JPG
    2.9 MB · Views: 19
  • DSC_1614.JPG
    DSC_1614.JPG
    2.7 MB · Views: 26
  • DSC_1615.JPG
    DSC_1615.JPG
    2.3 MB · Views: 25
  • DSC_1616.JPG
    DSC_1616.JPG
    3.1 MB · Views: 21
  • DSC_1617.JPG
    DSC_1617.JPG
    2.8 MB · Views: 16
Keep Going! Yes I have read the longer trumpets / airbox aid lower down torque.

Get stuck into those nasty bits :0

Have you got some of that weld thru primer? Its a brilliant primer on bare steel and helps stop rust. I got some from frosts recently.

I have been thinking about improving my rear number plate. I had fitted a square plate but it was 12 x 9 or something and too big. I also stuck it on with 3M foam tape which was a terrible idea as it ripped a lot of paint off.
I'm giving my car a makeover of its rear end as I'm welding in the new lower panels. It also had a motocycle number plate light stuck on with the same foam tape which was ok but i think i can do better. So i got these (one is already cut down shorter):
20160519_203341_zpsxi5ozhvp.jpg


and a plastic number plate frame, which i would usually hate but i think the X1/9 needs something extra... I might rub it back so its not so shiny?

20160519_203029_zpsvc27ol7c.jpg


Then I have drilled this frame to align with some existing original holes on the car so i do not have to drill any more. There are some square holes - I dont know what these were meant for? but im hoping to find some little plastic lugs from a land rover defender will fit. The plate will then be stuck onto the plastic frame which is screwed to the car.

I had to shorten the led bolts which are attached to the plate only. The wire will be hidden and will feed through the hole used for the fog light wires. The plate is now standard 8x11 inches.

Oh and BTW you can put a red bulb in one of the reversing lights and connect up the fog light wires and get through the MOT. You need a fog light after a certain year...

20160519_204453_zps5pypuaci.jpg


20160519_205455_zpsyqelu5fi.jpg


This is what mine currently looks like - it has an MOT! i should be driving it!
20160511_234319_zpscrb4wqaq.jpg
 
Last edited:
That looks fantastic! Love the plate, is it alloy? Also, would I get away with a black and silver plate? I just think they'd look great...

I've heard about that primer actually, though what's the purpose? Doing the other side of the panel? I was going down the acid etch route for the outside, just because I'm taking the vast majority of the car back to bare metal.

Out of interest Purf, what does the back of yours look like complete? Just wanting a few ideas?
 
Yes its a pressed alloy plate - about £10. Black and silver is for pre 72 i believe but lookign at the number of tuners driving about with no front plate at all I doubt you'd get noticed. If you do I believe there is no fine? and you are given with a week to rectify the issue and report to the local police station! I saw it on police camera action or whatever its called at the moment...

The weld through primer is good as you can protect the bare metal before welding and it doesn't interfere with the weld itself. If you left you bare metal for a while it might start to lightly rust on the surface... not what you want after all that hard work.

20140924_135342_zps888db889.jpg

just before the larger 'square' plate went on. I'm going to paint the rubber grommets so they blend in a bit... I was just thinking the standard format plate might look quite good with a frame around it with something cool like an old fiat dealer on it...? Would even it up a bit with the size of the rear lights.

20150606_175122_zpsgtv5kxfa.jpg

I don't have any decent pics with the square plate... this one has the small tyres on which don't look great! The retro rides sticker is covering up a rusty bit from the original number plate!

The rear valence will shortly be painted dark blue - i think...
 
Last edited:
That looks fantastic! Really loving the bumperless look. I think I might put in the extra hours and do the conversion sooner rather than later.

What did you do about front lights? I had a few superficial goes at mounting the indicators in the front but it didn't go well.

Yeah I think I'll end up trying the black plates, just think they'll suit the car better.
 
I also 'offered up' the original indicator / side lights and they didnt seem at home but ceck out the images by this ebay seller

http://www.ebay.co.uk/itm/Fiat-Bertone-X1-9-1300-replica-quarter-bumper-kit-/152063803834?_trksid=p2047675.l2557&ssPageName=STRK%3AMEBIDX%3AIT&nma=true&si=GG4d5ty8Bkz4bHEy%252FgLgM3HAh%252B8%253D&orig_cvip=true&rt=nc

I think they are just mounted inside the wings somehow.

First i used some spare side repeaters i had to get it on the road and eventually found some used 1300 lights I bought from Sledgehammer on here. New ones are 150 Euros each... New lenses are 32 Euros each. Check US ebay

temporary lights - home made front grill is also fitted in this pic.

20141102_160104_zps72626b9a.jpg


and these are the 1300 lights fitted. You need the little captive screw bits and very long 40/50mm? preferably stainless self tapping screws.

20150620_210218_zpswwvvqnhy.jpg


If you do the conversion 'permanently' it takes a lot longer and IMO you have to spend the money on all the correct parts which add up to quite a lot of money. I have gone alternative and done something that can be easily reversed back to factory in future. All the original parts are in the loft! This method is less work but I'd admit it doesn't look quite as good.
 
Last edited:
This post contains affiliate links which may earn a commission at no additional cost to you.
Looks a treat! Well I think I'm pretty sold on the conversion as it just looks so much better than without.

In other news, the windscreen is finally out! Completely forgot the metal reinforced trim strip... which is now ruined, so that's annoying. Though I'm going to remove the brown vinyl trim and hope it looks alright underneath and just leave them body colour.

The sanding continues as ever, got the frunk wiring harness removed and I've never seen such a mess! Some wires were hooked loosely together (not even twisted) and it was just nasty beyond belief. I was doing some electrical work on a 60 year old car and it looked a hell of a lot better than this!

So on with the more exciting (everything is relative isn't it?) stuff. I'm at the metalwork stage of the respray (pretty much) so I'm getting on with this VW rad and new lights to get rid of the front bumper. Just a couple things to check before I start:

In doing the rad conversion, is the process: Fit new rad to old frame, bend that top mounting bracket, fit new fan and fit a bleed? Does it require welding?

And here is the new light unit I'm gunning for unless anyone thinks it's terrible?
http://www.autoelectricsupplies.co.uk/product/903/category/73
Going for it as it is fairly cheap, should be easy to fit and shouldn't look out of place.

I'll post pictures when something noticeable actually happens
 
The lights look fine. Hopefully the size will work with the existing holes?

Regarding the rad. No cutting or welding required. I have placed two rubber pads between the body and the top of the rad. Then i extended the threads for the support crossmember with m8 extender nut things from screw-fix. With two U shape brackets (b&q fence panel brackets, Sounds bad I know ☺) with rubber lining to hold the rad at the bottom. Then as you tighten the support the radiator is held/trapped in place firmly. Then you just need a length of hose.

For the bleed use a fiat seicento rad bleed hose if you can get one. Its the type of thing that is impossible to buy aftermarket In this country... plenty on jegs website in the US.... but as they dont want to sell stuff to us across the pond the postage is about £40...

For the fan I installed the original. 2 screws into the plastic bottom and top of rad (if your lucky and have a plastic protective strips on the rad) and cable ties through the other two holes. Works well for me. You can buy special radiator fan ties or just use large cable ties.

I guess you could use a vw fan...


Photos and more detail here:
http://www.x1-9ownersclub.org.uk/forum/virtual-garage/29679-blocked-radiator-hg-fail.html
 
Last edited:
Well I have the new rad arrived and the fab work sorted to fit it. Did it slightly differently to you Purf and kept the original bracket.

Still sanding... Nothing new

The entire passenger side of the rear structural bit is rusted horrifically, to the extent that you can just poke your finger through all of it. So that's a worry.

Will get pics when my phone starts working again.

Also met a few guys from the Owners' Club down in Prescott at the weekend for the Hillclimb. The first time I've actually seen a proper X! Forgot how great they are, plus the folks were really useful.
 
Does the cill need replacing?

I'd be Interested In how you fitted the vw radiator
 
Last edited:
Hows it going? I have finally fitted the new lower rear springs on my car. Hopefully im getting the new panels fitted next week.
 
Sorry for the lack of update, just been trying to get a load of work done on it!

I'd be interested to see how that look like actually, do they work well?

So I've got a new rear valence, those two panels next to the valence and the nearside corner panel needs replacing too. Cut out most of the inner nearside rear wheel arch and repaired with self made panels. Just cut holes EVERYWHERE really, but it is at least rust free now. Just no car left...

Started to build the engine back up with a hone and new rings. Looks decent with the new Dellortos!

Got a pair of Suzuki Samurai front lights for the bumper swap and they will bolt in very nicely. Will just need a re wire owing to the shambles that's left.

Also just sealed all the seams on the front boot, so most of it is ready paint! Talking of which, I have the paint! Still a few things to sort but it's here I guess.

Anyone with a complete car, where do the ports on the cylinder head line up with on the rear boot divider? Due to the new carbs, I'm wondering what I'll have to cut, or can I just remove the dividing panel?

Cheers
 

Attachments

  • DSC_0031.JPG
    DSC_0031.JPG
    3.1 MB · Views: 22
  • DSC_0034.JPG
    DSC_0034.JPG
    3.1 MB · Views: 23
  • DSC_0023.JPG
    DSC_0023.JPG
    3 MB · Views: 20
  • DSC_0007.JPG
    DSC_0007.JPG
    3 MB · Views: 22
  • DSC_0021.JPG
    DSC_0021.JPG
    2.9 MB · Views: 21
Back
Top