Wiring Front Fog Lights
A Step-by-step Guide
Welcome all. Here I will try my best to create a easy to follow guide to wiring up some fog lights to your Punto S to make it a bit more SX! I'll also try and make the guide kinda fun to read so you don't feel like dying while following it!")
While writing this, I am assuming you all have some basic knowledge of wiring such as stripping wires etc.. So lets get started!!
Handy Hints
Before I get started theres a few things you may want to bear in mind, Throughout this guide I will tell you to tape up your connections, but if you want it may be better to do this after you've tested that it all works to avoid having to cut the tape off and re-doing the connection. Another tip I found usefull was to un-screw all the block connectors before I started so that when I came to use one, I didnt have to undo it then. Another good idea is to test the fog lights before hand, and test your connections once you've completed step five by twisting all the wires that you've pushed into the main cabin together and turning on your lights. If your fog lights come on, then the connections you've done so far must be working ok. If they don't, trace back the step's set out and re-check your connections.
Equipment Needed
First off, you'll need to get your stuff sorted out. To do this job you'll need a few tools and materials. Obviously you'll need some fog lights and a bumper to fit them in, so go and aquire one of those first. When/if you have one, you'll need the following things:
~ Wire (Not much, a few meters will do)
~ Electerical connectors (The little white blocks - c'mon, I did say basic knowledge!)
~ Electrical tape
~ Tools (A small screwdriver, wire cutters, scissors etc...)
~ Switch
~ Cable ties
~ Fog light connectors - These are just the connectors that clip into the fog lgihts. Get these when you get your bumper, or go to your local scrapyard and swipe some. If you don't then you'll have to figure out a way of making connector to fit which will be a pain.
Heres a picture to guide you through this difficult stage:


Step One
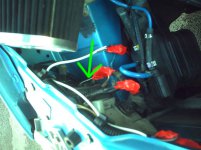
Right, now its time to get to business! First off, you'll need to pop your bonnet and make sure your ignition/lights are off. If you want to you can disconnect your battery, however I didn't as the wires you'll be touching are only live when you have the lights on - it's your choice. First off you'll need to locate your dipped beam connection on your lights. Heres a picture to help locate it:


The arrow shows the connection needed (Ignore the red tape - this picture is from after I'd finished). Cut the black and gray-black wires. Taking them out of the black plastic casing really helps here so don't worry about cutting it away. Make sure you leave yourself enough wire on either side to feed into a block connector. Strip the wires down and connect the black & gray wires coming from the light connector into the block. Now its time to put your wire to some use.
Step Two
Cut a length of wire long enough to run around the front of the engine bay an into the footwell of the cabin - and do just that! To get the wire into the cabin, either drill a hole or push it by the rubber gromit at the back of the enginge bay behind the gearbox. Its also a good idea to cable tie the wires together at the top. The image shows the gromit - along with the tonne of wires I have running around my car

This gromit is easily located in the footwell of the passenger side - just pull the carpet back abit and you can see it.
The wire I had was coloured blue and brown, so I chose blue as my live and brown as my earth. You also need to make sure you know which one is live and earth. Now strip the wire down and twist the live wire with the live wire of the lights to combine the two. Heres a picture to help explain this:

You can see the basic outline on the wires twisted together. Like in the picture, it will also help you to tape the two together to ensure they don't become un-twisted. Make sure you only do this with the live wire - the earth wire needs to connect to the fog light first. Now screw them into their correct place in the block connector. Make sure you do this on both lights. I originally wired both from one light and they weren't bright enough to be called fog lights so make sure you don't get lazy and do the same for both lights.
Step Three
Now its time to make use of your fog light connectors. Take a small amount of wire - enough to reach the wires you cut a moment ago - and strip down both ends. Take a block connector and connect the two wires for both the live and earth cables. Slap some tape around it and repeat with the other connector. Here's some pictures to show you what I mean:

Heres the connectors on the ground, one with a block connector attached.

Wire the two wires together using the block connector (Yes, this is different wire from my other pictures - this was from my first failed attempt)

Tape up the connection to ensure it stays dry and dirt free.
Step Four
Now plug the connectors into the fog lights - its easy enough to just lean under the front of the car and do it by hand but if you need to you can undo the three screws holding the side of the wheel arch liner on to prize it apart and look inside to see what your doing. Make sure the connectors push right in and are secured.
Step Five
Now that you've got them plugged in and ready to go, it's time to wire the switch up, yeah? Erm....no its not. Now you have to wire the fog light's into the cable you installed earlier. Take the live wire from your fog light and connect it with a connector block to the earth wire of the cable you connected to your light's wires. Heres an image to help:

The red wire is the earth from the cable and the green wire is the live to the fog lights. Now once you've connected these two, you need to connect the earth from the fog light to the earth of the dipped lights. You should have an earth wire spare from the lights cable if you've done things correctly. As with earlier, twist the two earth cables together and wire them into the block connector. Tape up and repeat with the opposite side.
Step Six
Right thats hard part done. Time to wire up that switch yet? No!! Be paitent. Now its time to make sure you've tested and taped everything up. Make sure all your wire's are tightly tucked away and not hanging around your engine bay. Cable tie them togehter where needed with the original loom. Once its looks all neat and tidy, you can move onto the next step
Step Seven
Yeah ok calm down, time for the easy bit. Now that you have your wires ready to wire up, you need to decide - are you going to have an aftermarket switch, or do you want it to look original and fit into the dash? If your not planning on wiring it into the dash then wire up the earths together and lives together to your swtich and you done. If not then read on.
Step Eight (Optional)
Personally, I wanted my switch to fit into the dash so I went to the trouble of geting an original fiat fog light switch from a local scrapyard and wiring that up. If your doing this then you will need the buttons circuit board from an SX model. Unfortunatly I can't provide pictures for this bit but if your pretty handy then you can probly figure it out yourself along with these instructions to help. You'll need a soldering iron and solder.
De-solder the connections from back of one of the buttons on the circuit board and pull it loose from it. All you need to do now is feed your wire through your dash and out where your new button will go. You'll have to cut a hole here and there for the wire to get through. You also need to solder the wire to the connections of the switch which can prove tricky as they are very small so be careful. Once I had done this, I taped up the connection to ensure it didn't come loose and replaced my button facsia. Heres what it will look like if you manage to do this:

Step Nine
Now its time to step back and enjoy your hard work. If you did it all correctly then your fog lights should only come on when you turn them on along with your dipped head lights.
Conclusion
Yeah, I know, this isn't the most pro and best way to wire up some fog lights to your car, but for an amature its easy and it works so I hope this helps. Any questions or suggestions to the guide? Feel free to reply your comments and let me know how I've done.
Regards, Lozzy

A Step-by-step Guide
Welcome all. Here I will try my best to create a easy to follow guide to wiring up some fog lights to your Punto S to make it a bit more SX! I'll also try and make the guide kinda fun to read so you don't feel like dying while following it!
While writing this, I am assuming you all have some basic knowledge of wiring such as stripping wires etc.. So lets get started!!
Handy Hints
Before I get started theres a few things you may want to bear in mind, Throughout this guide I will tell you to tape up your connections, but if you want it may be better to do this after you've tested that it all works to avoid having to cut the tape off and re-doing the connection. Another tip I found usefull was to un-screw all the block connectors before I started so that when I came to use one, I didnt have to undo it then. Another good idea is to test the fog lights before hand, and test your connections once you've completed step five by twisting all the wires that you've pushed into the main cabin together and turning on your lights. If your fog lights come on, then the connections you've done so far must be working ok. If they don't, trace back the step's set out and re-check your connections.
Equipment Needed
First off, you'll need to get your stuff sorted out. To do this job you'll need a few tools and materials. Obviously you'll need some fog lights and a bumper to fit them in, so go and aquire one of those first. When/if you have one, you'll need the following things:
~ Wire (Not much, a few meters will do)
~ Electerical connectors (The little white blocks - c'mon, I did say basic knowledge!)
~ Electrical tape
~ Tools (A small screwdriver, wire cutters, scissors etc...)
~ Switch
~ Cable ties
~ Fog light connectors - These are just the connectors that clip into the fog lgihts. Get these when you get your bumper, or go to your local scrapyard and swipe some. If you don't then you'll have to figure out a way of making connector to fit which will be a pain.
Heres a picture to guide you through this difficult stage:
Step One
Right, now its time to get to business! First off, you'll need to pop your bonnet and make sure your ignition/lights are off. If you want to you can disconnect your battery, however I didn't as the wires you'll be touching are only live when you have the lights on - it's your choice. First off you'll need to locate your dipped beam connection on your lights. Heres a picture to help locate it:
The arrow shows the connection needed (Ignore the red tape - this picture is from after I'd finished). Cut the black and gray-black wires. Taking them out of the black plastic casing really helps here so don't worry about cutting it away. Make sure you leave yourself enough wire on either side to feed into a block connector. Strip the wires down and connect the black & gray wires coming from the light connector into the block. Now its time to put your wire to some use.
Step Two
Cut a length of wire long enough to run around the front of the engine bay an into the footwell of the cabin - and do just that! To get the wire into the cabin, either drill a hole or push it by the rubber gromit at the back of the enginge bay behind the gearbox. Its also a good idea to cable tie the wires together at the top. The image shows the gromit - along with the tonne of wires I have running around my car
This gromit is easily located in the footwell of the passenger side - just pull the carpet back abit and you can see it.
The wire I had was coloured blue and brown, so I chose blue as my live and brown as my earth. You also need to make sure you know which one is live and earth. Now strip the wire down and twist the live wire with the live wire of the lights to combine the two. Heres a picture to help explain this:
You can see the basic outline on the wires twisted together. Like in the picture, it will also help you to tape the two together to ensure they don't become un-twisted. Make sure you only do this with the live wire - the earth wire needs to connect to the fog light first. Now screw them into their correct place in the block connector. Make sure you do this on both lights. I originally wired both from one light and they weren't bright enough to be called fog lights so make sure you don't get lazy and do the same for both lights.
Step Three
Now its time to make use of your fog light connectors. Take a small amount of wire - enough to reach the wires you cut a moment ago - and strip down both ends. Take a block connector and connect the two wires for both the live and earth cables. Slap some tape around it and repeat with the other connector. Here's some pictures to show you what I mean:
Heres the connectors on the ground, one with a block connector attached.
Wire the two wires together using the block connector (Yes, this is different wire from my other pictures - this was from my first failed attempt)
Tape up the connection to ensure it stays dry and dirt free.
Step Four
Now plug the connectors into the fog lights - its easy enough to just lean under the front of the car and do it by hand but if you need to you can undo the three screws holding the side of the wheel arch liner on to prize it apart and look inside to see what your doing. Make sure the connectors push right in and are secured.
Step Five
Now that you've got them plugged in and ready to go, it's time to wire the switch up, yeah? Erm....no its not. Now you have to wire the fog light's into the cable you installed earlier. Take the live wire from your fog light and connect it with a connector block to the earth wire of the cable you connected to your light's wires. Heres an image to help:
The red wire is the earth from the cable and the green wire is the live to the fog lights. Now once you've connected these two, you need to connect the earth from the fog light to the earth of the dipped lights. You should have an earth wire spare from the lights cable if you've done things correctly. As with earlier, twist the two earth cables together and wire them into the block connector. Tape up and repeat with the opposite side.
Step Six
Right thats hard part done. Time to wire up that switch yet? No!! Be paitent. Now its time to make sure you've tested and taped everything up. Make sure all your wire's are tightly tucked away and not hanging around your engine bay. Cable tie them togehter where needed with the original loom. Once its looks all neat and tidy, you can move onto the next step
Step Seven
Yeah ok calm down, time for the easy bit. Now that you have your wires ready to wire up, you need to decide - are you going to have an aftermarket switch, or do you want it to look original and fit into the dash? If your not planning on wiring it into the dash then wire up the earths together and lives together to your swtich and you done. If not then read on.
Step Eight (Optional)
Personally, I wanted my switch to fit into the dash so I went to the trouble of geting an original fiat fog light switch from a local scrapyard and wiring that up. If your doing this then you will need the buttons circuit board from an SX model. Unfortunatly I can't provide pictures for this bit but if your pretty handy then you can probly figure it out yourself along with these instructions to help. You'll need a soldering iron and solder.
De-solder the connections from back of one of the buttons on the circuit board and pull it loose from it. All you need to do now is feed your wire through your dash and out where your new button will go. You'll have to cut a hole here and there for the wire to get through. You also need to solder the wire to the connections of the switch which can prove tricky as they are very small so be careful. Once I had done this, I taped up the connection to ensure it didn't come loose and replaced my button facsia. Heres what it will look like if you manage to do this:
Step Nine
Now its time to step back and enjoy your hard work. If you did it all correctly then your fog lights should only come on when you turn them on along with your dipped head lights.
Conclusion
Yeah, I know, this isn't the most pro and best way to wire up some fog lights to your car, but for an amature its easy and it works so I hope this helps. Any questions or suggestions to the guide? Feel free to reply your comments and let me know how I've done.
Regards, Lozzy