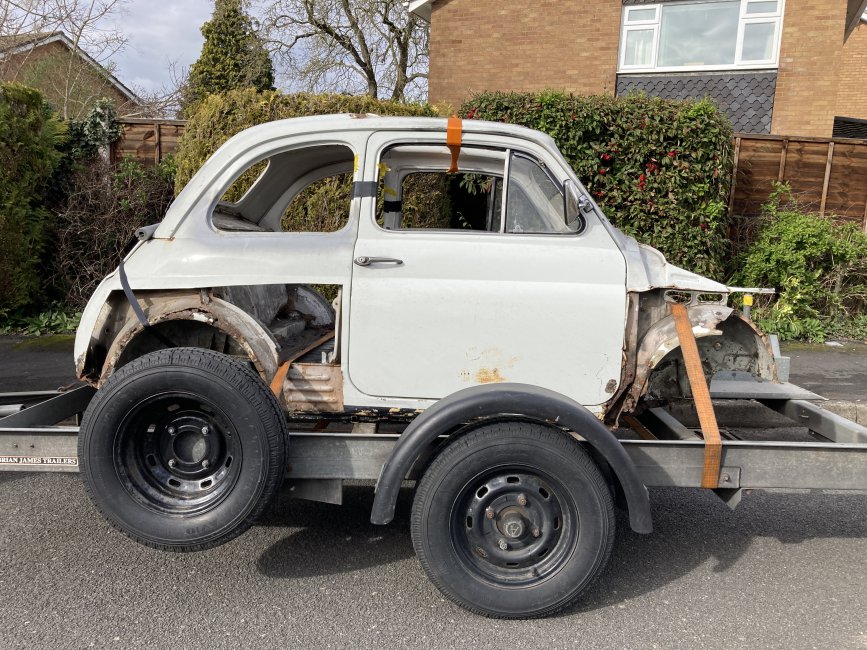
20230318_143836415_iOS.jpg

500 (Classic) Giovanni - 1972 500R

1972 500R in need of a pretty thorough restoration!

Introduction

I thought it may be worthwhile to start a thread showing the (hopefully very thorough!) restoration of my 1972 500R. I bought the car already disassembled, however, the person I bought it from had also bought it in this state but not got around to actually doing any work on it. The condition of the body may have been a little daunting for both - as you will see below there is extensive rot.
Here is the body and parts as I received them:-

20230318_143824474_iOS.jpg

20230318_143829606_iOS.jpg

20230318_143836415_iOS.jpg

20230318_143842577_iOS.jpg

20230318_143846866_iOS.jpg

20230318_143853303_iOS.jpg

20230318_143901820_iOS.jpg

20230318_144108276_iOS.jpg

20230318_144111335_iOS.jpg

20230318_144453645_iOS.jpg

20230318_144457518_iOS.jpg

20230318_144509160_iOS.jpg

20230318_144513378_iOS.jpg

20230318_144515687_iOS.jpg

20230318_144523572_iOS.jpg

20230318_144550193_iOS.jpg

20230318_144720649_iOS.jpg

20230318_152107194_iOS.jpg

20230318_150140455_iOS.jpg


A few of the parts sat in the back of the van for a little while until I'd worked out where to store them. I noticed that the engine was rattling as I drove along so invesitigated - the head was loose and teh pushrods rattling about, so I thought it best to pull it apart and make sure all was ok. Lucky I did as a I found teh following handy note on a piece of paper INSIDE the oil pan!!
20230326_194914620_iOS.jpg


I then set to work on a shopping list of all the bits of what I might need to carry out a complete restoration of the car. All the work is to be carried out by myself, including the paint.
A trip to visit Franko at Ricambio in south London and I came back with whole load of mechanical items - bushes/brake system/load of rubber parts and many body panels. I knew this wouldn't be everything I needed but it should allow me to get going:-

20230422_160614783_iOS.jpg


All the suspension, braking components and wheels have also been shot blasted, zinc primed and refinished in black, along with the engine tinwork and some of the internal metalwork. Lucky for me a friend of mine has a very large shotblasting cabinet I could use.

20230729_115452482_iOS.jpg

20230729_172709730_iOS.jpg

20230729_153226708_iOS.jpg

20230729_172717560_iOS.jpg

20230731_140446499_iOS.jpg


These are all now built up into sub-assemblies with new bushes, braking components etc and stored away for assembly back into the bodyshell when it's ready.

Unfortunately when I got the car i didn't have a complete ignition key, just a broken off handle part! Luckily for me my family have a house in Tuscany where I'm very lucky to visit most summers, so I took the broken key and the ignition barrel with me in the hope that I'd be able to find some blank keys to make the lock work. I found some so I bought 10 expecting that I probably wont get it right first time. In fact it turned out to not be that complicated... I took all the pins out of the barrel and then made a key and the pins fit each other - I now have 3 ignition keys for my car and 7 spare blanks (if anyone needs blank 500R ignition key for a steering lock type car then get in touch).

20230915_175524590_iOS.jpg


So now onto the body that's been waiting for me for 5months wrapped up outside:-

20230916_164528232_iOS.jpg


Myself and my son picked it up and moved it into the garage onto trestles so it's at working height. First thing was to weld a frame inside to keep whatever will be left of it the correct shape for when it goes back together The intention is to cut as much of teh rot out before having the remains shotblasted. This will provide a good, clean starting point for the reconstruction. I already know I need s few more bits dash panel being one of them as it's rotted away and had a poor repair to the right hand end (historically or by one of the previous two owners).

20230917_150911830_iOS.jpg

20230917_150925897_iOS.jpg


20230917_150936125_iOS.jpg


And then I got to work getting it ready for shotblasting. This is work in progress, but most of the RHS is shown to be now removed in these pictures below. I've taken a whole load of measurements from known datums to ensure correct reassembly.

20230918_153707889_iOS.jpg

20230918_153717693_iOS.jpg

20230918_153723356_iOS.jpg

20230918_153735893_iOS.jpg

20230918_153744927_iOS.jpg


Another week or so and I should have the body ready for shotblasting. It's a little car and I've made it littler, so it should now fit in the back of my Renault Trafic for the journey!

Ray
  • Like
Reactions: wingless and ben
So I've finally managed to the the bodyshell (almost) ready to head off to the shotblaster. There's just a small piece of floor panel to remove where it overlaps the bulkhead on LHF - another hour's work or so.
20231015_154606381_iOS.jpg
20231015_154559403_iOS.jpg
20231015_124309566_iOS.jpg
20231015_124338976_iOS.jpg
20231015_124350612_iOS.jpg
20231015_154634560_iOS.jpg


On stripping the roof I've noticed that unfortunately there quite a lot of (accident?) damage to the roof panel on the LHS above the gutter. Not a lot I can do to pull it out, so it'll just have to filled again like it was before...
Last edited:
Whilst waiting to get the shell off to eb blasted I've been making a few panels that I haven't bought, or it is not possible to buy.

Rear Inner Cill Panels.
I know it's possible to buy these, but I fancied having a go at making some....there's a bit of trimming to be done as they are installed.
20231020_163250710_iOS.jpg


Lower inner B-post panels
It's not possible to buy these. If anybody wants some let me know and I'll make some more. Again, some trimming required as they are installed.

20231024_183900099_iOS.jpg
20231024_173132444_iOS.jpg


20231024_173201204_iOS.jpg
I managed to agree a day with the shotblaster to pop over with the bodyshell and wait while it was blasted so that I can take it back immediately get some zinc primer on it. I used Lankies Refurb in Redditch, UK. Mark is a great guy and easy to deal with, I'd absolutely recommend him if anyone needs some shotblasting/powder coating carried out.

To get the bodyshell there I squeezed it inside my SWB Renault Trafic - it was a tight squeeze indeed and I had to remove the front passenger seats to fit it in...
20231101_072107384_iOS.jpg


At Lankies, pre-blasting:-

20231101_080931189_iOS.jpg


And after blasting....with Mark Handley (Lankie himself!) in the background:-

20231101_111506623_iOS.jpg
20231101_111516745_iOS.jpg


Then back to base for a coat of zinc primer:-
20231101_155943429_iOS.jpg


Now just the small task of building the shell back up into what most people would recognise to be a 'car'!
Despite the "squeeze", that car still looks so tiny inside your van.
It's scary level of dismantlement, but you seem to have the shell well-braced. Does it still have a bit of floppiness?
It's getting the suspension mounting-points in the right place that would worry me with stripping back so far. I have a very rusty spare shell in storage that was flopping about even before anything was removed from it. I think I'll need to make a jig based on my good car before I would be confident to get all the alignments right. Did you make anything like that?
Thanks for cheering me up as I weld one little corner of my car and consider it to be a challenge. ;)
The frame i've welded inside the shell to keep everything in place definitely does not allow anything to move - it was welded in place before anything was cut away. I added some extra bracing in a couple of places whilst it was being blasted to reduce the risk of any potential distortion caused by the blasting moving any important datum points (I was mostly concerned about the positioning of the A-post structural panel that the door hinges attach to, as the door fit is crucial to getting the floor and cills back in the correct position). These additional parts have now been removed as they interfere with cill/floor/A&B post installation.
Regarding the suspension mounting points - the front leaf spring mount is unaffected by what I've done and the front upper wishbone mounting points are also still attached to the front crossmember to define their Z position (i.e. up/down) and X position (i.e. front/rear); and their Y position is defined by the end of the front crossmember once the front inner clamshells are reinstalled, so there's very little risk of developing any errors in these mounting points. The rear suspension mounting points are not at all affected by what I've removed.
That sounds really thorough (as it looks). The issue that worries me if I ever get round to my second car is that enough critical parts have lost their rigidity to the point where I worry that there has been rotation of the body around its cental axis in both planes; the car wasn't even rigid to start with!
This gives a idea of its level of integrity:

DSC_5407.JPG


DSC_5404.JPG


Although I did put a floor in before having to pause the project through over-committing on other things; you can see my sophisticated bracing method in the footwell. ;)

FOR_3697.JPG
 
Time to work on the shell has been a bit sporadic recently, but the floor panel has now been installed along with the rear inner cill panels:-

20231109_164157448_iOS.jpg
20231122_170218359_iOS.jpg


20231114_153055387_iOS.jpg
20231114_153105410_iOS.jpg


A bit of jiggery-pokery and the inner and outer cills have also been installed to the RHS:-

20231122_203204847_iOS.jpg


RHR wheel house outer eyebrow panel installed after checking positioning with dummy fitment of the rear wing panel:-

20231126_162722118_iOS.jpg


Before the rear wing panel could be fitted there was a repair required to the horizontal rail below teh rear side window. There was a very poor quality repair that had been made at some point in the past. So I made a jig to form the panel and then welded it in place:-
20231126_170058746_iOS.jpg
20231210_162345146_iOS.jpg


A coating of zinc primer on the hard to get to bits and the rear quarter is fitted in position ready for welding:-

20231212_150748100_iOS.jpg
20231212_134713995_iOS.jpg

Attachments

  • 20231210_162418013_iOS.jpg
    20231210_162418013_iOS.jpg
    3 MB · Views: 48
That sounds really thorough (as it looks). The issue that worries me if I ever get round to my second car is that enough critical parts have lost their rigidity to the point where I worry that there has been rotation of the body around its cental axis in both planes; the car wasn't even rigid to start with!
This gives a idea of its level of integrity:

View attachment 433073

View attachment 433072

Although I did put a floor in before having to pause the project through over-committing on other things; you can see my sophisticated bracing method in the footwell. ;)

View attachment 433074
"Fatcat"---I have a 'Factory' workshop manual which does have quite a number of pictures, with measurements, for the suspension, and to a lesser degree, the chassis. Would it help you to have copies of these pages? If it would, drop me an e-mail with your address ( [email protected] ) and I will put them into the post for you.
 
A mighty fine job you are doing.
I’m currently doing a resto on a car that’s been so badly welded ( by previous owner) that having to redo the appalling “workmanship “ is a challenge!
 
It's been a while since the last update of how the bodywork is progressing, but I've managed to get quite a lot done....

The LHS of the car is now back together from the a-post rearwards. I had to do a repair to the end of the gutter as the new rear quarter panel didn't align properly with the end of the existing gutter. I've used some M5 rivnuts for the fixings of the grille above the engine lid rather than using self-tappers as I've never liked using screws for that sort of thing.
20240211_154424792_iOS.jpg


Some detail of the repair to the lower corner of the rear window aperture. This had been poorly repaired in the past so i cut that repair out and made a better job. It'll need a bit of filler to get the shape right.
20240211_143457349_iOS.jpg


I drew up some press tools in CAD and 3D printed them to make the inner surround part. I was happy that the tool worked and then welded the part in place. Again, a little bit of filler required to get it just right.

20231018_212632299_iOS.jpg
20240211_143537799_iOS.jpg


Next onto the rear right hand corner of the engine bay. The corner fillet panel had been used as a jacking point at some time and been crushed, then become rusty, so I cut it out before the shell was blasted. I made a panel and then installed it


20240211_182327296_iOS.jpg
20240213_152225197_iOS.jpg


Then onto the most expensive panel of the reconstruction - the dash. To cut the old one out and fit the new one only took a couple of hours....the new panel was a very good fit.

20240213_162509833_iOS.jpg
20240213_162515637_iOS.jpg


Now it's time to move to the front of the car. Scuttle next, then the wings/front panel/inner front panel.
Last edited:
All the structural work and welding on the bodyshell is now complete.

Scuttle welded in position along with the front panel and wings. It wasn't a perfect fit where it meets the original parts of the A-post by the windscreen, but again a skim of filler will make it look right. Getting the whole lot to line up was a bit fiddly.
20240318_115112132_iOS.jpg


Once the front end was all welded in place I cut out the framework as there was now no risk that the body could deform.

I then welded in place teh repair panels I had previously made for the bottom of the B-posts. At the same time I made up two formers and made panels to repair the A-posts and then weld those in place.

20240406_095853394_iOS.jpg
20240406_113826374_iOS.jpg
20240406_142004779_iOS.jpg


As I've mentioned previously the LH gutter and roof had been damaged at some point in history. The gutter condition was not recoverable so I cut it off, folded up a new section of gutter and welded it in position.
20240417_171040016_iOS.jpg
20240420_163454257_iOS.jpg


There were a few little repairs required to the roof where the LH rear of the hood attaches. The other hole is also repaired, but I haven't got a picture of that to hand....

20240420_132919110_iOS.jpg


And that's it for all the welding. It's all done...at last.

Now on to preparation for making it look shiny and white again!

20240421_182403451_iOS.jpg
Well done! It's such a milestone to have completed the welding stage of the project. Looks like you've done a great job and it will be a nice straight car when it's finished 🙂

Starting on the paint prep / filler is a nice refreshing change... for the first days at least! haha.
 
Well done! It's such a milestone to have completed the welding stage of the project. Looks like you've done a great job and it will be a nice straight car when it's finished 🙂

Starting on the paint prep / filler is a nice refreshing change... for the first days at least! haha.
When you get round to fitting the outer ends of the roof's rear cross-bar, you can, again, use riv-nuts instead of the self-tappers that the factory normally fitted---and yes to a previous query (by Peter if I remember correctly), you can get stainless riv-nuts. A little trick which I used---the front corners of the roof have a tendency to, over time, remove the paint from the roof. I fitted a small double-layer patch on the area of roof that the front corners sit on of the clear stck-on plastic sheeting that is used by cars with very wide rear wheel arches (some Porsche for example) to protect the front surface of the rear wing from stone damage. Because it is clear it is pretty well unnoticeable, but it does protect the paint.
 
When you get round to fitting the outer ends of the roof's rear cross-bar, you can, again, use riv-nuts instead of the self-tappers that the factory normally fitted---and yes to a previous query (by Peter if I remember correctly), you can get stainless riv-nuts. A little trick which I used---the front corners of the roof have a tendency to, over time, remove the paint from the roof. I fitted a small double-layer patch on the area of roof that the front corners sit on of the clear stck-on plastic sheeting that is used by cars with very wide rear wheel arches (some Porsche for example) to protect the front surface of the rear wing from stone damage. Because it is clear it is pretty well unnoticeable, but it does protect the paint.
Yep, I've already put rivnuts in those places where there would have originally been self tappers....

Also a good tip regarding wear to the roof. What you're referring to is known as Helitape, of which I do have some, so will put it in those locations - thanks.
 
Back
Top