Technical ECU in the oven method to re-flow worn solders

Currently reading:
Technical ECU in the oven method to re-flow worn solders

zoli

Member
Joined
Apr 15, 2012
Messages
67
Points
94
Location
Serbia, Subotica
Hi guys,

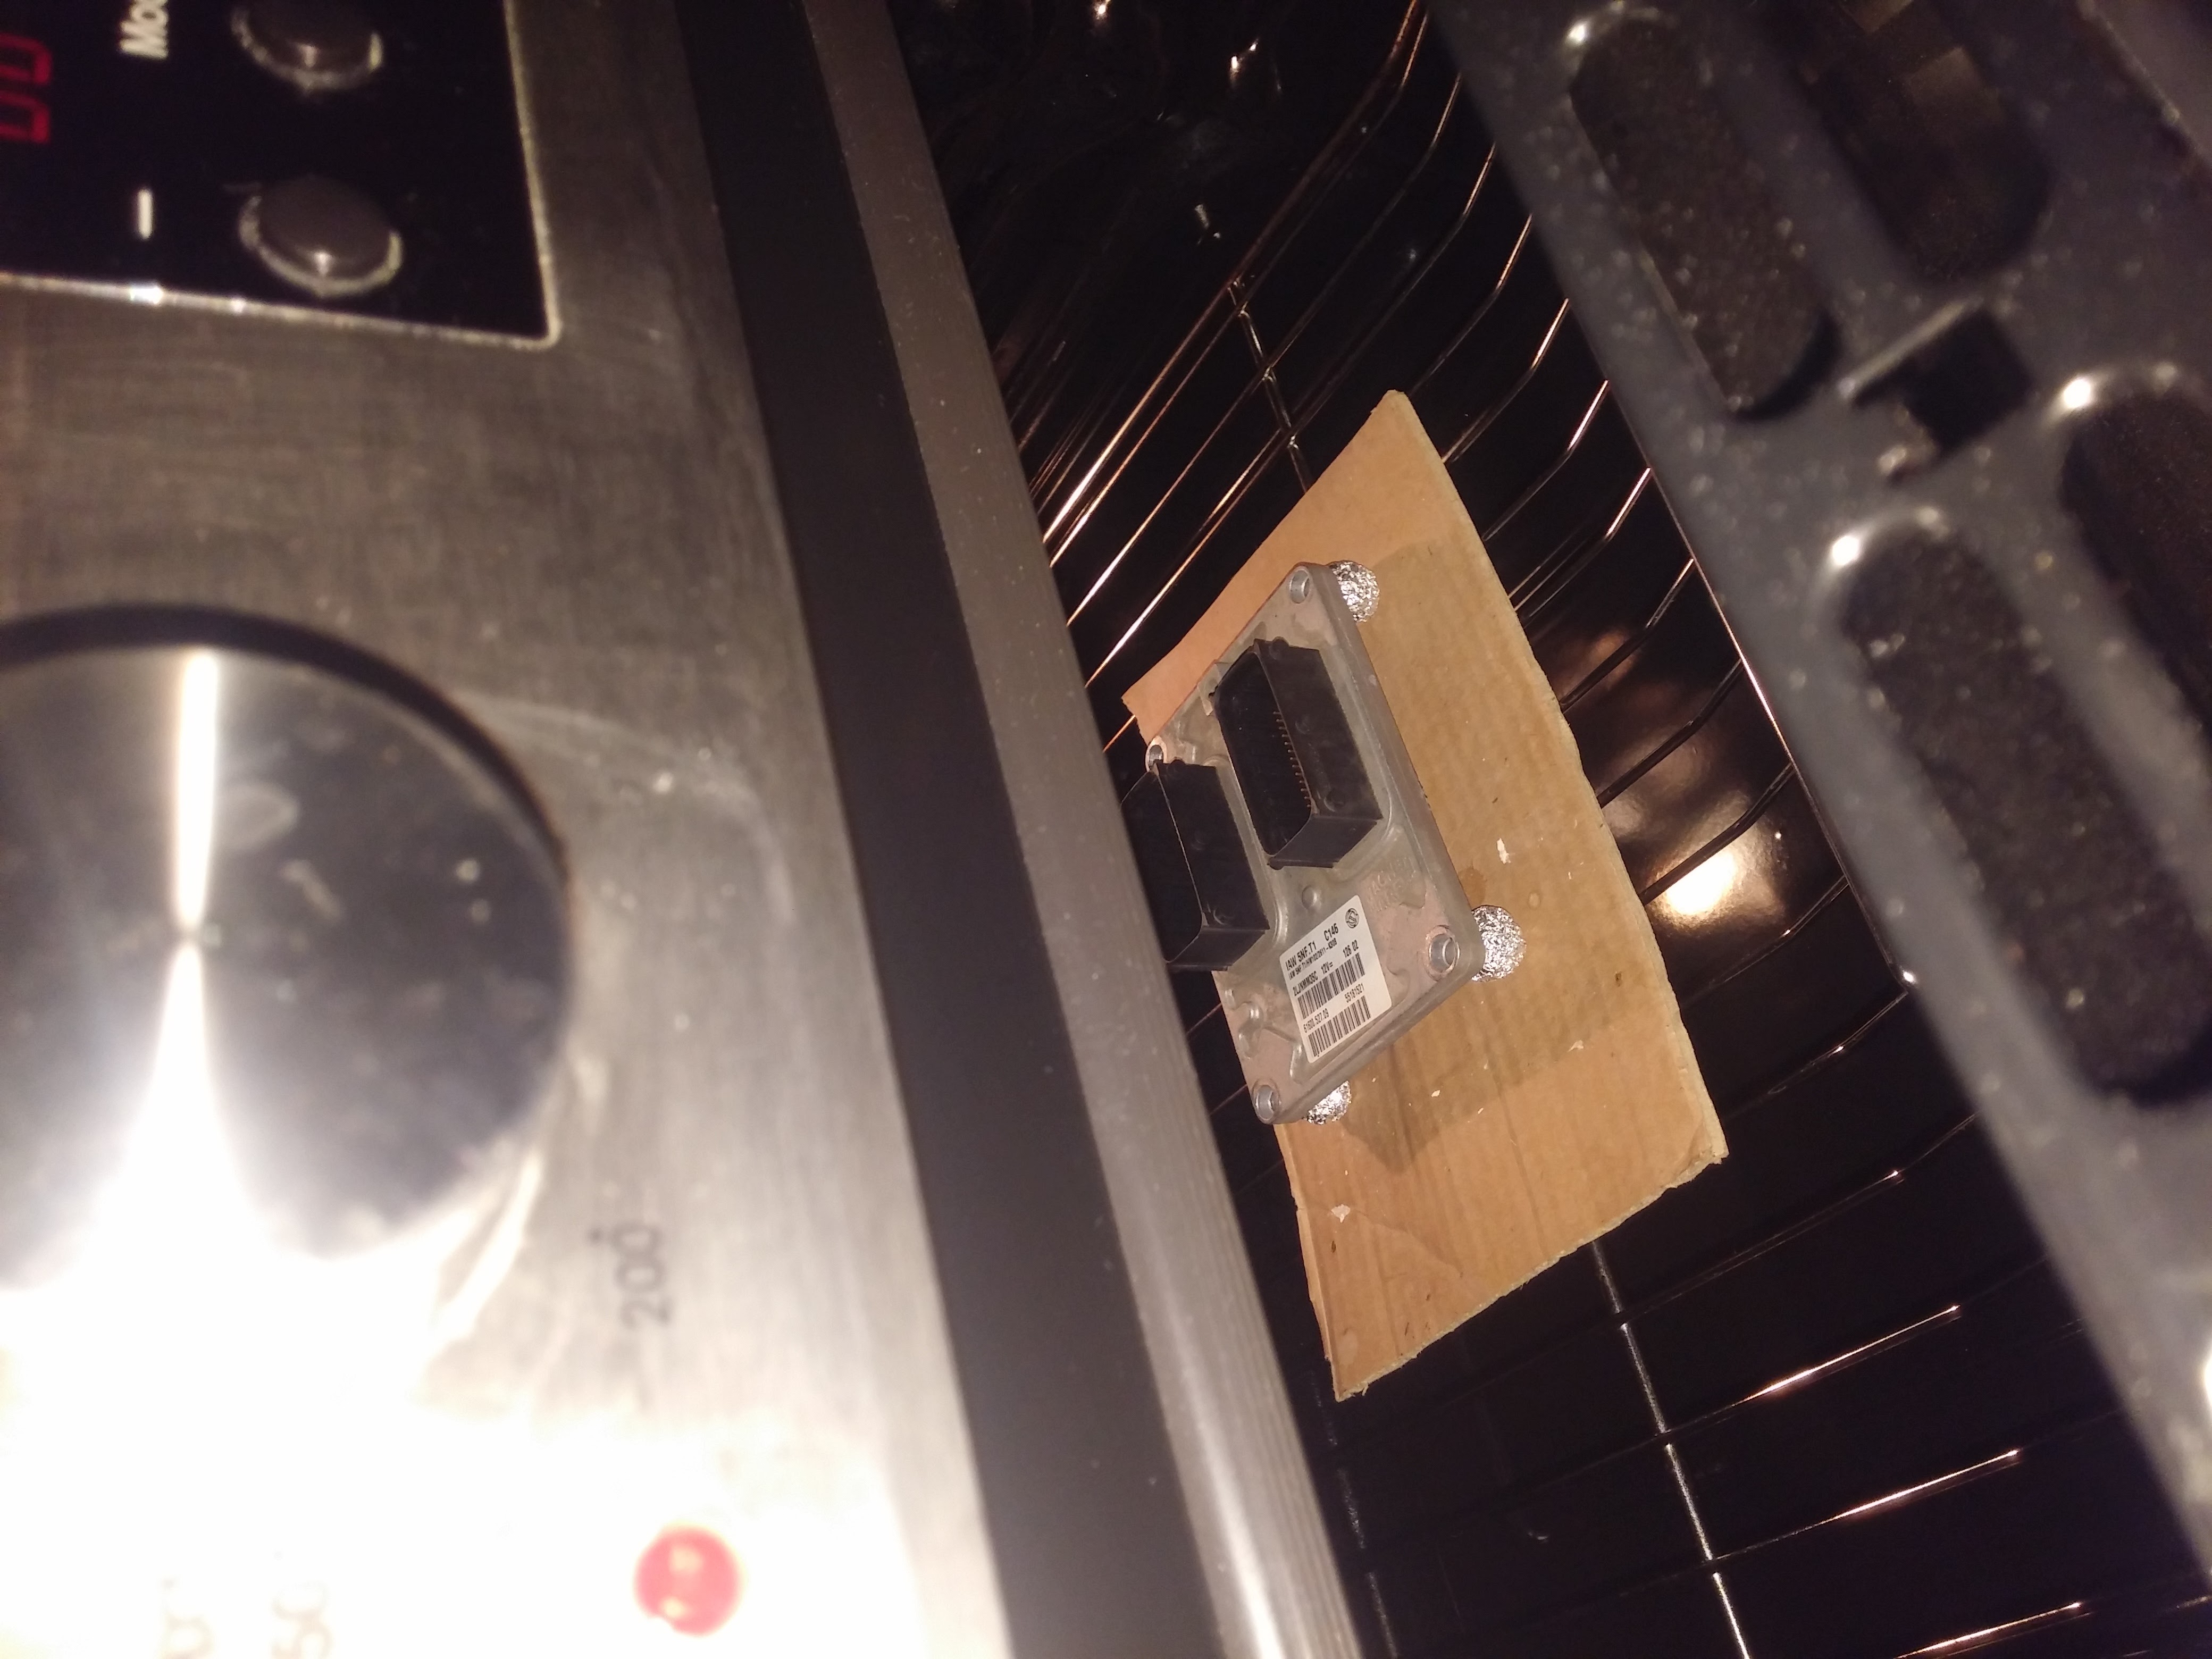
I'm curious, has anyone tried fixing the engine ECU of a Stilo 1.6 Petrol at home by baking the PCB board of the ECU in the oven for a certain amount of time to fix the famous " Loose connection, ASR fault, ABS fault, High Coolant Temp, Engine Fault, ect. " errors that come and go and are definitely not caused by a bad battery or other electrical faults ?

After 5 years of steady and perfect service our Stilo 1.6 Petrol decided to flip us off by leaving me at the side of the road (thankfully in town) with the various and intermittent faults that I just call " dashboard Christmas lights errors " which are most probably caused by old and worn solders on the PCB of the Engine ECU.

I did of course the obvious, cleaned all " known roots of evil " connectors with contact spray, took out the fuse box and cleaned it, cleaned the major ground and 12V line connectors around the battery, checked the battery which was more than good, checked the charging voltage which is rock steady and sufficient, I could not find no apparent corrosion marks on any of the major connectors, all lines seem OK, engine ECU connector pins also seem OK, so I'm left with no other (or very little) causes that can manifest themselves in these all kinds of lightshow effect on the dash which sometimes do pop up, other times I can drive the car fine, some times the immobilizer inhibits me to start the engine, other times it just comes up during engine start but disperses soon and off I can go.

My electrician friend tells me (oh, and my mechanic as well) that all things said, this points to the ECU failing, most probably the worn solder points under neath the chips in on the PCB.

In the IT industry, in which I work, there is a good old last resort method of fixing bad graphics cards, ssd's, mother boards, by baking them at just about the melting point of the solder for about 5-to-10 mind and letting it cool down, and voila :) in most cases it fixes the old worn solders and the thing comes back to life. I did it myself that's why I can vouch for that method.

Now, I'm curious, could that also work on the engine ECU of the Stilo ???

I'm either looking at having it fixed by a professional or finding a virginized one anyway, so I'm thinking of giving it a shot.

What do the forum goers think ? :)

BR
Zoli
 
There a a lot of people on the internet baking PCB in the oven and even re balling BGA chips assuming that the problem is caused by cracks in the solder when in fact they are totally wrong in there assumption,removal of lead from solder 10 years ago resulted in another phenomenon commonly called tin whisker formation or dendritic growth this is where microscopic whiskers sprout from metal surfaces and as they grow in length they touch adjacent pins on chips causing short circuits and intermittent faults,heating the chips in question will destroy the failure mechanism by evaporating the tin whisker,that is until it grows again,all this started when the industry removed lead from solder,lead is a very important additive to solder , interesting enough military and medical applications are still permitted to use leaded solder because they know the importance of lead in solder,I wrote an article for a magazine over 10 years ago describing this phenomenon but it's very widely document on the internet now,just do a search for Tin whisker grow.
 
Well personally, you'll never catch me baking my ECU. You might as well literally fry it for my money.

From what evidence I see the problems seen with the ECUs, which particularly affect the 1.6s due to the location of the ECU, isn't broken solder joints - its dropped pins.

The solder warms to the point of softening and then the motion and vibration of the vehicle lets the ECU connector pins wriggle down through the PCB and dropping the connection and causing all sorts of electrical merriment.

I dont think that baking would necessarily directly address this issue. The simplest and most effective way to deal with this is to take a soldering iron directly to the dropped pin and put it back where it belongs. Relocating the ECU to a cooler home in the engine bay should prevent the problem repeating.
 
Hi Artemis,

I already did the pin checking and re-soldering to their right place. Actually there were only 3 pins in total that seemed out of place, and even those were only barely visibly dropped in but I did align them with the rest using the soldering iron. It did not fix the issue with the ECU, nothing changed in fact.

Now I'll take apart the ECU once again, re check pins and any connections I see out of place, and if tempted I'll pop it in the oven, tin whiskers or not, If I'm looking at having it sent to the shop for rebuilding which costs a few hundred euros, I might as wel have a go at it in the oven, it might just fix the thing, or break it completely.
To be frank about it, I did fix our LG LCD TV motherboard by baking it ad it's been over half a year now and it works perfectly.

Z
 
Without getting too technical the point I was trying to make most people assume that by putting a board in the oven they are simply re flowing the solder, or to put another way re soldering the board by melting the solder,but this is not correct , if the board was made after 2006 it will use lead free solder which has a melting point depending on what alloy it used of between 220 and 250 degrees c, during manufacture boards are reflowed at the peak temperature of 250 degrees C for no more that 20 seconds, any more and you risk melting every plastic part on the board.
The fault on the LG TV you refer to is very common and you would have cured your problem simply by heating up the BGA chip to 200 degrees with a hot air gun for a couple of minutes rather than putting it in an oven.
 
Hi Michael,

Our Stilo is from 2002, so it should still have the good old leaded solder kind on it's boards. Hence why I took the approach 180C preheated oven, then bake board for no longer than 8min, then with the hot air blower still on but the heaters off open the doors just slightly so that tit gradually cools down.

The thing is at the moment sitting in the oven and cooling. Keep your fingers crossed, I'm putting the thing together in about half an hour, I'll put some high temp silicone on it first so it's sealed snug.

Let you know the outcome later.

BR
Z
 
Hi , Yes please let me know how you go on , as its still possible to get tin whisker growth inside chips themselves, especially if the chemical Bromide has been added to the plastic package of the IC itself as a flame retardent and this was in use from the late 1999 onwards but its use has now since been discontinued.
 
Hi Michael,

Our Stilo is from 2002, so it should still have the good old leaded solder kind on it's boards. Hence why I took the approach 180C preheated oven, then bake board for no longer than 8min, then with the hot air blower still on but the heaters off open the doors just slightly so that tit gradually cools down.

The thing is at the moment sitting in the oven and cooling. Keep your fingers crossed, I'm putting the thing together in about half an hour, I'll put some high temp silicone on it first so it's sealed snug.

Let you know the outcome later.

BR
Z

How did it go?
 
Aaaaaaaaaaaaaaand ...... drum roll please ..... pa damm tssss .... (y)

It actually worked ! :)

To give you some details, I took apart the ECU as much as I could without stripping the two black plastic connectors, but they are relatively heat resistant so 8min at 180C in the oven will not do them any harm.

I chose 180C to be on the safe side as the melting point of leaded solder is somewhere in the mid 180-185C range (or at least should be if it's the good old Sn-Pb alloy which probably is since ours is a 2002 Stilo 1.6 Petrol).

After exactly 8 minutes I opened the door of the oven but left the blower running without heating so that the board can gradually cool down. Once it cooled down to about room temperature, at least not hot to the touch, I just did a quick try-out on the engine, put the thing back together and turned the key and it worked flawlessly, engine turned over as usual, no apparent faults, no mil light, no bip-bip-bip you know :)

Once I made sure it starts a took the ECU out again just to apply heat resistant silicone glue to the sides of the top panel of the ecu so that it's nicely sealed, and I put the thing back on the engine and took the car for a drive.

I was out about 30minutes, stopped at 3 different places, turned off the engine, did errands, went back in and came home. Not once did it flash errors at me nor did it act anyway peculiar. The car ran fine as it's supposed to run for a 15 year old machine.

For now, the ECU stays in it's original compartment on top of the engine but I might think of relocating it to a cooler place, say the sides of the battery tray, but that's a future project for now.
For the time being I will not take the car for long trips, at least not planning to, but it will be used around town each upcoming day.

Next week I'm looking at a major work on the engine, head gasket change among other things and taking apart and rebuilding the top part of the engine block as this has been on the table for some time now. For a 15 year old car it performed nicely so far, but it gradually consumes cooling liquid as well as oil and I cannot delay this job any more. I plan on having it done before Christmas.

I'll update the thread with new info about how does the ECU perform and do I notice any errors. I'll be giving updates in the upcoming days.

I have to thank Michael for a very professional attitude and the pointers he gave, thanks man !

Pictures of the ECU in the oven below :)


All the best
Z
 
Last edited:
Aaaaaaaaaaaaaaand ...... drum roll please ..... pa damm tssss .... (y)

It actually worked ! :)

To give you some details, I took apart the ECU as much as I could without stripping the two black plastic connectors, but they are relatively heat resistant so 8min at 180C in the oven will not do them any harm.

I chose 180C to be on the safe side as the melting point of leaded solder is somewhere in the mid 180-185C range (or at least should be if it's the good old Sn-Pb alloy which probably is since ours is a 2002 Stilo 1.6 Petrol).

After exactly 8 minutes I opened the door of the oven but left the blower running without heating so that the board can gradually cool down. Once it cooled down to about room temperature, at least not hot to the touch, I just did a quick try-out on the engine, put the thing back together and turned the key and it worked flawlessly, engine turned over as usual, no apparent faults, no mil light, no bip-bip-bip you know :)

Once I made sure it starts a took the ECU out again just to apply heat resistant silicone glue to the sides of the top panel of the ecu so that it's nicely sealed, and I put the thing back on the engine and took the car for a drive.

I was out about 30minutes, stopped at 3 different places, turned off the engine, did errands, went back in and came home. Not once did it flash errors at me nor did it act anyway peculiar. The car ran fine as it's supposed to run for a 15 year old machine.

For now, the ECU stays in it's original compartment on top of the engine but I might think of relocating it to a cooler place, say the sides of the battery tray, but that's a future project for now.
For the time being I will not take the car for long trips, at least not planning to, but it will be used around town each upcoming day.

Next week I'm looking at a major work on the engine, head gasket change among other things and taking apart and rebuilding the top part of the engine block as this has been on the table for some time now. For a 15 year old car it performed nicely so far, but it gradually consumes cooling liquid as well as oil and I cannot delay this job any more. I plan on having it done before Christmas.

I'll update the thread with new info about how does the ECU perform and do I notice any errors. I'll be giving updates in the upcoming days.

I have to thank Michael for a very professional attitude and the pointers he gave, thanks man !

Pictures of the ECU in the oven below :)


All the best
Z

Good work dude :)
 
So far so good. The car has been on the road for all weekend now, we were doing errands with the misses and a friend also took the car once so after at least 2 days of driving it with 3 different driving styles and several cold and hot starts later the car still runs fine and no engine fault light nor errors.

Will update the post once the head gasket change is done next week.

Z
 
Well I don't like that it's worked, as I dont like the idea of a dangerous technique of cooking your ECU working. It's not something I'd try but one way or another I'm pleased you've sorted your problem.
 
Sure Artermis, I agree with you.

This is NOT a post about spreading the "oven baking cure" for bad ECU's.

It's actually a post about an experiment that in some extreme cases might work if the circumstances are right. So to anyone reading this post, I would not straight on recommend to start trying this method, but if someone understands that they can completely brick the ECU and they still would like to forego with the said procedure, there is at least one forum goer who, I have to stress, might have just managed to fix his ECU issue with this extreme approach.

The proper and professional way about it would be to
1. Conduct a test on the ECU by proper means to have the problem localized to the ECU
2. If the problem is ECU bound, try to pinpoint the issue to a component
3. Then either fix the component or perhaps just re-solder that one that is causing the issue.

It should be done by a person who has some experience in fixing board computers and by completely stripping down the ECU from it's casing and examining it that way.

The oven baking method is a " brute force " approach to re-soldering warn solders or removing tin whiskers and potentially fixes the issue if these are the causes of the bad behavior. A lot of other things can go wrong with the ECU where excess heating it might cause it to fail completely.

That being said to recap, for an experiment it was sure a fun one so far as I have managed apparently to fix the ECU for almost 0 quid and with a bit of luck, which I usually don't like to play with, but as I had my cup full with constant repairs on the Stilo I was ready to try this approach to cut down on the spending.

If some of you have decommissioned ECU's that you don't mind to pop in the oven and try to fix like that, I would be curious what will be your findings and experience. I don't encourage anyone to start popping the things in the oven, but if someone has their experimental on, why not give it a try :)

All the best,
Zoli
 
The word brute force is slightly incorrect,this is how printed circuit boards are manufactured these days, first the blank PCB has solder paste applied by wiping the paste over a stencil ,then the components are placed onto the solder paste which holds them in position and the whole board passes down a conveyor belt into a giant oven with many different temperature gradients for a pre determined time, it is perfectly acceptable to heat up a board you suspect to be faulty,the key to either fixing it or writing it off completely is all down to getting the temperature right .
 
Last edited:
I meant under brute force that rather just re-soldering the main processor I just went with the heating of the complete board to re-solder all of the components.

But I agree with you Michael, they do make PCB boards that way nowadays. Essentially I did something similar just the heat is not that controlled in precise gradients and not for a very precise time but for a "home remedy" apparently it worked so far.

As I wrote earlier, for anyone willing to try this approach the temp of the owen should be set to about the melting point of the solder (leaded Sn-Pb kind in my case) ~185C and the time of baking should be anywhere from 5 to 10 min as the heat needs to penetrate the board and the components properly for the solder to just soften enough but not fry the components all together, so I went with 8min out of precaution and as an experiment.

Z
 
Last edited:
If anyone is worried about baking a board or don't feel confident enough to try this let me pass on another tip which is not so widely discussed on the net,in the case of tin whisker growth it's a metal and what happens to metal when you freeze it ? It shrinks slightly , so in the case of your faulty LG TV ,I am assuming you had no HDMI inputs working which is very common ,if you had of squirted some freezer spray underneath the BGA micro the HDMI inputs would have come back to life ,that is for about 10 minutes before the chip warmed up ,but this is a very useful and quick fault finding tip ,this technique of freezing can also be used on SPI and flash memory chips when you can't get a read from them,if you are reading the chip in circuit and it returns garbage freeze it and read it again.
Now most people unless in the electronics industry won't possess a tin of freezer spray so you could try this ,put your board in the freezer compartment of the fridge for a few hours and then try it again to see if you problem has cleared,but remember this is only a diagnostic test and if your board is suffering from tin whisker growth the fault will re appear when the board returns back to room temperature,if freezing cures the problem for a short time you will have confirmed you need to bake the board or replace it.
 
Hi guys,

I bear sad news :( The oven fried ECU lasted perhaps a month...even less.
All of the earlier errors, ASR, Loose Connection, High Coolant Temp., Car Security Error, etc., have returned. Albeit very randomly and sometimes the car drives fine without any errors, other times like yesterday It died on me for 30 minutes it would not start. I left it in the driveway, came back in an hour or so and then it started without errors. Just like today morning, again no errors what so ever...

Anyway it seems that the ECU is on it's way out after all and I'm looking for a replacement used one. I already asked my mechanic to find one for me.

If I find a good condition used one, I will definitely relocate it to the sides of the battery tray.

For now that's all.
 
Last edited:
Back
Top