Technical Engine rebuild, Stilo Abarth 2.4 manual

Currently reading:
Technical Engine rebuild, Stilo Abarth 2.4 manual

well done with that cylinder head.
any info on fuel injectors ? will the std ones flow enough to make that sort of hp or did they have specific group n /or group a injectors also?


Hi Sussexa, I did not forget about your question.
I setup a meeting with the then head of racing workshop to get all info he can remember, he were very willing to share and will when we finally meet, he cancelled our Friday meeting due to business in another town, so we moved it to this Friday(y)
 
keep an eye on this about half price new injector
http://www.ebay.co.uk/itm/Brand-new-genuine-injector-Fiat-Stilo-Marea-2-0-2-4-0280155770-46470473-/281197586817?pt=UK_CarsParts_Vehicles_CarParts_SM&hash=item4178aea981
theyre about £170 new at fiat
also here for clean/check
http://autolusso.co.uk/injector-cleaning.html
or find somewhere closer who can probably do cheaper
although looks like a few out there, something like this may pay and pick 5 highest flowing from 5 plus your 5 ?
http://www.ebay.co.uk/itm/FIAT-STILO-2-4-ABARTH-FUEL-RAIL-AND-INJECTORS-0280155770-2001-2006-/271289484053?pt=UK_CarsParts_Vehicles_CarParts_SM&fits=Model%3AStilo&hash=item3f2a1d0315
I don't know if these suffer like diesel injectors with age /milage.
heres a cheaper place
http://www.injectorcleaning.co.uk/post.htm
found linked to a place showing injector flow for loads of injectors
http://www.polog40.co.uk/article_injector_table.php
if this is right
bosch injector 0280155787 flows 182cc/min @3bar
and appear to be same as landrover discovery
if so new are cheaper than fiat
http://www.ebay.co.uk/itm/Land-Rover-Discovery-2-V8-Engine-Petrol-Fuel-Injector-1998-2004-New-Bosch-Part-/280807694294?pt=UK_CarsParts_Vehicles_CarParts_SM&hash=item4161715fd6
or even
http://www.ebay.co.uk/itm/BOSCH-FUEL-INJECTOR-BRAND-NEW-ERR6600-BOSCH-0-280-155-787-ONE-/251819290226?pt=LH_DefaultDomain_3&hash=item3aa1996e72

worth mentioning when you quiz the guys
as I said I don't know abarths or this type of injector so don't know of any gains or issues,
I cant say ive seen many referances to injectors over the years ive been on here (jtd aside)

followed from a v8 thread
http://www.fiveomotorsport.com/fuel-injectors/peugeot/405/
this sort of thing would be nice if just a straight swap
also how much will the abarth self regulate for fuel flow as in will it always inject more or less to achieve good lambda , ie if it can breath more air will it inject more fuel.
 
Last edited:
This post contains affiliate links which may earn a commission at no additional cost to you.
So I though it might be good idea to record times, then this can be used as a guide for someone in the future, obviously some bolts come out easily and some don't etc.

8 Feb 2015

1. 00h02 Removed engine cover
2. 00h02 Removed battery cover
3. 00h02 Removed battery
4. 00h02 Moved fuse box and cables safely out of the way
5. 00h04 Removed battery holder/foot bracket (nr 13 socket)/drip tray
6. 00h15 Removed Air filter box and pipe's (2x metal clamps, 1x air flow meter plug)
7. 01h00 Removed exhaust, from 5 to 1 flange to flange before 1st silencer box (lost time due to long bolts used by shop during decat, grime & dust lie on thread causing it to seize)
Tip: use short bolts and lubricate with copper compound
 

Attachments

  • m_IMG_4481a 20150208_165259.jpg
    m_IMG_4481a 20150208_165259.jpg
    62.9 KB · Views: 89
  • m_IMG_4482.JPG
    m_IMG_4482.JPG
    93.2 KB · Views: 73
  • m_IMG_4483.JPG
    m_IMG_4483.JPG
    81 KB · Views: 83
  • m_IMG_4484.JPG
    m_IMG_4484.JPG
    38.9 KB · Views: 70
  • m_IMG_4486.JPG
    m_IMG_4486.JPG
    77.7 KB · Views: 78
  • m_IMG_4487.JPG
    m_IMG_4487.JPG
    80.3 KB · Views: 78
  • m_IMG_4488.JPG
    m_IMG_4488.JPG
    42.4 KB · Views: 76
So I though it might be good idea to record times, then this can be used as a guide for someone in the future, obviously some bolts come out easily and some don't etc.

If you're making a guide for this, could you put it in the Stilo guides section of the forum here: https://www.fiatforum.com/stilo-guides/

Makes it easier for people to find later. ;)
.
 
If you're making a guide for this, could you put it in the Stilo guides section of the forum here: https://www.fiatforum.com/stilo-guides/

Makes it easier for people to find later. ;)
.


Hi, that is the idea, just in the growing phases.
The idea is to edit and compile for the guide section when finished and everyone's contribution and lessons learned can be added.

Is that fine?
 
Hi there,

Just a question, where are you getting your shells (bearings) from and oil pump parts?

I want to rebuild my schumacher gp! Can't find anything on the net trustworthy.

Kind regards,
Jim
 
Hi there,

Just a question, where are you getting your shells (bearings) from and oil pump parts?

I want to rebuild my schumacher gp! Can't find anything on the net trustworthy.

Kind regards,
Jim


Hi Jim

I buy it directly from FIAT South Africa
5x Big End
6x Main
1x Oil Pump (Oil pump sold as unit)
 
Continue

15 February 2015

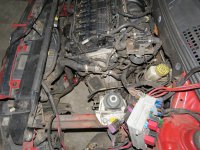
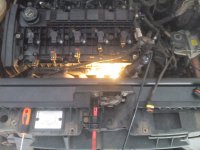
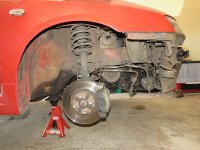
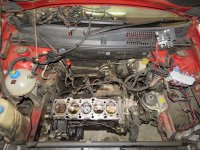
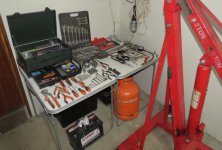
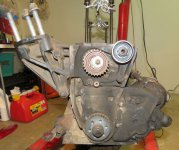
8. 00h30 Remove front bumper for better access, (so wanted to remove front end completely like some other members, but air con piping changed my mind, amount of work and re-gas not worth it I think. Would have been great for better access though.)
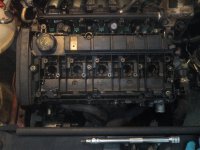
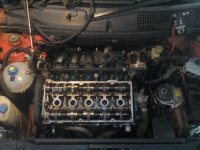
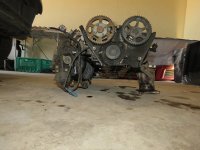
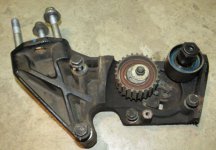
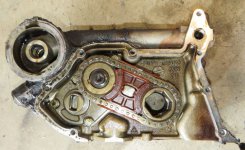
9. 00h20 Removed Timing belt cover.
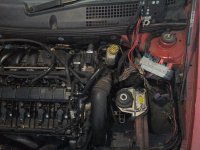
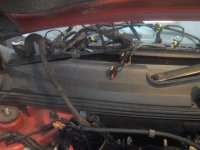
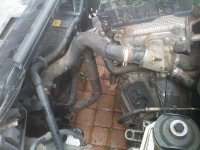
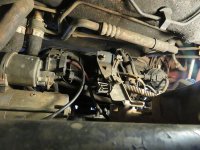
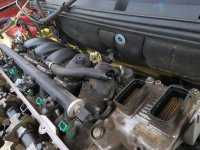
10. 01h30 Remove wiring (ECU Left hand)
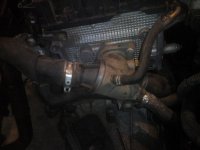
10.a Pulled out Flow sensor and Cat 2
10.b Unplugged all coil plugs
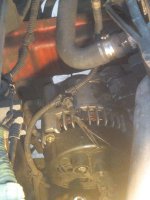
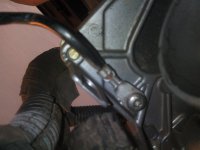
10.c Removed Alternator lug
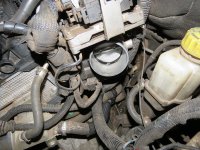
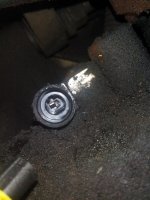
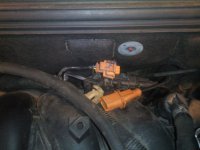
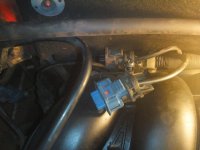
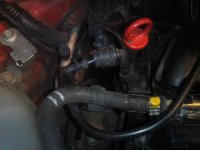
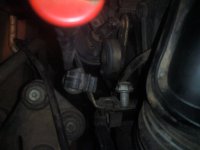
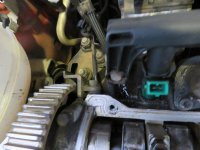
10.d Pulled of Air con plug, (Very difficult to see, I used cell phone to take picture how cable is hold in place, it is situated below the alternator and in the centre on top of the air con pump)
10.e pulled all to the top, including Cat 1
10.f Unplugged Thermostat plug
10.g Unplugged Throttle body plug
10.h Loosened earth lug behind the head next to throttle body
10.i Loosened earth lug under ECU
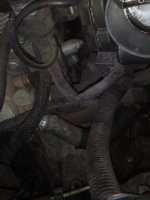
10.j Unplugged Timing sensor - light blue (I think! left hand on top of intake manifold)
10.k Unplugged Intake manifold solenoid - black (I think! left hand on top of intake manifold)
10.l Unplugged Timing sensor - orange (I think! right hand on top of intake manifold)
10.m Unplugged Intake manifold solenoid - black (I think! right hand on top of intake manifold)
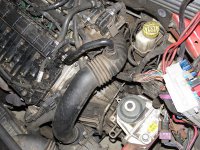
10.n Loosen clamp on "low rev" oil gas return to tapped cover ( To easily pull out cables from injectors running underneath - don't want to bend old cables!!!)
10.o Unplugged all injector plugs.
10.p Moved all cables including LH plug on ECU out of the way (placed on driver side wiper - RH drive:D)
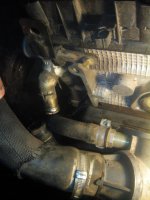
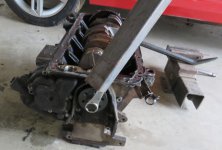
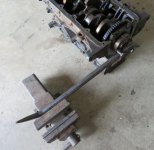
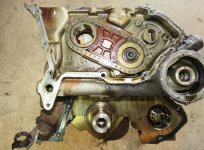
11. 00h03 Unplugged supply fuel pipe on manifold (NB! Sealed hole with plastic)
12. 00h03 Unplugged return fuel pipe on manifold (NB! Sealed hole with plastic)
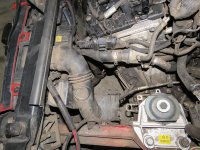
13. 00h05 Remove Thermostat to water bottle clamp and pipe and move out of the way (so far not removing water bottle...) ( be careful not to put to much pressure on hose, plastic on water bottle not designed for side pressure.)
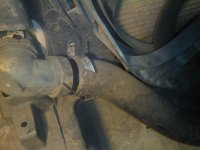
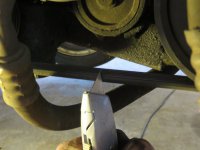
14. 00h30 Loosened bottom radiator pipe clamp (some clamps are crimped so with a special tool, and is in such a way I can't get a screw driver in to bend open, so I filed it in order not to damage pipe) (Tip! always replace clamps with new ones - I use industrial clamps not automotive)
15. 00h10 Removed lowest pipe on thermostat clamp.
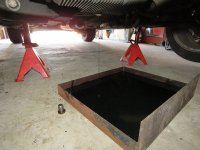
16. 00h10 Pushed car outside and removed these 2 pipes and drained the water.
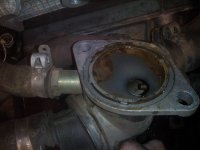
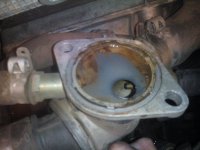
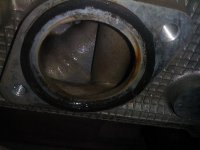
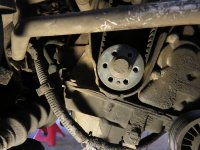
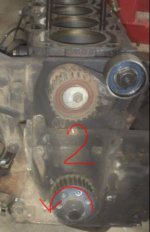
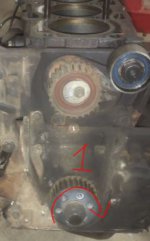
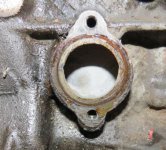
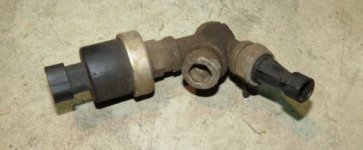
17. 00h05 Loosened Thermostat (y):D 
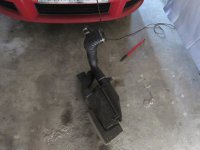
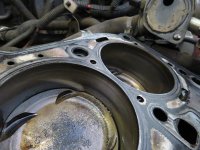
(And WOW! look how good is the condition from the original thermostat and port after 10 years & 258000km's) (TIP!!!;) Always and I mean always use antifreeze, never mix with another colour or brand) (Have also never changed water pump:D)
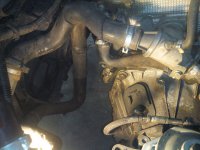
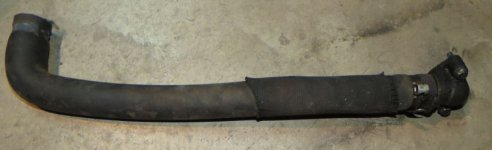
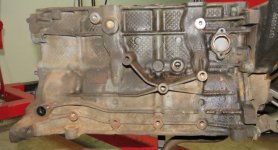
18. 00h05 Removed water pipe LH Front of Head
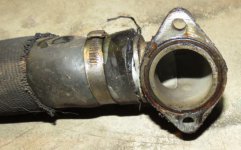
19. 00h15 Removed 2 water pipes RH Front of Head
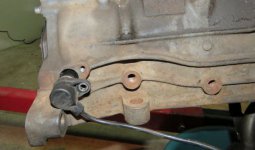
20. 00h05 Removed dipstick bold, LH Rear of head
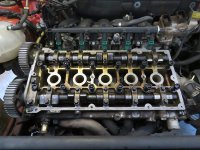
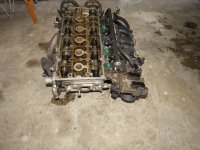
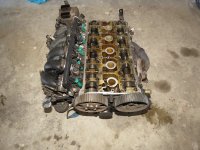
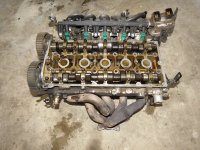
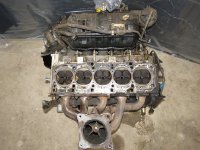
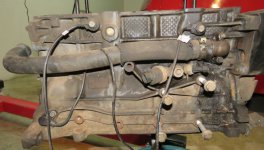
21. 00h05 Removed ignition coils
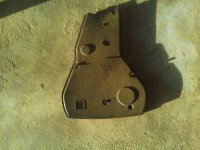
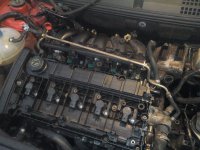
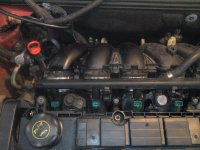
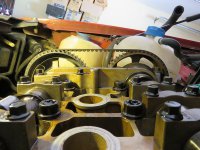
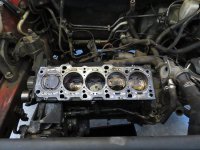
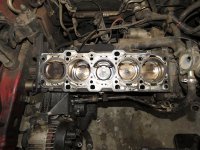
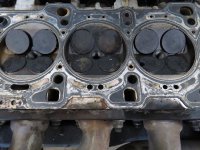
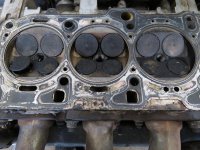
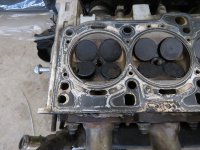
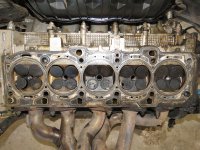
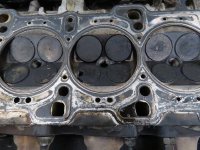
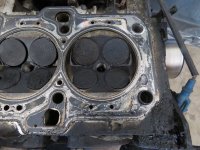
22. 00h10 Removed Tapped/cam cover
 

Attachments

  • m_IMG_20150215_131012.jpg
    m_IMG_20150215_131012.jpg
    54.5 KB · Views: 74
  • m_IMG_20150215_125240.jpg
    m_IMG_20150215_125240.jpg
    49.9 KB · Views: 64
  • m_IMG_20150215_125211.jpg
    m_IMG_20150215_125211.jpg
    51.9 KB · Views: 61
  • m_IMG_20150214_175305.jpg
    m_IMG_20150214_175305.jpg
    62.3 KB · Views: 46
  • m_IMG_20150214_171046.jpg
    m_IMG_20150214_171046.jpg
    51.3 KB · Views: 59
  • m_IMG_20150215_141108.jpg
    m_IMG_20150215_141108.jpg
    49.9 KB · Views: 48
  • m_IMG_20150215_140617.jpg
    m_IMG_20150215_140617.jpg
    43.9 KB · Views: 50
  • m_IMG_20150215_135618.jpg
    m_IMG_20150215_135618.jpg
    44.2 KB · Views: 54
  • m_IMG_20150215_133830.jpg
    m_IMG_20150215_133830.jpg
    36.1 KB · Views: 56
  • m_IMG_20150215_132628.jpg
    m_IMG_20150215_132628.jpg
    43.9 KB · Views: 56
  • m_IMG_20150215_142722.jpg
    m_IMG_20150215_142722.jpg
    58.9 KB · Views: 68
  • m_IMG_20150215_142851.jpg
    m_IMG_20150215_142851.jpg
    36.4 KB · Views: 54
  • m_IMG_20150215_143834.jpg
    m_IMG_20150215_143834.jpg
    57.2 KB · Views: 55
  • m_IMG_20150215_143956.jpg
    m_IMG_20150215_143956.jpg
    41.1 KB · Views: 56
  • m_IMG_20150215_144400.jpg
    m_IMG_20150215_144400.jpg
    64.5 KB · Views: 55
  • m_IMG_20150215_152953.jpg
    m_IMG_20150215_152953.jpg
    41.7 KB · Views: 53
  • m_IMG_20150215_152947.jpg
    m_IMG_20150215_152947.jpg
    41.1 KB · Views: 65
  • m_IMG_20150215_151226.jpg
    m_IMG_20150215_151226.jpg
    61.9 KB · Views: 61
  • m_IMG_20150215_150339.jpg
    m_IMG_20150215_150339.jpg
    44.8 KB · Views: 47
  • m_IMG_20150215_144748.jpg
    m_IMG_20150215_144748.jpg
    56.5 KB · Views: 60
  • m_IMG_20150215_162440.jpg
    m_IMG_20150215_162440.jpg
    54.9 KB · Views: 58
  • m_IMG_20150215_161806.jpg
    m_IMG_20150215_161806.jpg
    31 KB · Views: 49
  • m_IMG_20150215_160524.jpg
    m_IMG_20150215_160524.jpg
    47.6 KB · Views: 56
  • m_IMG_20150215_153943.jpg
    m_IMG_20150215_153943.jpg
    56.3 KB · Views: 55
  • m_IMG_20150215_153000.jpg
    m_IMG_20150215_153000.jpg
    41.7 KB · Views: 55
  • m_IMG_20150215_162947.jpg
    m_IMG_20150215_162947.jpg
    60.4 KB · Views: 85
21 February 2015

00h10 lifted car and put on 2 tressals.
00h05 removed RH Front wheel
00h10 remove RH Front wheel arc plastic cover
00h10 unplugged and removed manifold low/high rev solenoid plug and cable.
00h10 removed all manifold cables still connected with brackets.
00h15 remove manifold bracket
:eek::( then I saw the oil breather pipe cracket, earlier I moved it(bended it) out of the way, (Important as mentioned when I started replace all hoses) after 10 years and a few years in city traffic the engine bay becomes hot and all plastic/rubber parts will become brittle.
00h03 cut off aircon belt (This belt is a stretch belt) under tremendous tension, when I did a service a while back changing the timing belt and this belt, this belt kept me busy for quite some time.
00h15 removed crank puly
00h15 turned motor on timing marks (Cranc, piston 1 top, see pics) and marked and recorded inlet\outlet cam positions and teeth position on gears.
00h05 :premoved 2 allan keys bolts that holds the timing belt bottom cover under the top gears of the cams. (later I realized it was not necessary)
00h05 drained oil
00h30 loosen head bolts :)thumb:use an extention, very tight, and PLEASE don't use your torque wrench, if you don't know why ask?)
00h05 removed head with intake/outlet manifolds on.
:pOops forgot to pull out dipstick, but was not a problem.

Quite nice to see the complete head removed, so now much easier to remove intake\outlet manifolds.:D
Also very happy to see good condition of piston sleeves and pistons (10 years, 258000km's)
 

Attachments

  • m_IMG_4555.JPG
    m_IMG_4555.JPG
    66.3 KB · Views: 60
  • m_IMG_4554.JPG
    m_IMG_4554.JPG
    46.7 KB · Views: 55
  • m_IMG_4553.JPG
    m_IMG_4553.JPG
    55.2 KB · Views: 62
  • m_IMG_4550.JPG
    m_IMG_4550.JPG
    48.8 KB · Views: 51
  • m_IMG_4549.JPG
    m_IMG_4549.JPG
    39.3 KB · Views: 52
  • m_IMG_4556.JPG
    m_IMG_4556.JPG
    68.4 KB · Views: 64
  • m_IMG_4558.JPG
    m_IMG_4558.JPG
    38.1 KB · Views: 57
  • m_IMG_4559.JPG
    m_IMG_4559.JPG
    37.3 KB · Views: 52
  • m_IMG_4560.JPG
    m_IMG_4560.JPG
    60.7 KB · Views: 58
  • m_IMG_4564.JPG
    m_IMG_4564.JPG
    80.9 KB · Views: 69
  • m_IMG_4574.JPG
    m_IMG_4574.JPG
    70.9 KB · Views: 78
  • m_IMG_4573.JPG
    m_IMG_4573.JPG
    49.8 KB · Views: 51
  • m_IMG_4572.JPG
    m_IMG_4572.JPG
    54 KB · Views: 56
  • m_IMG_4571.JPG
    m_IMG_4571.JPG
    49.2 KB · Views: 54
  • m_IMG_4565.JPG
    m_IMG_4565.JPG
    63.1 KB · Views: 54
  • m_IMG_4584.JPG
    m_IMG_4584.JPG
    60.5 KB · Views: 64
  • m_IMG_4583.JPG
    m_IMG_4583.JPG
    63.2 KB · Views: 76
  • m_IMG_4582.JPG
    m_IMG_4582.JPG
    72.8 KB · Views: 76
  • m_IMG_4581.JPG
    m_IMG_4581.JPG
    85.4 KB · Views: 85
  • m_IMG_4576.JPG
    m_IMG_4576.JPG
    61.1 KB · Views: 116
  • m_IMG_4586.JPG
    m_IMG_4586.JPG
    49.7 KB · Views: 82
  • m_IMG_4587.JPG
    m_IMG_4587.JPG
    72.5 KB · Views: 96
  • m_IMG_4588.JPG
    m_IMG_4588.JPG
    64.6 KB · Views: 106
Great to see one of these engines in such good shape after that huge mileage! The 2.4's taken a lot of flack over the years from doomsdayers on here who thought it was made of chocolate. Great to see it wearing so well...
 
21 February 2015 continue

So this is how the head (valves) is looking:eek:

So except for using a lot of oil 10l/400km's:p the main reason to stop and redo the motor were that it was really missing a lot and loosing power, so for the last +- 3000km's it just went backward, I kept on driving since I we need 2 vehicles.
I knew one of the vlaves were burned, but after seeing 4 valves burned now I am confused:confused:, I could still keep my speed during an uphill in 5th at 120kph

:confused:WHY??? did the valves burn so bad and only the exhaust flywheel side?

Can it be because: (Well car started missing)
  1. I changed 3 ignition coils during the last 4 months? (I don't think it is possible)
  2. I did the Decat modification and drove 700km's before stripping, can it be because of low back pressure? (But I still have the 2 normal silencers in?)
  3. I changed the spark plugs (Bad history, FIAT dealer recommended spark plugs only last 10000km's, my previous Abarth plugs lasted 24000km's to next service)(I always knew when these were done, engine fault came on and cruise control not working) So 2 weeks before stripping I changed from "Lancia FIAT NGK BKR6EZ to NGK Laser Iridium ITR6F13 4477 (According to supplier this Spark plug is colder than equivalent but I wanted to put NGK Laser Platinum PFR6T-G6314 but opted for "colder" plug) Can this be the reason? I don't think so.. then my pistons would have had holes in?
  4. I drove a while with a bad airflow meter, not sure this is the reason, I replaced it.
Any comments, I can only think of to low back pressure or wrong fuel mixture?After rebuild I will have on dyno to measure mixture before running in motor, maybe some mixture problem.
 

Attachments

  • m_IMG_4593.JPG
    m_IMG_4593.JPG
    67.2 KB · Views: 77
  • m_IMG_4592.JPG
    m_IMG_4592.JPG
    70.5 KB · Views: 90
  • m_IMG_4591.JPG
    m_IMG_4591.JPG
    63.7 KB · Views: 102
  • m_IMG_4590.JPG
    m_IMG_4590.JPG
    81.8 KB · Views: 116
  • m_IMG_4589.JPG
    m_IMG_4589.JPG
    67.5 KB · Views: 119
  • m_IMG_4594.JPG
    m_IMG_4594.JPG
    69.7 KB · Views: 81
  • m_IMG_4595.JPG
    m_IMG_4595.JPG
    69.9 KB · Views: 88
Last edited:
21 February 2015 continue

01h00 Tried:bang::mad:(n) to remove oil sump, as you can see on the picture, I need to remove the flywheel because their is 2 bolts "under" the Fly wheel arch. (According to elearn not nessesary:confused:) but reality differs, or did FIAT put in a weird flywheel when the clutch kit and flywheel were changed by them at 248000km's?

I did not see bolts and wedged sump on support strud and crack:(, :pluckily just on the outside.

So now I must remove the gearbox and need to fetch my engine hoist a few 100 km's away on the farm.

Is this normal for the fly wheel to extend over these bolts?
 

Attachments

  • m_IMG_4605.JPG
    m_IMG_4605.JPG
    92 KB · Views: 111
21 February 2015 continue

So I noticed my engine mount (timing belt side) needs replacement.
Also the bottom gearbox mount. ( finally know now where the knocking sound is coming from, were afraid it was the gearbox(y))

I recently changed both lower control arms and gearbox top mounting (bold and rubber mount unit)
 

Attachments

  • m_IMG_4599.JPG
    m_IMG_4599.JPG
    94.2 KB · Views: 73
  • m_IMG_4600.JPG
    m_IMG_4600.JPG
    37.7 KB · Views: 73
21 February 2015 continue

01h00 Tried:bang::mad:(n) to remove oil sump, as you can see on the picture, I need to remove the flywheel because their is 2 bolts "under" the Fly wheel arch. (According to elearn not nessesary:confused:) but reality differs, or did FIAT put in a weird flywheel when the clutch kit and flywheel were changed by them at 248000km's?

I did not see bolts and wedged sump on support strud and crack:(, :pluckily just on the outside.

So now I must remove the gearbox and need to fetch my engine hoist a few 100 km's away on the farm.

Is this normal for the fly wheel to extend over these bolts?


I'd like to know the answer to this. For the Alfa Twinspark engine, there is a special long, thin Ribe tool required to remove those sump bolts. I don't know whether the same tool applies for the five-cylinder motor.


It's been a few months - I wonder how this story concluded?


-Alex
 
Hello everyone, I am back.


Needless to say when life throw the worst at you so your personal live is changed for ever you need to reset and this is the reality of all our lives in the back ground.
So respect to all of you who also deal with life challenges in the back ground.


So I have started this week again continuing from were I left.
 

Attachments

  • 5.JPG
    5.JPG
    62.9 KB · Views: 52
  • 4.JPG
    4.JPG
    40.7 KB · Views: 42
  • 3.JPG
    3.JPG
    37.2 KB · Views: 45
  • 2.JPG
    2.JPG
    56.5 KB · Views: 44
  • 1.JPG
    1.JPG
    63.5 KB · Views: 41
Last edited:
Busy stripping the engine block.


Struggling to remove the Drive Pulley.
To loosen according what I understand from the Manual must be Option 1 - Clock wise, because the Manual state "Bolt with left hand threat"


Can anyone confirm this?
I have applied a lot of pressure anti clockwise then stopped thinking maybe it must be clockwise, reading the manual and now tried clockwise but extremely tight, I don't want to break something.
 

Attachments

  • Drive Pulley 2.JPG
    Drive Pulley 2.JPG
    26 KB · Views: 49
  • Drive Pulley 1.JPG
    Drive Pulley 1.JPG
    24.7 KB · Views: 50
Stripping engine rear.


00H10 Marked and removed 2x Detonation Sensors.
00H05 Removed RPM Sensor.
00H05 Remove water pipe and elbow. (Thinking of replacing this with stainless steel elbow and pipe unit)
00H05 Removed engine oil low pressure sensor.
 

Attachments

  • Engine rear Water port.JPG
    Engine rear Water port.JPG
    55.6 KB · Views: 53
  • Engine rear Water pipe and elbow inside.JPG
    Engine rear Water pipe and elbow inside.JPG
    42 KB · Views: 59
  • Engine rear Water pipe and elbow.JPG
    Engine rear Water pipe and elbow.JPG
    35.1 KB · Views: 62
  • Engine rear RPM sensor.JPG
    Engine rear RPM sensor.JPG
    48.4 KB · Views: 59
  • Engine rear 1.JPG
    Engine rear 1.JPG
    81.5 KB · Views: 40
  • Engine rear Oil pressure sensor.JPG
    Engine rear Oil pressure sensor.JPG
    24.3 KB · Views: 62
  • Engine rear Stripped.JPG
    Engine rear Stripped.JPG
    64.4 KB · Views: 68
Last edited:
Busy stripping the engine block.


Struggling to remove the Drive Pulley.
To loosen according what I understand from the Manual must be Option 1 - Clock wise, because the Manual state "Bolt with left hand threat"


Can anyone confirm this?
I have applied a lot of pressure anti clockwise then stopped thinking maybe it must be clockwise, reading the manual and now tried clockwise but extremely tight, I don't want to break something.


After some more homework and some extra leverage I got the bolt loose.
Note! The drive pulley bolt is left hand threat, which means you need to turn clockwise to loosen.
The bolt marking indicate an "L"
I tried using penetrating oil, sprayed and waited, but as you can see from the pictures the oil never even reached the thread.


00h30 Removed Drive pulley
 

Attachments

  • Drive Pulley 4.JPG
    Drive Pulley 4.JPG
    25.5 KB · Views: 40
  • Drive Pulley 3.JPG
    Drive Pulley 3.JPG
    36.9 KB · Views: 40
  • Drive Pulley Leverage.JPG
    Drive Pulley Leverage.JPG
    50 KB · Views: 85
  • Drive Pulley lock.JPG
    Drive Pulley lock.JPG
    58.4 KB · Views: 43
Stripping engine Belt side

00H05 Remove static tensioner pulley.
00H05 Remove engine bracket (Reaction rod)
00H05 Remove Engine Front - Oil pump - Loosen oil pipe bolts and remove.
00H05 Remove Engine Front - Oil pump - Remove oil filter.
00H05 Remove Engine Front - Oil pump - Removed heat exchanger (Hold with big nut)
00H30 Remove Drive pulley
00H05 Removeoil pump.
00H05 RemoveBalance shaft - circlips.
00H05 RemoveBalance shaft - by hitting shaft on belt side with rubber hammer till seal onFly wheel side pop out.
00H05 Remove Balance shaft engine side bearing. (I do not have a bearing puller sogently hit the bearing with a long rod from the Fly wheel side.
 

Attachments

  • Engine Front Heat exchanger.JPG
    Engine Front Heat exchanger.JPG
    50.5 KB · Views: 84
  • Engine Front Oil Filter.JPG
    Engine Front Oil Filter.JPG
    49.1 KB · Views: 74
  • Engine Belt side Mounting.JPG
    Engine Belt side Mounting.JPG
    56.4 KB · Views: 82
  • Engine Belt side.JPG
    Engine Belt side.JPG
    63.2 KB · Views: 51
  • Engine Belt side Balancing Shaft 1.JPG
    Engine Belt side Balancing Shaft 1.JPG
    63.1 KB · Views: 71
  • Engine Belt side Oil pump 3.JPG
    Engine Belt side Oil pump 3.JPG
    111 KB · Views: 78
  • Engine Belt side Oil pump 2.JPG
    Engine Belt side Oil pump 2.JPG
    84.1 KB · Views: 79
  • Engine Belt side Oil pump 1.JPG
    Engine Belt side Oil pump 1.JPG
    89.9 KB · Views: 69
  • Drive Pulley 3.JPG
    Drive Pulley 3.JPG
    36.9 KB · Views: 39
  • Engine Belt side Balancing Shaft 2.JPG
    Engine Belt side Balancing Shaft 2.JPG
    75.6 KB · Views: 69
  • Engine Belt side Balancing Shaft 3.JPG
    Engine Belt side Balancing Shaft 3.JPG
    41.4 KB · Views: 75
  • Engine Belt side Balancing Shaft 4.JPG
    Engine Belt side Balancing Shaft 4.JPG
    74.1 KB · Views: 73
  • Engine Belt side Balancing Shaft 5.JPG
    Engine Belt side Balancing Shaft 5.JPG
    37 KB · Views: 82
  • Engine Belt side Balancing Shaft 6.JPG
    Engine Belt side Balancing Shaft 6.JPG
    27.4 KB · Views: 82
  • Engine Belt side Stripped.JPG
    Engine Belt side Stripped.JPG
    61.7 KB · Views: 89
Back
Top